

How to Use a Dr. Pen at Home: A Professional Esthetician’s Guide
Mastering how to use a Dr. Pen at home is the secret to achieving professional-grade skin rejuvenation and a radiant K-beauty glow without the salon price tag. This guide provides a clear, step-by-step roadmap for safe preparation, precise needle depth selection, and effective serum application to ensure you get glowing results with total confidence.
Achieving a glass skin glow doesn't require a monthly $300 office visit when you have the right tools and a professional technique. It's natural to feel a bit hesitant about microneedling yourself for the first time. You might worry about causing irritation or feel overwhelmed by the different needle settings and serum options available.
The good news is that you can master this process safely to reduce the appearance of fine lines and create a smoother, clearer complexion. We'll walk through the entire process, including how to prep your skin, adjust your Dr. Pen for different facial zones, and use K-beauty favorites like Salmon DNA to nourish your skin during recovery.
Key Takeaways
- Learn the professional "Section and Glide" technique to ensure even coverage and minimize skin trauma during your session.
- Mastering how to use a Dr. Pen at home begins with a sterile setup and a 72-hour prep window to ensure your skin is ready for rejuvenation.
- Understand how to select the correct needle depth for different facial zones to improve skin texture safely and effectively.
- Discover the importance of the "Golden Hour" for applying professional-grade serums like Salmon DNA (PDRN) to boost skin revitalization.
- Ensure long-term device performance and safety by following specific cleaning protocols and proper needle cartridge disposal.
Understanding Microneedling and Your Dr. Pen Device
Welcome to the world of professional-grade skin rejuvenation. Microneedling, also known as Collagen induction therapy (microneedling), is a process that uses tiny needles to create controlled micro-channels in the skin. These micro-channels trigger your skin's natural regeneration response, encouraging the production of fresh collagen and elastin for a firmer, smoother appearance.
When you learn how to use a dr pen at home, you're using a device that utilizes rapid vertical oscillations. This vertical motion is a major upgrade from traditional rollers because the needles enter and exit the skin cleanly. This precision minimizes unnecessary trauma, reduces downtime, and allows for a much more comfortable experience.
This technique is a cornerstone of the K-beauty "glass skin" routine. By refining skin texture and evening out your tone, it helps you achieve that coveted, lit-from-within glow. Results are cumulative; you'll typically see the most significant changes after a series of sessions spaced 4 to 6 weeks apart to allow your skin time to renew.
The Anatomy of a Dr. Pen
Your Dr. Pen device is designed for professional-level precision in a handheld format. On the body of the pen, you'll find a power button that often doubles as a speed controller. A rotating dial near the top allows you to adjust the needle depth, which is vital for targeting different areas of the face safely.
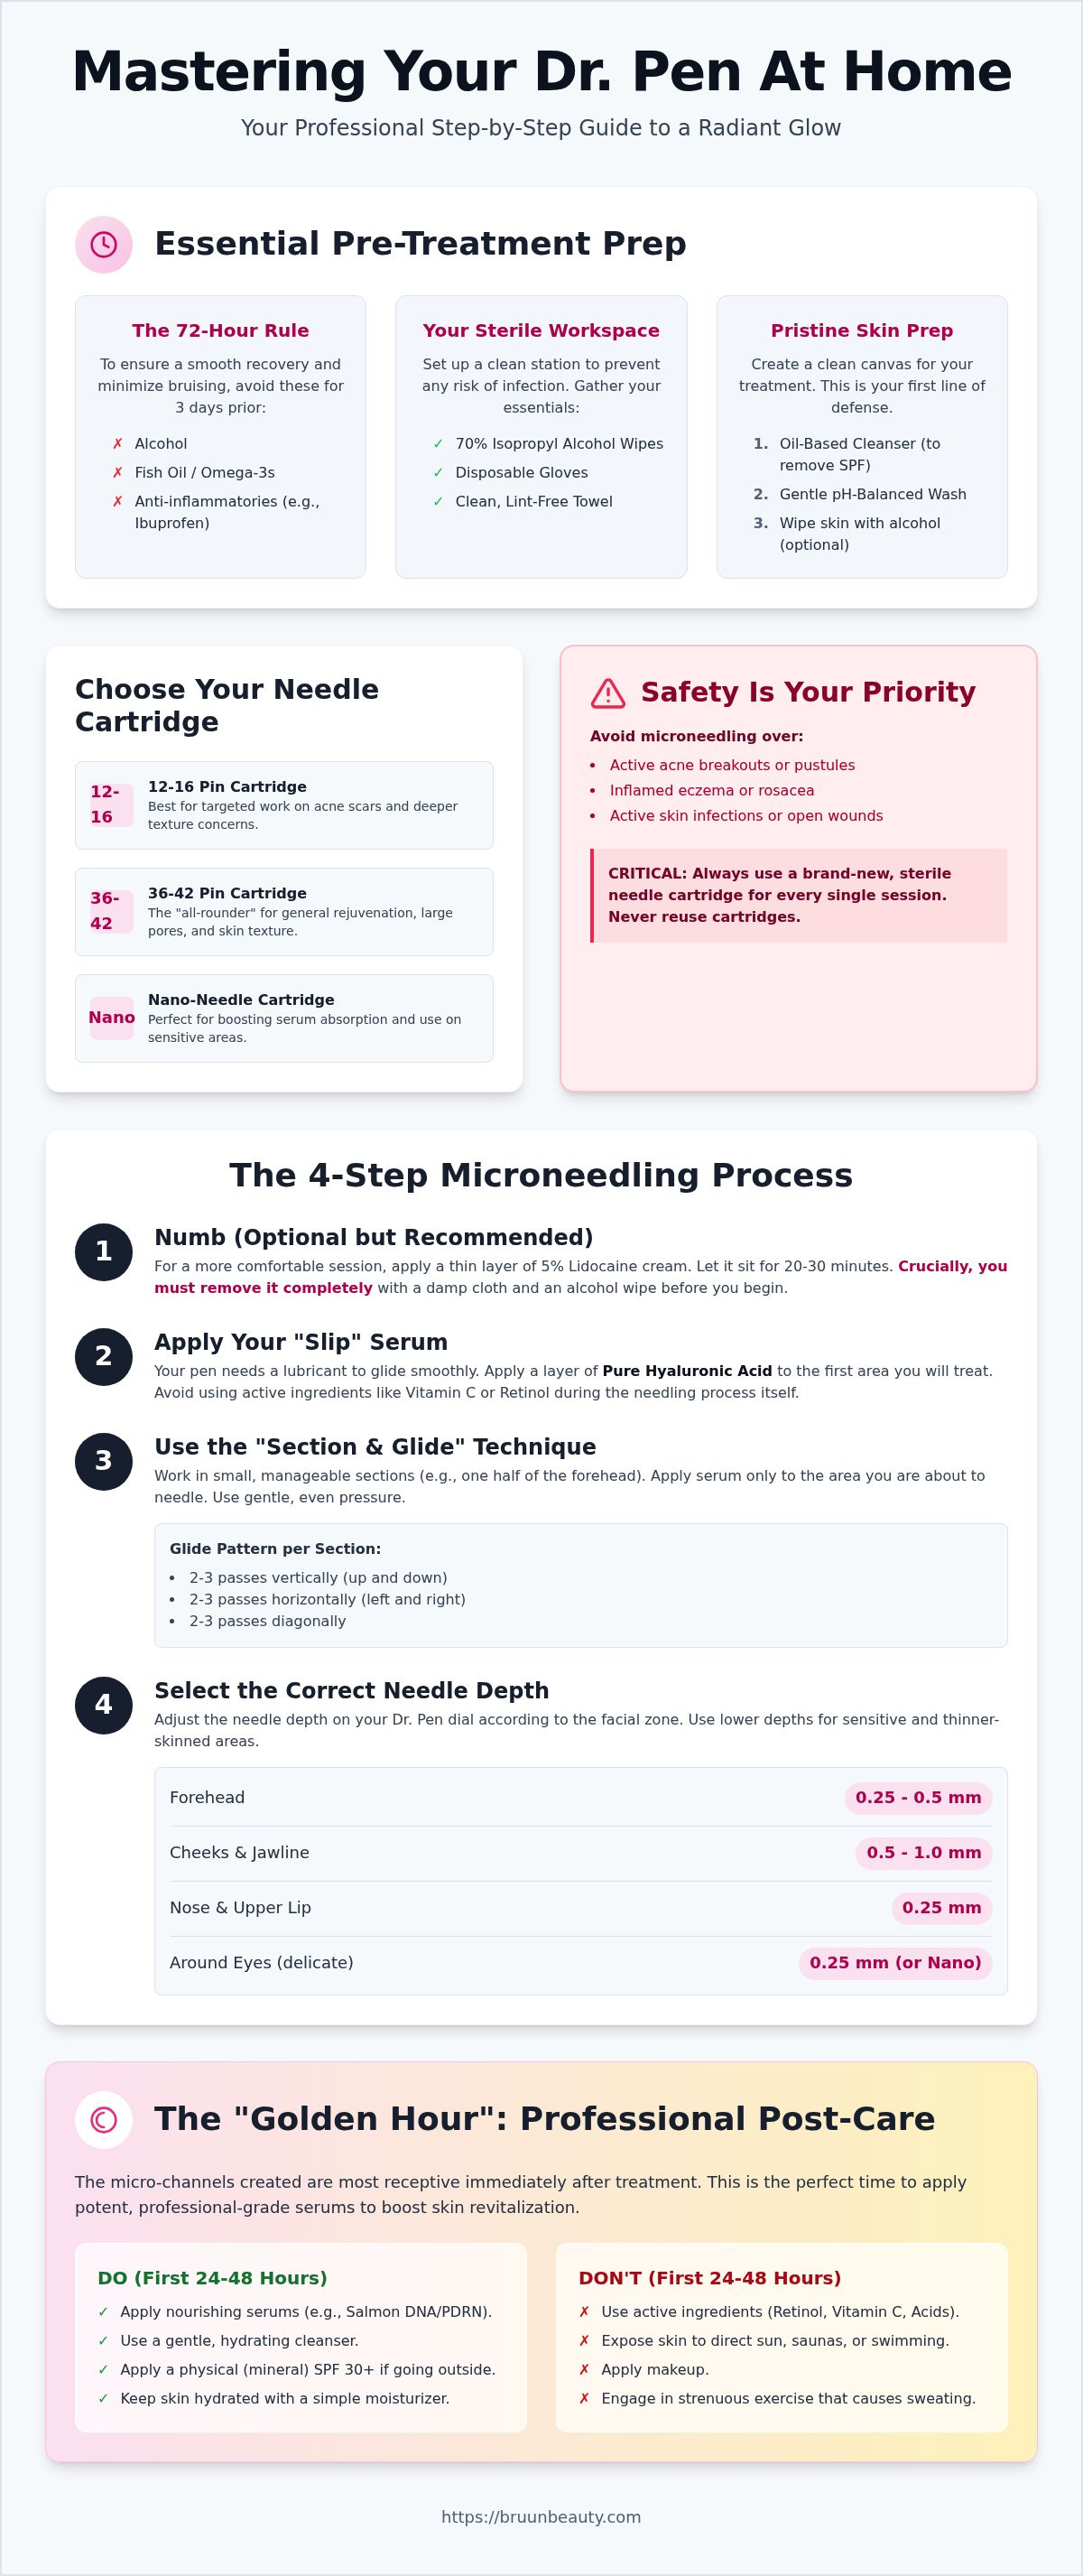
Choosing the right needle cartridge is essential for reaching your specific goals:
- 11-16 Pin: These are often used for targeted work on acne scars or deeper texture issues.
- 36-42 Pin: These are the "all-rounders" best for general skin texture, large pores, and overall rejuvenation.
- Nano-needling: These tips don't penetrate deeply, making them perfect for serum infusion and sensitive skin areas.
Higher speed settings increase the frequency of the needle pulses, which helps the device glide effortlessly across your skin without any pulling or snagging.
Safety First: Who Should Avoid Microneedling?
Safety is the most important part of learning how to use a dr pen at home. You should avoid needling over active acne, inflamed eczema, or flared rosacea. If you have any active skin infections or open wounds, wait for your skin to be completely calm before starting a session.
Always use a brand-new, sterile cartridge for every single session. Reusing needles is a major safety risk that can lead to infection and skin damage from dull tips. As your knowledgeable esthetician friend, I also recommend performing a patch test with any new serums on a small area like your jawline 24 hours before your full treatment to ensure your skin loves the ingredients.
Essential Preparation: Setting the Stage for Success
Start your preparation three days before your session. To minimize bruising and ensure a smooth recovery, follow the 72-hour rule. Avoid alcohol, fish oil, and anti-inflammatories like ibuprofen. These substances can thin your blood, which often leads to unnecessary pin-point bruising during the procedure.
When figuring out how to use a dr pen at home, your environment is just as important as your technique. Create a sterile station by laying down a fresh, lint-free towel on a clean surface. Gather your 70% isopropyl alcohol wipes, disposable gloves, and your device. Before you even think about attaching a cartridge, wipe the entire handle of your pen with alcohol to maintain a hygienic workspace.
Double cleansing is your first line of defense against infection. Start with an oil-based cleanser to break down SPF and makeup, then follow with a gentle, pH-balanced wash. For more FDA information on microneedling devices, you can review their safety guidelines regarding professional-grade tools. This step ensures your skin is a clean canvas for the micro-channels you are about to create.
The Numbing Process (Optional but Recommended)
If you're nervous about discomfort, a 5% Lidocaine cream can make the experience much more pleasant. Apply a thin layer to the treatment area and let it sit for 20 to 30 minutes. You must remove it completely before you start. Use a clean, damp cloth followed by an alcohol wipe. Leaving residue behind is a mistake; you don't want numbing chemicals pushed deep into your skin.
Selecting Your "Slip" Serum
Your pen needs a lubricant, or "slip," to glide without dragging. Pure Hyaluronic Acid is the safest choice because it hydrates without causing irritation. Avoid active ingredients like Vitamin C, Retinol, or exfoliating acids during the needling process itself. These are too aggressive for open micro-channels and can lead to unwanted inflammation.
Choosing a high-quality formula is essential for achieving that K-beauty glow. You can browse our microneedling collection to find professional serums that are safe for use during the procedure. Having the right slip ensures your device moves smoothly while you're learning how to use a dr pen at home.
Step-by-Step Technique: How to Microneedle Like a Pro
Mastering how to use a dr pen at home requires a methodical approach. I recommend the "Section and Glide" method to ensure you don't miss any spots or overlap too many times in one area. Divide your face into small 2x2 inch sections, such as the forehead, each cheek, and the chin. Apply your hyaluronic acid "slip" serum to only one section at a time so it doesn't dry out before you reach it.
To ensure every millimeter of skin is reached, perform three passes over each section: vertical, horizontal, and then diagonal. This criss-cross pattern creates a uniform grid of micro-channels. Your free hand is your best tool for stability; use your fingers to gently pull the skin taut. This provides a flat, firm surface that prevents the needles from "bouncing" and ensures even penetration across the entire area.
Adjusting your needle depth on the fly is a professional secret that protects your skin. As you move from the fleshy part of your cheek to the thinner skin on your forehead, you must decrease the depth. The Dr. Pen device allows you to rotate the dial easily during the session to maintain safety and comfort.
Face Mapping for Precision
Understanding the different zones of your face helps you achieve better results without irritation. Different areas require different settings because the skin thickness varies significantly:
- Forehead and Nose: Keep depths shallow, between 0.25mm and 0.5mm. These areas have very little "padding" over the bone, and shallow settings are sufficient for skin refinement.
- Cheeks and Jawline: You can safely increase the depth here to 0.5mm or 1.0mm. This is where most people target texture concerns or large pores.
- The "No-Go" Zones: Never needle directly on your eyelids or the vermillion border of your lips. These tissues are too thin and sensitive for standard microneedling.
Managing Speed and Pressure
It might seem counterintuitive, but higher speeds are often more comfortable for the skin. When the needles oscillate rapidly, they enter and exit the skin so quickly that the sensation is minimized. If the speed is too low, you might feel a slight "tugging" sensation, which is exactly what we want to avoid for a smooth glide.
Use a feather-light touch throughout the entire session. You don't need to press the device into your skin; the motor provides all the power necessary for the needles to do their work. Your goal is to see "pinpoint redness," also known as erythema. This looks like a mild sunburn and indicates that you've successfully stimulated the skin. You don't need to see heavy bleeding to achieve a beautiful, revitalized complexion.
The Recovery Phase: Professional K-Beauty Post-Care
The work doesn't end once you turn off your device. In fact, the 60 minutes immediately following your session is known as the "Golden Hour." During this time, your skin's micro-channels are at their most receptive, making it the absolute peak period for nutrient absorption. This is when you can truly elevate your results by applying high-performance ingredients that sink deep into the skin.
One of the best-kept secrets in professional K-beauty is Salmon DNA, also known as PDRN. This powerful ingredient is celebrated for its ability to support rapid skin revitalization and provide a refreshed, youthful appearance. Applying the SD Control Salmon DNA Ampoule during the Golden Hour helps calm the "sunburned" sensation while nourishing the skin at a cellular level. It is a vital step for anyone mastering how to use a dr pen at home for a professional-grade glow.
To finish your treatment like a pro, follow up with a "Cooling Calm" step. A professional jelly mask is the gold standard for post-needling care. These masks create a vacuum-like seal over the face, forcing the serums deeper into the micro-channels while providing an immediate, soothing temperature drop to the skin's surface. It's the ultimate way to lock in moisture and reduce redness before you go about your day.
The First 24-48 Hours
Your skin is in a highly sensitive state for the first two days. During this window, skip your usual foaming cleansers and stick to lukewarm water only. You want to avoid any friction or chemical interference while the micro-channels close. Sun protection is your absolute best friend; use a physical SPF with zinc oxide or titanium dioxide to protect your fresh skin from UV damage.
It is also important to keep your body temperature stable. Avoid activities that cause heavy sweating, such as intense workouts, saunas, or hot showers. Stay away from swimming pools as well, as chlorine can be incredibly irritating to open skin. Give your complexion the peace and quiet it needs to revitalize properly.
K-Beauty Recovery Ritual
Using a jelly mask once or twice during your first week of recovery can significantly improve your comfort levels. These masks are packed with electrolytes that help rehydrate the skin barrier. After masking, focus on layering gentle products containing peptides and ceramides. These ingredients act as the "mortar" between your skin cells, ensuring your barrier remains strong and nourished.
Be patient with your "actives." While you might be eager to get back to your routine, you should wait at least 5 to 7 days before reintroducing Vitamin C, Retinol, or any exfoliating acids. Using these too early can cause unnecessary inflammation and set back your progress. When you follow this professional timeline, you'll notice a clearer, more resilient texture emerging within the first week.
Maintenance and Long-Term Skin Success
The final step in mastering how to use a dr pen at home is proper maintenance and cleanup. Once your session is complete, immediately remove the needle cartridge. These are strictly single-use tools; never attempt to clean or reuse them, as the needles become dull and can carry bacteria. Place the used cartridge into a puncture-proof sharps container for safe disposal rather than your regular household trash.
Your device also needs attention to ensure it lasts for years. Wipe the entire body of the pen, including the adjustment ring, with 70% isopropyl alcohol to remove any serum residue. Store your pen in its original case in a cool, dry place. To stay prepared for your next session, it is a good idea to stock up on needles and cartridges so you never have to delay your routine.
Consistency is the key to seeing a transformation in your skin's appearance. While your skin will look refreshed after one session, most people require a series of 3 to 6 sessions to see significant visible changes in texture and fine lines. Space these sessions 4 to 6 weeks apart to give your skin's natural regeneration cycle enough time to complete its work.
Tracking Your Progress
The best way to see the cumulative effect of your hard work is by taking "glow-up" photos. Take a clear, high-resolution photo before your first session and then again 10 days after each subsequent session. Use the same room and lighting for every photo to get an accurate comparison of your progress over time.
As you continue your journey, you may notice your skin becomes more resilient. You can slowly adjust your routine by incorporating more advanced serums or slightly increasing needle depth in thicker areas like the cheeks. Always prioritize consistent hydration between sessions; a well-hydrated barrier recovers faster and glows brighter.
Why Order from Bruun Beauty?
When you are ready to invest in your skin, choosing a reliable supplier makes all the difference. Bruun Beauty is a US-based leader in professional skincare supplies, offering the same high-grade quality that licensed estheticians trust. We ship directly from our warehouses in Miami and Los Angeles, ensuring your restocks arrive quickly so you never miss a scheduled session.
Shop the full K-beauty and Microneedling range today
Your Journey to Radiant, Professional-Grade Skin
Mastering how to use a dr pen at home is a powerful way to take control of your skincare journey and achieve that sought-after K-beauty glow. Throughout this guide, we've covered everything from creating a sterile workspace to the "Section and Glide" technique and the importance of the Golden Hour. By following these professional steps, you're ensuring that every session is safe, effective, and focused on long-term skin health.
Bruun Beauty is committed to providing you with the authentic tools and high-performance serums needed to see real results. With fast shipping from our Miami and Los Angeles hubs, you can trust that your professional-grade supplies will arrive exactly when you need them. We're proud to support beauty professionals and enthusiasts across the US in their pursuit of clear, nourished, and resilient skin. Start your routine today and enjoy the confidence that comes with professional-level care.
Frequently Asked Questions
How often can I use my Dr. Pen at home?
You should wait 4 to 6 weeks between sessions to allow your skin's natural regeneration cycle to complete. Using your device too frequently can lead to irritation and inflammation rather than the glowing results you want. This timeline ensures your skin has enough time to produce fresh collagen and elastin. Consistency over several months is the secret to long-term success when learning how to use a dr pen at home for skin rejuvenation.
Does microneedling with a Dr. Pen hurt?
Most people describe the sensation as a light tingling or vibrating feeling rather than pain. If you're sensitive, applying a 5% lidocaine cream 20 minutes before you begin can make the process very comfortable. Using higher speed settings on your Dr. Pen also helps the needles glide quickly, which minimizes the sensation on your skin. You should feel a "feather-light" touch, not a deep or sharp discomfort during your session.
Can I use a Dr. Pen cartridge more than once if I sanitize it?
No, you must never reuse a needle cartridge, even if you attempt to sanitize it with alcohol. Cartridges are strictly single-use because the tiny needles become dull and microscopic hooks can form after just one session. Using a dull needle causes unnecessary skin trauma and significantly increases the risk of infection. Always dispose of your used cartridge in a sharps container and start every session with a fresh, sterile tip for the safest results.
What is the best serum to use during the microneedling process?
Pure Hyaluronic Acid is the best serum to use during the actual needling process because it provides the necessary "slip" without irritating open micro-channels. It's a safe, hydrating lubricant that helps the device move smoothly across your face. Once you've finished the procedure, you can introduce advanced K-beauty formulas like the Advanced Microneedling Serum SD with Salmon DNA to support rapid revitalization and achieve a more radiant, nourished complexion.
How long does the redness last after an at-home session?
You can expect mild redness, similar to a light sunburn, to last for approximately 24 to 48 hours after your treatment. Some people also experience slight swelling or a "tight" feeling in the skin during the first day. Applying a professional jelly mask immediately after your session can help calm the skin and reduce this redness much faster. Most enthusiasts find their skin looks refreshed and back to normal within two days.
Can I use my Dr. Pen on my neck and chest?
Yes, you can use your device on your neck and chest, but you must adjust your technique for these delicate areas. The skin on the neck is much thinner than the skin on your cheeks, so you should keep your needle depth shallow, typically around 0.25mm to 0.5mm. Always hold the skin taut with your free hand and use a gentle glide to ensure even penetration without causing irritation on these sensitive zones.
When can I start seeing visible results from my treatments?
You will often notice a brighter, smoother complexion within a week as the initial redness fades and the skin hydrates. However, more significant visible changes in texture and fine lines usually appear after 4 to 6 weeks, which aligns with your skin's natural renewal process. For the best results, plan a series of 3 to 6 sessions. This cumulative approach allows your skin to build resilience and show a more dramatic, youthful glow over time.
How Long to Leave Serum on After Microneedling: The Esthetician’s Guide
Can You Use Vitamin C with Microneedling? A Guide to Radiant Results
Related Posts

Getting Spa Results on a Budget: Build a Smart At-Home Routine

Professional vs. At-Home Microneedling: Cost Comparison

Hydrogen Water Bottle Buying Guide: Choose the Right Size and Features

Microneedling for Men’s Skincare: What to Know in 2026

What Results to Expect After 3 Microneedling Sessions: A Realistic Guide

Creating a Yearly Microneedling Schedule: A Practical 2026 Guide

How to Choose Professional Esthetician Lighting: A Moon Lash Light Buying Guide
