

How Microneedling Around the Mouth Relates to Needle Depth and Safety
The skin around your lips isn’t simply a smaller version of cheek skin. Understanding how to microneedle around the mouth starts with recognizing that the lip area has three skin layers and responds differently from surrounding facial skin. Microneedling may improve the appearance of texture and fine lines, but it doesn’t add lasting lip volume.
If vertical lip lines concern you, it’s natural to wonder whether treating this delicate area is like treating the rest of your face. The distinction matters: the pink lip surface and the skin above and beside it are separate treatment zones, and needle depth is only one part of the decision.
This guide explains how microneedling relates to collagen and elastin, why the area around the lips needs extra care, and how cosmetic microneedling differs from medical procedures. You’ll also learn what to expect from results around the mouth, how the nose-and-mouth area fits into facial treatment planning, and why microneedling doesn’t replace procedures designed to add lip volume.
Key Takeaways
- Lip tissue differs from nearby facial skin, so the area needs a more tailored approach than a standard full-face treatment.
- Microneedling supports skin texture and the appearance of lines by stimulating collagen and elastin, but it doesn’t create lasting lip volume.
- Needle depth depends on the treatment area and goal; upper-lip lines call for careful consideration of the delicate surrounding tissue.
- Cosmetic and medical microneedling differ in scope, and topical hyaluronic acid doesn’t provide predictable, lasting volume.
- Mapping the nose and mouth as distinct facial zones can help clarify which areas are being addressed and what results to expect.
So, is Microneedling Better for Lip Lines?
Microneedling may be relevant if your concern is the appearance of lines in the skin above your lips. The lip surface and surrounding facial skin have different structures, so the treatment area and your desired result should guide your approach.
Lip Tissue and Surrounding Skin
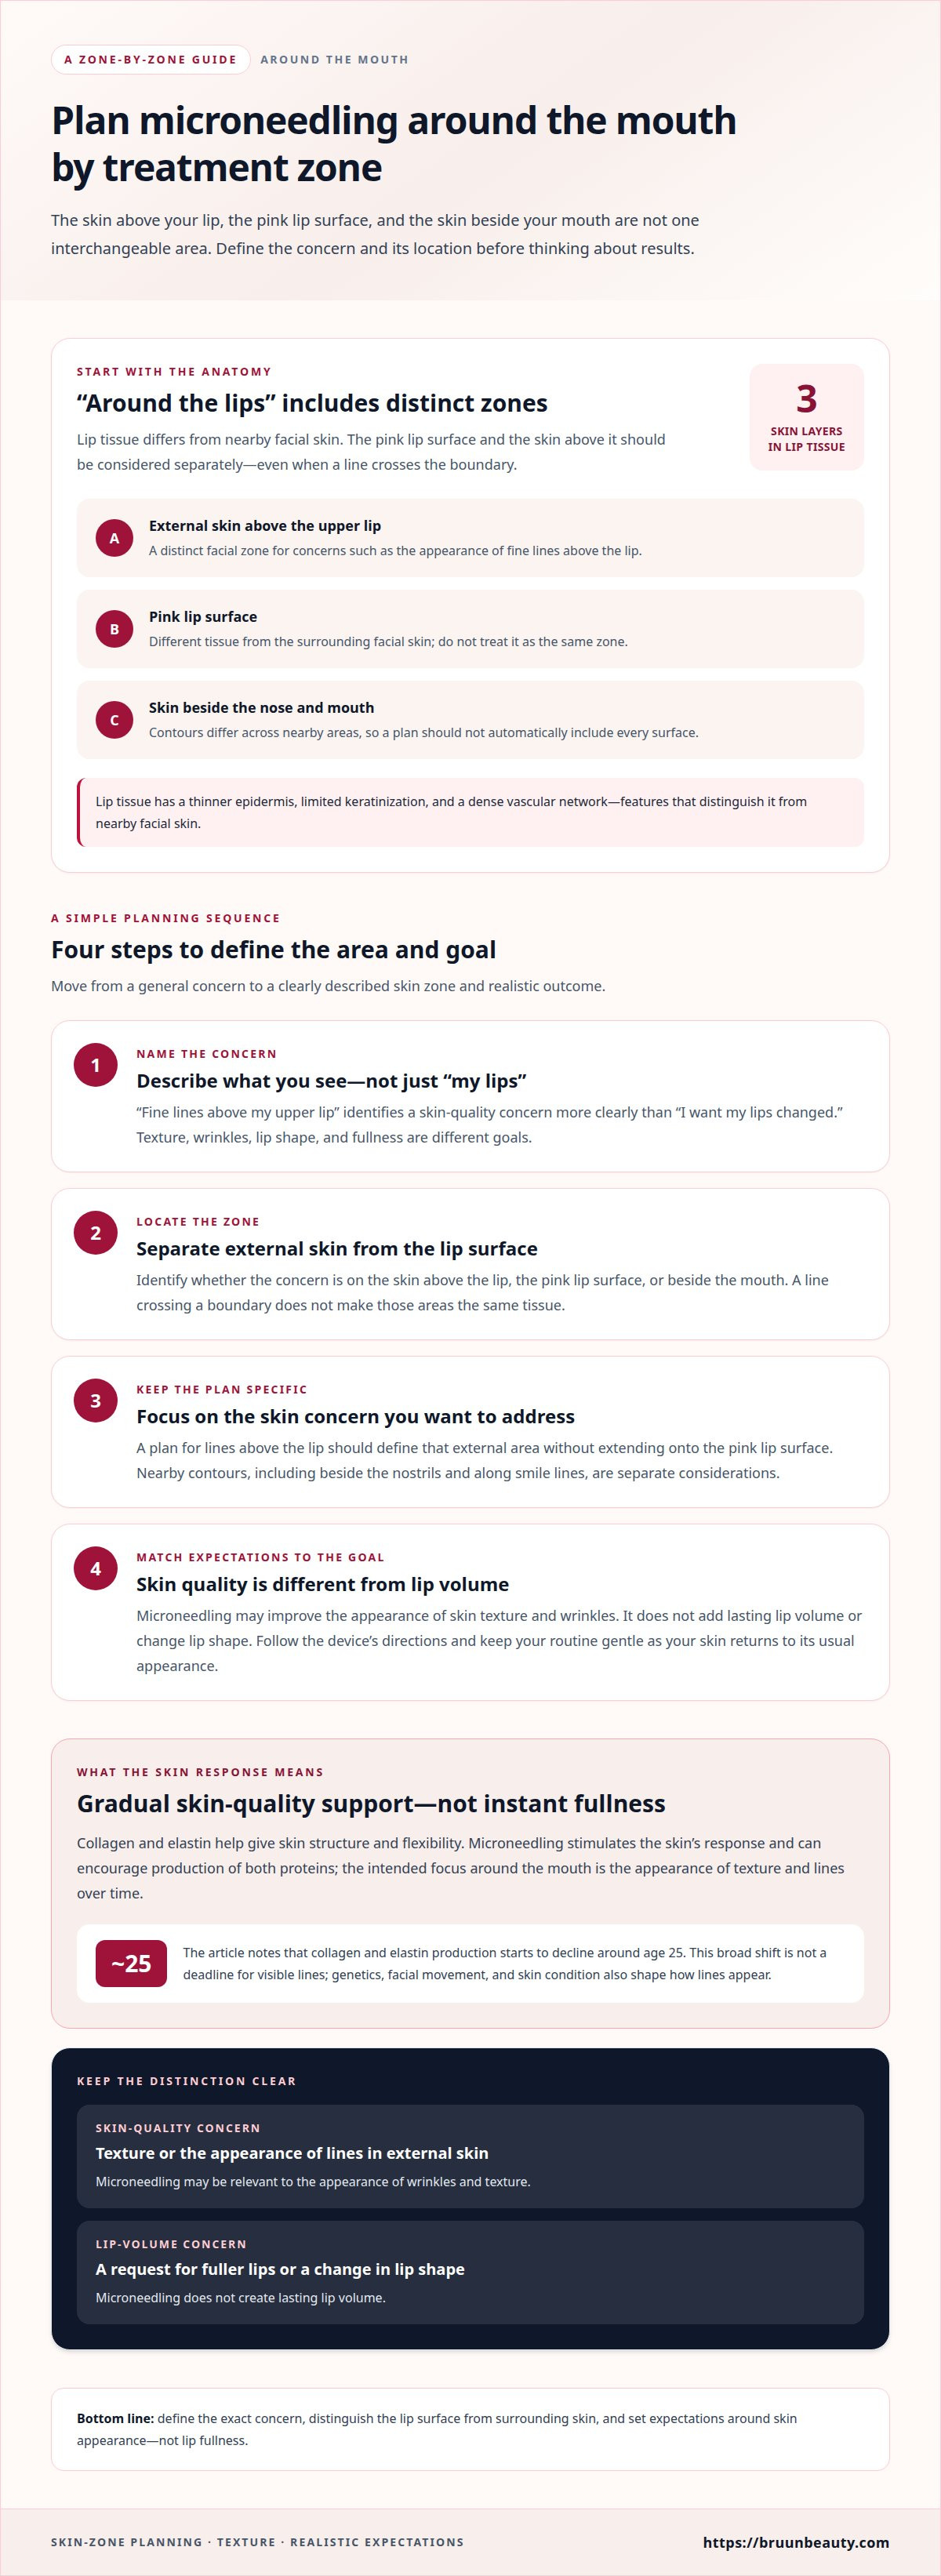
Lip tissue has three skin layers, a thinner epidermis, limited keratinization, and a dense vascular network. These features distinguish it from the skin around the mouth and influence its response to cosmetic procedures. The pink lip surface and the skin above it are separate areas, even when a vertical line crosses their boundary.
Supported Effects on Skin
Microneedling can improve the appearance of skin texture, acne scarring, and wrinkles. For lip-line concerns, the relevant goal is to change the appearance of the surrounding skin, not the lip itself. A fine line above the lip, uneven texture beside the mouth, and lip fullness are different concerns. Naming your specific concern helps set realistic expectations.
Treatment-Area Planning and Skin-Barrier Care
Careful planning starts by distinguishing external skin from the lip surface and inner mouth. Treat the skin above the upper lip as its own facial zone, not an extension of the lips. This clear boundary matters because lip tissue responds differently from nearby facial skin.
Keep the treatment area focused on the skin concern you want to address. For example, a plan for lines above the lip should define that external area without extending onto the pink lip surface. Follow the device’s directions and keep your routine gentle as your skin returns to its usual appearance.
Before choosing a procedure, describe your concern by location and appearance. “Fine lines above my upper lip” gives a clearer goal than “I want my lips changed.” That distinction separates a facial skin-quality goal from a request focused on the lips themselves.
The area around the mouth also includes the skin beside the nostrils and along the smile lines. These zones have different contours, so a treatment plan shouldn’t automatically include every nearby surface. Marking the exact concern helps keep the plan specific, whether you’re addressing texture beside the nose or lines above the lip.
Microneedling isn’t automatically the best fit for every lip-line concern. Its relevance depends on whether your goal involves the appearance of external skin, rather than a change in lip shape, color, or fullness. Defining the treatment area keeps that distinction clear.
Collagen and elastin production
Collagen and elastin help give skin structure and flexibility. Microneedling creates controlled stimulation that activates the skin’s repair response and can encourage production of both proteins. Around the mouth, this process matters because repeated facial expressions can make vertical lines more noticeable. The goal is to improve skin quality over time, not to change lip shape or volume instantly.
The body’s production of collagen and elastin starts to decline around age 25. That figure describes a broad biological shift, not a deadline when visible lines must appear. Genetics, facial movement, and the condition of the skin also shape how lines show. For example, a fine line above the upper lip and a deeper crease can look similar at rest, but reflect different skin concerns.
Microneedling works by prompting a response in the skin, rather than filling a line directly. As collagen and elastin production responds, skin may look smoother and wrinkles may appear less prominent. This is why microneedling is discussed for vertical lines around the mouth. It doesn’t create new lip volume, and the collagen response develops differently from an immediate change in appearance.
The delicate area around the lips calls for realistic expectations. Distinguish a surface-texture concern from a request for fuller lips: microneedling relates to skin quality, but doesn’t add projection. The treatment area matters, too. Skin above the lip isn’t identical to the lip itself, so define your desired result by the specific zone, such as upper-lip lines rather than overall fullness.
Think of collagen and elastin as part of a gradual skin response, not a one-session volume effect. The treatment’s supported role is improving the appearance of wrinkles and texture; it shouldn’t be framed as a way to replace lost fullness. If you’re considering products to support your microneedling routine, explore microneedling skincare options alongside a clear plan for the skin concern you want to address.
Needle depths used for upper lip lines
Needle depth for upper-lip lines depends on the treatment zone and goal, not a one-size-fits-all setting. The skin above the lip differs from the lip itself, so a setting used for a cheek doesn’t automatically suit the upper lip. Keeping this distinction in mind helps you assess device guidance without treating any depth as universal.
Start by identifying the exact area of concern. A fine line in the skin above the lip differs from texture on the vermilion border or lip surface. These zones have different tissue characteristics, so depth should relate to the specific area being addressed. Mapping the upper lip separately from the cheeks also clarifies the intended treatment zone.
Needle depth influences how a device interacts with skin, but it doesn’t guarantee a particular result. For example, changing a setting to target a deeper-looking line doesn’t mean the line will respond predictably. The device, treatment area, and skin concern all shape the approach. Texture and wrinkles are skin-quality concerns; pigment control and lip volume involve different goals.
This distinction matters for pigment. Microneedling doesn’t provide the same depth control or pigment stability as cosmetic tattooing. If your goal is defined lip color or a sharply outlined border, don’t treat microneedling as an equivalent technique. Improving the appearance of fine lines calls for a different discussion than changing color or adding definition.
Hyaluronic acid doesn’t make depth selection a shortcut to fullness. Applied topically during microneedling, it doesn’t reliably reach or remain in deeper tissue layers to create predictable, lasting volume. Surface hydration may support a smoother appearance, but it doesn’t change the tissue plane reached or turn a skin-texture procedure into a volume treatment.
Follow the device manufacturer’s directions and use training appropriate to the device and treatment context when assessing settings. A setting intended for facial skin, for example, shouldn’t be assumed appropriate for the lip surface. Don’t turn a number from a tutorial into a universal rule for the upper lip. The treatment area, device design, and desired result matter more than copying a setting without context.
For a considered approach, distinguish upper-lip skin from lip tissue, then match the planned treatment to the concern. If your routine includes microneedling, you can explore microneedling skincare options as part of your broader skin-quality plan.
Cosmetic and medical microneedling
Professional microneedling around the mouth isn’t automatically safer than at-home care. The setting alone doesn’t determine quality: technique, device instructions, treatment area, and practitioner experience all matter. Costs vary by location, provider, treatment area, and procedure plan, so there’s no single price for every appointment.
For a cosmetic goal, define the visible change you want before choosing an approach. Smoother-looking skin above the upper lip, for example, is different from changing lip color or shape. A clear goal keeps treatment focused on external skin and helps you assess whether the procedure fits your expectations.
The word “cosmetic” describes the purpose: improving the appearance of skin. Around the mouth, that may mean focusing on texture or the appearance of fine lines. Identify the exact area, such as the skin above the lip, rather than treating the whole mouth as one zone. Follow the device instructions when using the equipment.
At home, you’re responsible for following the device directions and clearly defining the treatment area. In a professional setting, the practitioner’s training and technique shape how the plan is carried out. In either case, a familiar device or polished setting doesn’t replace careful attention to the selected area and intended cosmetic result.
Cost depends on practical details, not a universal rate. Location, provider, area size, and the services included in an appointment can all affect the price. A session focused on upper-lip skin, for example, may differ from a broader facial appointment. Before comparing options, clarify which area and steps the quoted fee covers.
Hydration is another cosmetic goal, but it isn’t the same as changing lip structure. A topical product can support surface moisture and a smoother feel. Hydration can therefore be part of skincare planning, while microneedling itself should be assessed according to the skin area and appearance goal you’ve identified.
Use a simple decision framework: name the concern, mark the external skin area, review the device directions, and clarify what the appointment includes. “Texture above the lip,” for instance, gives a more useful focus than “full-mouth rejuvenation.” This wording distinguishes a cosmetic skin goal from a request for a different lip appearance.
Choose an approach that fits your cosmetic goal and the level of guidance you need. Professional care and at-home use are different settings, but both depend on a clearly defined treatment area, informed technique, and realistic expectations for the skin’s appearance.
Microneedling around the nose and mouth
Before planning treatment, map the external skin around the nose and mouth as distinct facial zones. This helps align the technique with the area and cosmetic goal.
Areas Around the Mouth
Microneedling around the mouth means treating selected external skin, such as the upper-lip area or skin beside the nose. The upper lip can be part of facial mapping, but the lips and inner mouth are separate zones. Skin beside a nostril and a line above the lip, for example, need separate area planning.
Identify the precise concern before defining the treatment area. A plan for texture beside the nose shouldn’t automatically extend across the upper lip or cheeks. This zone-by-zone approach clarifies the intended coverage and keeps a focused cosmetic goal from turning into treatment of every nearby surface.
Avoiding Lips and Mucous Membranes
Keep microneedling on the selected external skin, away from the lip surface and inner mouth. Before beginning, locate the vermilion border and the moist tissue inside the mouth. These landmarks provide a clear boundary, especially when working near the upper lip.
Use deliberate movements within the mapped area instead of sweeping across the mouth. If your planned path reaches the lip edge, pause and reposition on external skin. This boundary-focused technique keeps the intended area distinct from the lips and mucous membranes.
Preparation and Aftercare
Prepare by cleansing the external skin and removing makeup, then review the device instructions for the planned procedure. Map areas such as the upper lip and nose folds separately. A simple diagram or clear mental outline can help you stay within the selected zone during treatment.
After treatment, keep your routine gentle and follow the device’s aftercare directions. A mild cleanser and moisturizer can support comfortable surface hydration. If you use microneedling skincare products, explore options in the microneedling skincare collection and choose products that fit your routine.
Treatment Frequency
There’s no schedule that fits every treatment around the mouth. Frequency depends on the device instructions, technique, treatment area, and your skin’s response. A focused upper-lip session, for example, isn’t necessarily comparable to a broader facial session.
Follow the device’s recommended schedule and allow your skin to return to its usual appearance before considering another session. If the treated area still looks or feels different, give it more time instead of repeating treatment according to a fixed calendar.
Keep your treatment map, goal, and aftercare routine connected. Separating the nose folds, upper-lip skin, and lip surface helps you make a more precise plan for this facial area.
Bruun Beauty: Advanced Microneedling Serum SD - Control Salmon DNA Ampoule Serum
Advanced Microneedling Serum SD - Control Salmon DNA Ampoule Serum is a skincare option to consider alongside a microneedling routine focused on the skin’s appearance and feel. Choose products based on your treatment plan and the area you’re addressing, especially around the mouth, where lip tissue differs from surrounding facial skin.
Explore the Advanced Microneedling Serum SD - Control Salmon DNA Ampoule Serum for more product details. It’s a practical next step if you’re building a skincare routine around microneedling and want to compare a Salmon DNA serum option. Keep your focus on skin quality, realistic expectations, and care suited to your treatment area.
For more information, visit bruunbeauty.com.
Choose Your Next Step With a Clear Goal
Before choosing a device setting or skincare routine, write down the result you want and the exact area you want to address. Improving the appearance of a line above the lip is more specific than seeking a general change around the mouth. That clarity helps keep your treatment plan focused.
Use the question of how to microneedle around the mouth as a prompt to define your boundaries, expectations, and next step. If you’re weighing your options, explore microneedling products and build a routine that supports your skin goals. Clear planning is a practical foundation for a considered approach.
Keep your goals specific and your approach thoughtful. A clear plan can help you make choices aligned with the skin you want to care for.
Frequently Asked Questions
How are lips different?
Lip tissue has a thinner epidermis and less keratinization than nearby facial skin, so it responds differently to cosmetic procedures. The pink lip surface and the skin above it are distinct areas, not one continuous treatment zone. Keep your goal specific: addressing the appearance of a line above the lip differs from changing lip fullness or color.
Can someone with a history of cold sores have lip microneedling?
If you have a history of cold sores, seek guidance from a qualified healthcare professional before planning treatment around the lips. Don’t microneedle over an active cold sore or irritated skin; wait until the area has healed. A past history and a current active sore are different, and an active sore shouldn’t be treated as ordinary facial skin.
How do I start microneedling and what do I do if I need help?
Read the device instructions and learn its controls before using it near your mouth. Define the external skin area you intend to address, keeping the lips and inner mouth outside that map. If you’re unsure how the device works, pause and consult the manufacturer’s guidance or seek hands-on direction from a qualified professional rather than improvising.
How long does healing take?
There’s no fixed healing timeline for everyone or every treatment around the mouth. The skin’s response depends on the area and procedure, so wait for your skin to return to its usual appearance and feel before resuming your routine. If the upper-lip area still looks or feels noticeably different, keep care gentle instead of scheduling another session.
Can you safely microneedle around the mouth at home?
At-home microneedling around the mouth requires careful device handling and close attention to the treatment boundary. Follow the device instructions, work only on the intended external skin, and don’t treat the lips or inner mouth. If you’re new to the device or uncertain about its controls, learn how to use it first rather than testing it on this delicate area.
What needle depth is safe for microneedling around the lips?
No single needle depth is safe for every device, treatment area, and goal around the lips. The skin above the upper lip differs from the lip surface, so don’t automatically transfer a setting used elsewhere on the face. Follow the device instructions and appropriate training, and don’t choose a depth by copying an online example.
What are the risks of microneedling around the mouth, including cold sore flare-ups?
Disrupting the skin barrier can carry potential complications, and a non-injectable procedure isn’t automatically lower risk. Cold sores require particular care: don’t microneedle an active sore or irritated area, and wait until it has healed. If you have a history of cold sores, discuss the timing and suitability of treatment with a qualified healthcare professional before proceeding.
When to See a Dermatologist vs DIY for Safer Skincare
When to See a Dermatologist vs DIY for Safer Skincare
Related Posts

PDRN Benefits for Skin: Regeneration, Results and Safety

How to Dispose of Used Microneedle Cartridges Safely

Self-care rituals for better skin through mindful daily habits

How to Explain Microneedling Benefits for Skin and Scars

How to use a Korean 10-step skincare routine for hydration

Microneedling for atrophic scars: clinic or at-home results

V-Line Lifting Masks and Their Claimed Face-Shaping Effects
