

Advanced Dr. Pen Techniques: The Professional Esthetician's Guide to Results
What if the reason your skin has plateaued isn't the device you're using, but the way you're mapping your facial zones? You've likely mastered the basics of microneedling and seen that initial glow, but now you're looking for a professional-grade transformation. It's frustrating when you follow the standard steps yet still struggle with uneven texture or stubborn fine lines. By mastering advanced dr pen techniques, you can move beyond simple gliding to a strategy focused on technical precision and bio-active synergy.
This guide will teach you how to elevate your results using precision needle mapping for different facial zones and smart serum infusion strategies. We'll explore why pairing your device with PDRN Salmon DNA serums is a game-changer for skin nourishment and texture. You'll also learn expert recovery protocols, including the use of professional jelly masks, to ensure your skin stays calm and radiant after every session.
Key Takeaways
- Learn why matching higher motor speeds with deeper needle settings is the secret to avoiding skin snagging and ensuring a clean vertical entry.
- Discover how to customize your depth settings across five specific facial zones to maintain safety while maximizing results on both fleshy and bony areas.
- Master advanced dr pen techniques like vertical stamping and the "butterfly" motion to achieve professional-grade skin texture without causing unnecessary trauma.
- Understand the synergy between microneedling and bio-actives like PDRN Salmon DNA to transform your device into the ultimate nutrient delivery system.
- Find out why the 20-minute window after your session is critical and how professional jelly masks can help prevent heat-induced pigment issues.
Mastering the Mechanics: Technical Precision with Dr. Pen
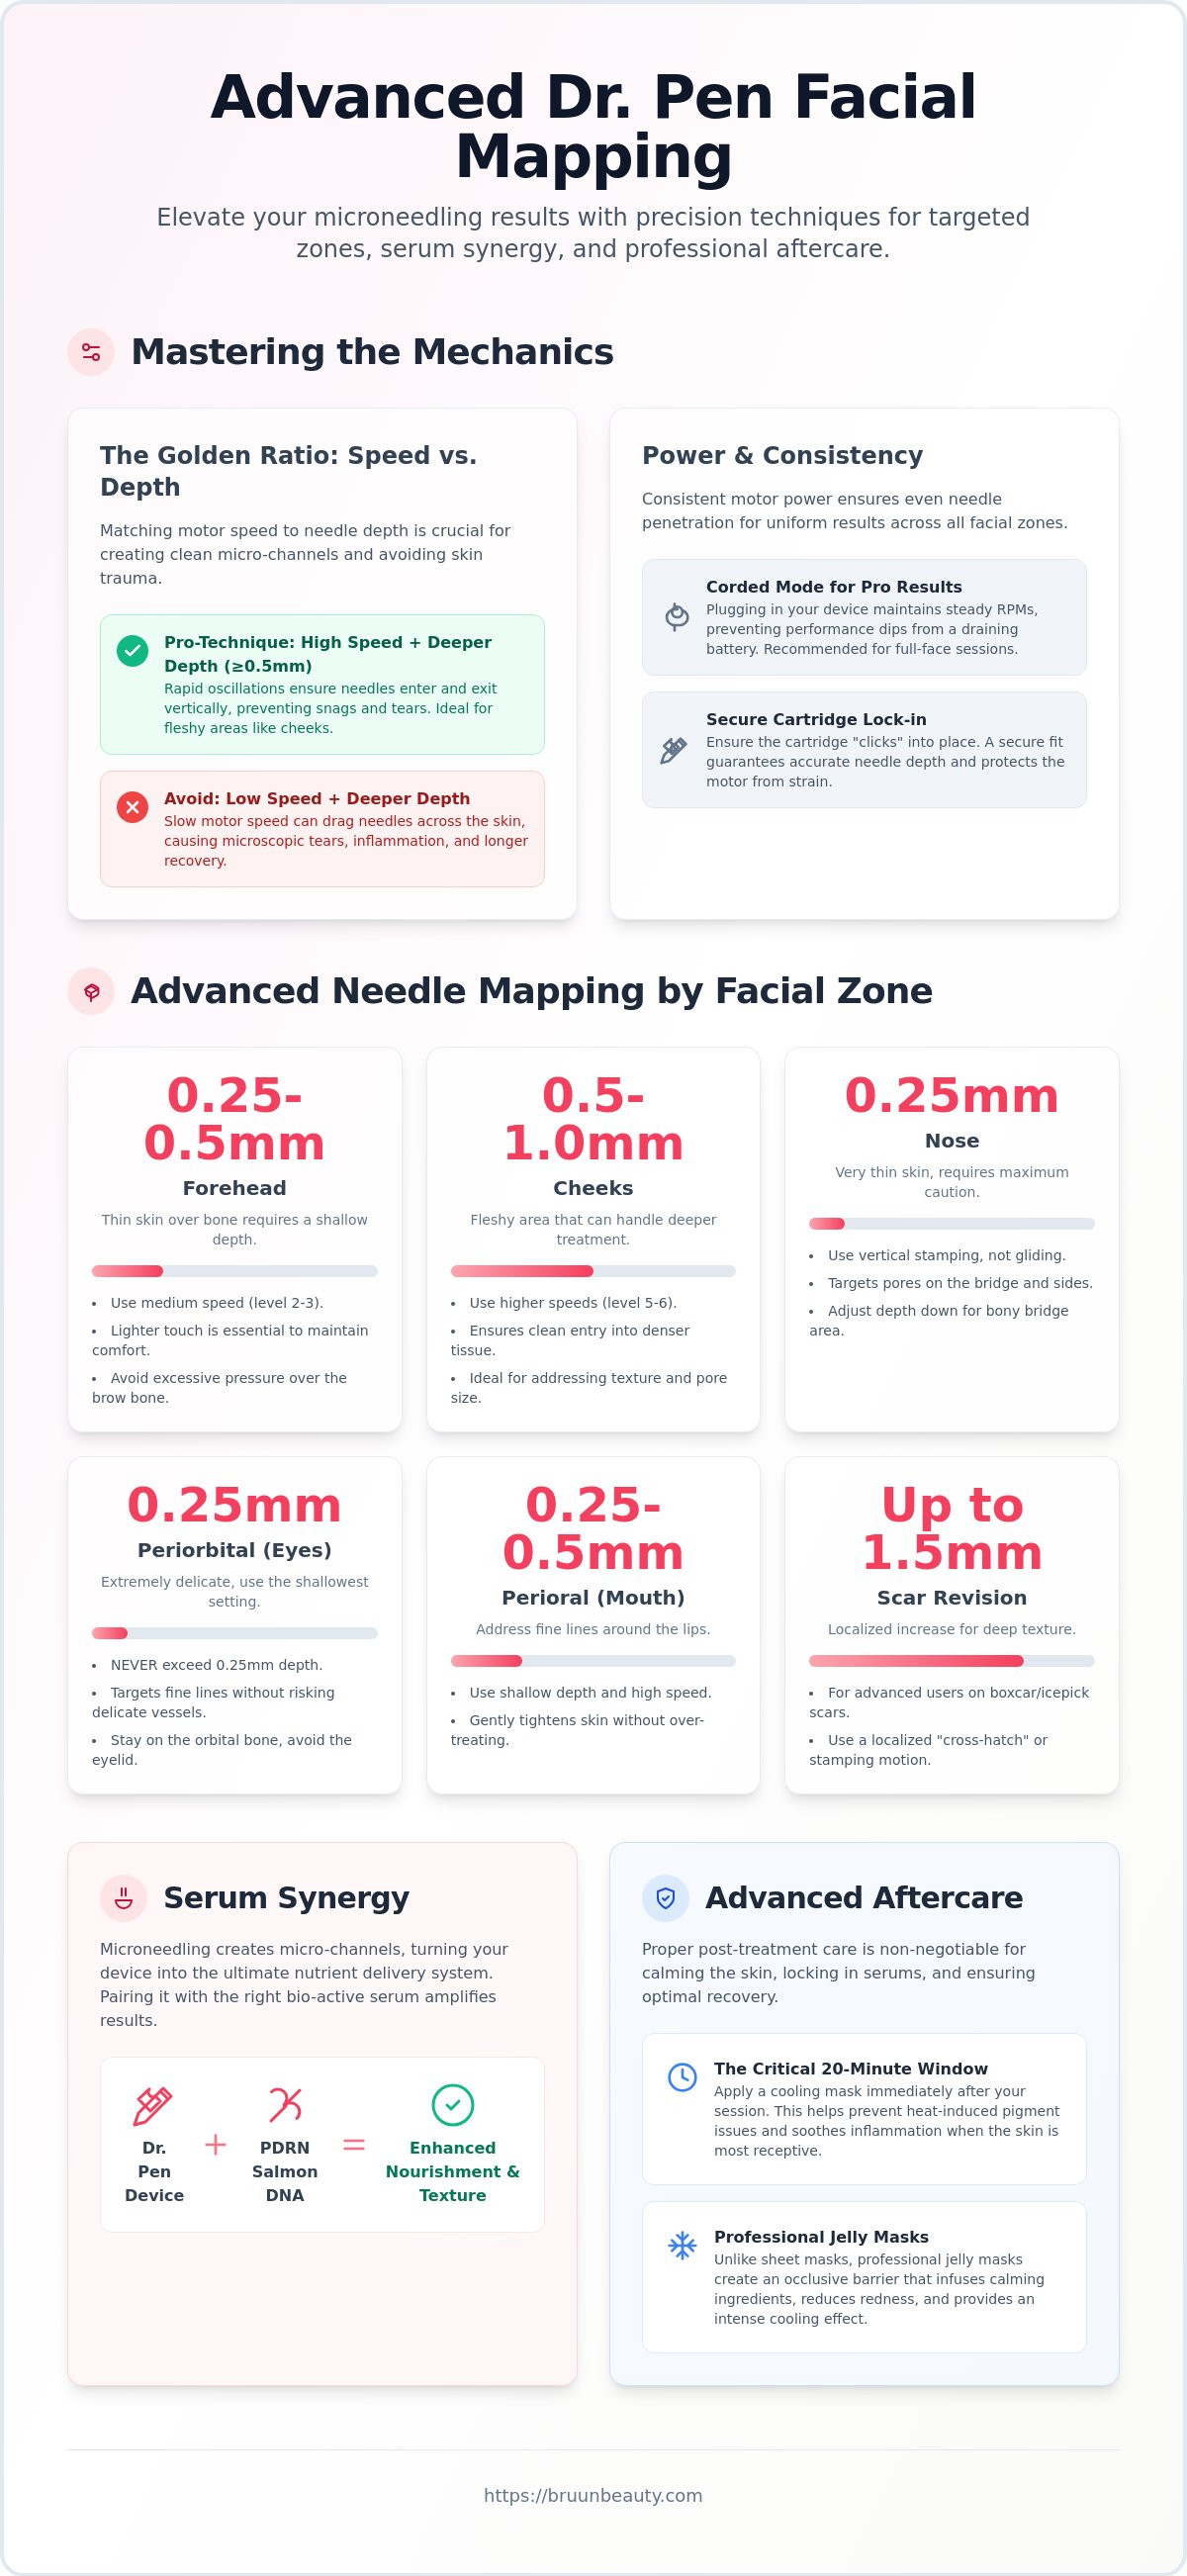
Think of your microneedling pen as a high-performance engine. To get the best results, you need to understand the relationship between motor speed and needle depth. If your speed is too low while your needles are set deep, you risk "dragging" the cartridge across the skin. This creates microscopic tears rather than clean, vertical channels, which can lead to unnecessary inflammation and longer recovery times.
Using advanced dr pen techniques means setting your device to higher speeds when working at depths of 0.5mm or greater. These rapid oscillations ensure the needles enter and exit the skin so quickly that they don't have time to "snag" as you glide the pen. This precision is the foundation of successful collagen induction therapy, allowing you to trigger the skin's natural renewal process without damaging the delicate surface layer.
Speed vs. Depth: The Golden Ratio
Adjusting your speed based on tissue density is a pro-level skill. Bony areas with thin skin, like the forehead or temples, require a lighter touch and lower speed settings to maintain comfort. Conversely, the "fleshy" parts of the face, such as the cheeks or jawline, benefit from high-frequency oscillation to minimize the sensation of the needles. For the thin skin on your forehead, keep your speed at a medium setting (level 2 or 3) with a shallow depth, while your cheeks can handle higher speeds (level 5 or 6) to ensure clean entry into denser tissue.
Battery Management and Power Consistency
While wireless freedom is great for quick touch-ups, corded mode is often the secret to professional-grade consistency. As a battery loses its charge, the RPMs can fluctuate, leading to uneven needle penetration across the face. For advanced protocols, plugging in your device ensures the motor maintains a steady rhythm from the first pass to the last. When selecting Dr. Pen devices for professional or high-volume use, look for models that offer stable power delivery to avoid these subtle performance dips.
Maintaining your device is just as critical as the technique itself. Always ensure your cartridge is seated correctly with a firm twist; you should feel a distinct "click" that confirms it's locked in place. This prevents the motor from straining and keeps your needle depth accurate throughout the entire session. Proper seating and hygiene don't just protect your skin; they extend the life of your equipment so you can focus on achieving that signature glow.
Advanced Needle Mapping for Targeted Facial Zones
Think of your face as a map with varying terrain. One depth setting doesn't fit all. To get the best results, you must customize your approach for the five key zones: forehead, cheeks, nose, periorbital (eyes), and perioral (mouth). Mastering advanced dr pen techniques means you're constantly adjusting your device to respect the skin's thickness and underlying structure.
Bony areas like the forehead and bridge of the nose have very little "cushion." If you use the same depth here as you do on the cheeks, you'll likely cause bruising or unnecessary discomfort. Dial your depth down to 0.25mm or 0.5mm for these spots. For the best safety and results, always use fresh, high-quality microneedling cartridges. Dull needles from previous sessions can cause jagged tears rather than clean channels.
As you transition from the fleshy part of the cheek toward the jawline and neck, your skin density changes. You'll need to increase depth slightly for the cheeks and then dial it back as you move over the jawbone. According to Yale Medicine on microneedling, professional-grade results depend on this type of precision to avoid damaging deeper tissues while still triggering renewal. If you're ready to start mapping your own routine, check out our full range of microneedling supplies to get started.
The Periorbital and Perioral Protocol
The skin around your eyes and lips is the thinnest on your body. For the under-eye area, never exceed a depth of 0.25mm. This is enough to help with fine lines without risking the delicate vessels underneath. When working on "smoker's lines" or the perioral area, keep your depth shallow and your speed high to tighten the skin gently without over-treating the area.
Deep Texture and Scar Revision Mapping
For stubborn boxcar or icepick scars, you can use a localized depth increase. Use a "cross-hatch" mapping technique where you glide the pen horizontally and then vertically over the specific scar. Stop once you see mild erythema, which is a healthy pinkish glow. This "endpoint" tells you that you've successfully stimulated the skin without crossing the line into epidermal trauma.
Serum Synergy: Infusing PDRN and Bio-Actives
Microneedling is essentially the ultimate delivery system for high-performance skincare. By creating thousands of micro-channels, you're bypassing the skin's barrier and allowing ingredients to reach the deeper layers where they can do the most good. A Comprehensive Review of Microneedling confirms that this process significantly boosts the absorption of topical actives compared to just rubbing them on the surface. This is where advanced dr pen techniques shift from simple skin stimulation to targeted nutrient infusion.
It's vital to distinguish between your "glide" serum and your "infusion" serum. A glide serum, usually a pure hyaluronic acid, provides the slip needed for the pen to move smoothly. An infusion serum contains bio-active molecules like Salmon DNA or peptides that target specific skin goals. Never use serums with harsh acids, retinol, or heavy fragrances during your session. These can cause severe irritation when they penetrate deep into the dermis.
The Power of Salmon DNA (PDRN)
Salmon DNA, or PDRN, is a K-beauty powerhouse that mimics the structure of human DNA to accelerate skin revitalization. These Salmon DNA ampoules work by providing nucleotides that help the skin repair its own structure at a cellular level. For the best results, apply half of the ampoule during your treatment to act as a lubricant and the remaining half immediately after to saturate the open channels.
This process supports nucleotide repair in the dermal layer, which is essential for maintaining a clear, nourished, and glowing complexion. It's a professional secret for achieving that sought-after "glass skin" look without the downtime of more aggressive treatments. Using advanced dr pen techniques to infuse PDRN ensures these vital building blocks reach the areas that need them most.
Peptides and Growth Factors for Elasticity
Peptides are short chains of amino acids that act as messengers, signaling your skin to produce more collagen and elastin. When you combine these with Vitamin B12, you create a synergistic effect that brightens the skin while improving its bounce. These powerful actives signal your skin to rebuild its structure, effectively softening fine lines and creating a firmer, more youthful appearance. This combination is particularly effective for those looking to improve overall skin density and resilience.
Professional Stamping vs. Gliding Techniques
Mastering the movement of your device is what separates a basic treatment from a professional-grade session. Vertical entry is the gold standard for safety and results. You must maintain a strict 90-degree angle to the skin at all times. If the pen tilts, the needles enter at a slant, which can "slice" the epidermis and lead to track marks or micro-tears. By refining these advanced dr pen techniques, you ensure every micro-channel is clean and precise.
For large surface areas like the cheeks, many professionals use a "butterfly" motion. This involves light, overlapping loops that provide even coverage without over-treating a single spot. The key is to keep your hand pressure light; let the motor do the work. If you find yourself pressing down to get the needles into the skin, you're likely using a speed that is too low for your chosen depth.
The Precision Stamping Method
Stamping is the preferred method for localized issues and tight facial contours. Unlike gliding, you lift the pen completely off the skin before moving it to the next spot. This is particularly useful for the bridge of the nose and the upper lip, where the skin doesn't have much "give." Stamping allows you to target boxcar scars or deep lines with absolute control.
When stamping, you may feel a "bounce back" effect from the device motor. Don't fight this vibration by pushing harder. Instead, use a firm but gentle grip to stabilize the pen as it makes contact. This technique ensures that the needles reach their full intended depth without the risk of dragging across the surface during the oscillation cycle.
Advanced Gliding for Full-Face Rejuvenation
Gliding is the most efficient way to cover the forehead, neck, and jawline. To avoid dragging, use the "lift and place" technique at the end of every pass. You should never drag the pen backward; always move in one consistent direction, lift, and start the next pass. For most skin types, two to three passes are the limit. Going over the same area too many times can lead to "hot zones" or excessive inflammation.
Ensuring even coverage requires a disciplined mapping approach. If you're ready to upgrade your toolkit and put these methods into practice, you can explore our professional microneedling collection for the latest devices and accessories. Remember that consistent speed and a steady hand are your best tools for achieving that clear, nourished, glowing skin your clients love.
The 'Cool Down': Advanced Aftercare and Recovery
The first 20 minutes after your session are the most critical for your final results. During this window, your micro-channels are at their most receptive, but your skin is also generating significant internal heat. If you don't lower the skin temperature quickly, you risk "heat-induced" pigment issues or prolonged inflammation. Mastering advanced dr pen techniques requires a transition from the active needle work to a structured cooling phase that locks in your serums.
Occlusive recovery is the secret to protecting these newly created channels while they begin to close. By applying a cooling, barrier-forming layer, you prevent environmental pollutants from entering the skin. This phase also ensures that the bio-actives you infused, like PDRN or peptides, stay exactly where they need to be. For long-term maintenance, plan to schedule your next advanced session every four to six weeks to align with your skin's natural cellular turnover cycle.
Professional Jelly Mask Integration
While traditional sheet masks are popular, professional jelly masks are superior for post-pen recovery. These masks create a complete vacuum seal over the face, which forces any remaining serums deeper into the skin. This physical pressure increases the "push" of nutrients that might otherwise evaporate off the surface. It's an essential step for anyone serious about achieving a professional-grade glow at home.
Choosing the right formula depends on your specific skin goals for that session. A Hyaluronic Acid jelly mask is perfect for immediate hydration and soothing intense redness. If you're focusing on evening out skin tone, a Brightening formula with Vitamin C or niacinamide can be used once the initial inflammatory heat has subsided. These masks don't just soothe; they act as a secondary delivery system for your skin's nourishment.
The First 72 Hours: A Protective Protocol
The inflammatory phase lasts roughly three days, and your "dos and don'ts" during this time are vital. Avoid heavy sweating, saunas, and direct sun exposure, as these can trigger irritation in the vulnerable channels. Don't use makeup for at least 24 hours to give the skin a clean environment to begin its repair process. Stick to a simple, hydrating routine with a gentle cleanser and a rich moisturizer to support the barrier.
You should wait at least 72 hours before reintroducing "active" ingredients like Retinol or high-percentage Vitamin C. These can be too aggressive for freshly needled skin and might lead to peeling or sensitivity. Once the initial pinkness has faded, these ingredients will actually work more effectively on your revitalized texture. Applying a broad-spectrum SPF 30+ every single morning is the most important step you can take to protect your skin from pigment changes following advanced microneedling.
Elevate Your Skin Strategy with Professional Precision
Mastering advanced dr pen techniques is about more than just moving a device across your skin; it's about understanding the "why" behind every pass and setting. You've learned how to map different facial zones with precision and why pairing your treatment with bio-actives like PDRN Salmon DNA is the secret to a professional-grade glow. These small technical adjustments are what transform a standard session into a high-performance skin revitalization strategy.
Ready to put these skills into practice? We make it easy to get started with fast shipping from our Miami and Los Angeles locations. You can Shop BRÜUN’s Professional Dr. Pen Collection and Advanced Serums to find 5-star rated products trusted by estheticians across the country. Our US-based support team is always here to help you choose the right tools for your specific skin goals.
Your journey to clear, nourished, glowing skin is well underway. By focusing on technical precision and smart aftercare, you're giving your skin the best possible environment to thrive. Keep practicing these professional methods and enjoy the confidence that comes with expert-level results.
Frequently Asked Questions
What is the best needle depth for treating deep acne scars with a Dr. Pen?
Deep acne scars often require a depth of 1.0mm to 1.5mm to reach the fibrotic tissue in the dermal layer. For localized boxcar or icepick scars, use the vertical stamping method rather than gliding. This ensures the needles penetrate vertically without dragging across the scar tissue. Always start at a shallower depth to assess your skin's tolerance before moving to deeper settings for targeted revision.
Can I use Salmon DNA (PDRN) serums with my microneedling device?
Salmon DNA (PDRN) serums are excellent for microneedling because they provide nucleotides that support cellular repair. When using advanced dr pen techniques, apply half the ampoule as a glide and the rest as a post-treatment infusion. This combination helps revitalize skin texture and supports a clear, nourished, glowing complexion with minimal downtime. It's a professional secret for achieving a glass skin finish while nourishing the skin's deeper layers.
How many passes should I do per area for an advanced treatment?
Most professional protocols recommend two to three passes per area to achieve optimal results without causing excessive trauma. Move the pen in one direction, lift it completely, and then start the next pass. Overlapping more than three times can lead to "hot zones" and increased inflammation. This can prolong your recovery time and increase the risk of sensitivity, so stick to a disciplined mapping approach for even coverage.
What is the difference between a 12-pin and a 36-pin cartridge for results?
A 12-pin cartridge is generally better for targeting deep texture and scars because the needles are spaced further apart, allowing for cleaner penetration. A 36-pin cartridge has more needles, creating a "bed of nails" effect that is ideal for surface-level brightening and infusing serums. Choose the 12-pin for structural changes and scar work, while the 36-pin is perfect for achieving a general professional-grade glow and improving skin tone.
How long is the downtime after an advanced microneedling session?
Typical downtime after an advanced session involves 24 to 72 hours of mild erythema or pinkness, similar to a light sunburn. The first 20 minutes are the most critical for cooling the skin to prevent heat-induced pigment issues. By the third day, most users see the initial redness fade, revealing a smoother and more radiant skin texture. Always follow up with a professional jelly mask to accelerate the recovery process.
Can I perform advanced Dr. Pen techniques on the neck and chest?
You can perform these techniques on the neck and chest, but you must significantly reduce your needle depth. The skin on the neck is much thinner and has fewer oil glands than the face, so stay between 0.25mm and 0.5mm. Use the same 90-degree vertical entry to ensure safety and avoid causing unnecessary bruising. This area is prone to sensitivity, so focus on light passes and high-quality infusion serums.
Should I use my Dr. Pen in corded or cordless mode for better precision?
Corded mode is the preferred choice for advanced protocols because it provides consistent power and RPMs throughout the entire session. While cordless mode offers convenience, a battery's power can dip as it drains, leading to uneven needle penetration. Using your Dr. Pen in corded mode ensures that your motor speed stays stable, which is essential for maintaining technical precision and achieving uniform results across all facial zones.
How do I prevent skin dragging or 'track marks' during the treatment?
To prevent dragging, always maintain a strict 90-degree angle and use a high-quality glide serum like pure hyaluronic acid. Ensure your motor speed is high enough for your needle depth so the needles enter and exit the skin rapidly. If you feel any "snagging," increase the speed or decrease the depth immediately. Mastering advanced dr pen techniques means letting the device do the work without applying excessive manual pressure.
Your Ultimate Dr. Pen Needle Depth Chart: A Safe Guide to Professional Results
Best Professional Microneedling Pen 2026: An Esthetician’s Guide to Results
Related Posts

Getting Spa Results on a Budget: Build a Smart At-Home Routine

Professional vs. At-Home Microneedling: Cost Comparison

Hydrogen Water Bottle Buying Guide: Choose the Right Size and Features

Microneedling for Men’s Skincare: What to Know in 2026

What Results to Expect After 3 Microneedling Sessions: A Realistic Guide

Creating a Yearly Microneedling Schedule: A Practical 2026 Guide

How to Choose Professional Esthetician Lighting: A Moon Lash Light Buying Guide
