

Dr Pen Microneedling for Body Treatments
Microneedling is about controlled precision, not pressing harder. Using an advanced microneedling device for body treatments, fine needles move across the skin to create tiny channels that prompt a natural renewal response; the full glow may appear from days 7 to 14 onward. A commonly recommended interval between sessions is 4-6 weeks, with spacing adjusted for skin type and the area’s response.
If you’re considering targeted body treatments but aren’t sure what a session involves, look beyond the device itself. This guide explains how microneedling works, what recovery can involve, when results may appear, how to space sessions, and how to care for your skin afterward.
Key Takeaways
- Match cartridge coverage to the body area: 12-pin cartridges are described for targeted areas, while 36-pin cartridges are suitable for body use.
- Think of visible changes as gradual. Skin texture and appearance can develop over time, and the number of sessions depends on your goal and skin response.
- Plan recovery around gentle skin care. The guidance recommends avoiding swimming for 24 hours and products with vitamins A and C or alpha and beta hydroxy acids for seven days.
- Space sessions thoughtfully instead of repeating them too soon; skin condition, sensitivity, and the area being addressed all affect timing.
- Explore Bruun Beauty’s Advanced Microneedling Serum SD - Control Salmon DNA Ampoule Serum as a product option to pair with your microneedling routine.
Microneedling pen function and adjustable needle depth
A microneedling pen moves a cartridge of fine needles across the skin, creating controlled channels at the surface. Device settings control the needles’ movement and length. Adjustable depth changes how far they extend, so the appropriate setting depends on the body area and your experience. Greater depth isn’t automatically better.
Cartridge pin counts describe needle arrangement, not depth. A 36-pin cartridge is listed as suitable for body treatments. Smaller 12-pin cartridges are described for targeted areas, while 24-pin cartridges cover larger areas with moderate intensity. Choosing a Dr. Pen for body treatments starts with matching cartridge coverage to the area, rather than assuming more pins mean greater penetration.
At-home Dr. Pen listings show different needle lengths. The M7S and A10 list 0.25 mm, while the M8S lists 0.26 mm. These figures describe specific listings, not a recommended depth for every body area. Check your exact device and cartridge instructions before setup.
For thighs, the abdomen, or upper arms, first identify your concern, such as uneven-looking texture or visible marks. Then consider the area’s size and sensitivity when selecting cartridge coverage and device settings. Don’t assume one setting suits every area.
Is Dr. Pen FDA-cleared for body treatments, and what US rules apply to at-home use? Clearance depends on the specific device and its intended use. The Dr. Pen name alone doesn’t establish clearance. For at-home use, follow the labeling and instructions for your model.
What are the risks and side effects of Dr. Pen body treatments? Needling may cause temporary redness, tenderness, or irritation. Stop if your skin has a strong or worsening reaction, and seek medical advice if you’re concerned.
Who should avoid microneedling, and when should a dermatologist be consulted? Avoid needling over open wounds, active irritation, or suspected infection. Consult a dermatologist if you have a skin condition, a history of unusual scarring, or uncertainty about a changing mark.
Before application, cleanse the area and prepare a new cartridge according to the device instructions. Work methodically over a small section, keeping pressure light and movement even. Don’t force the pen across a bony or highly sensitive spot. For lengths longer than 1 mm, Dr. Pen US advises applying numbing cream beforehand; its store guidance says to apply it 20 minutes before the procedure.
How soon will I see results with a home-use microneedling device?
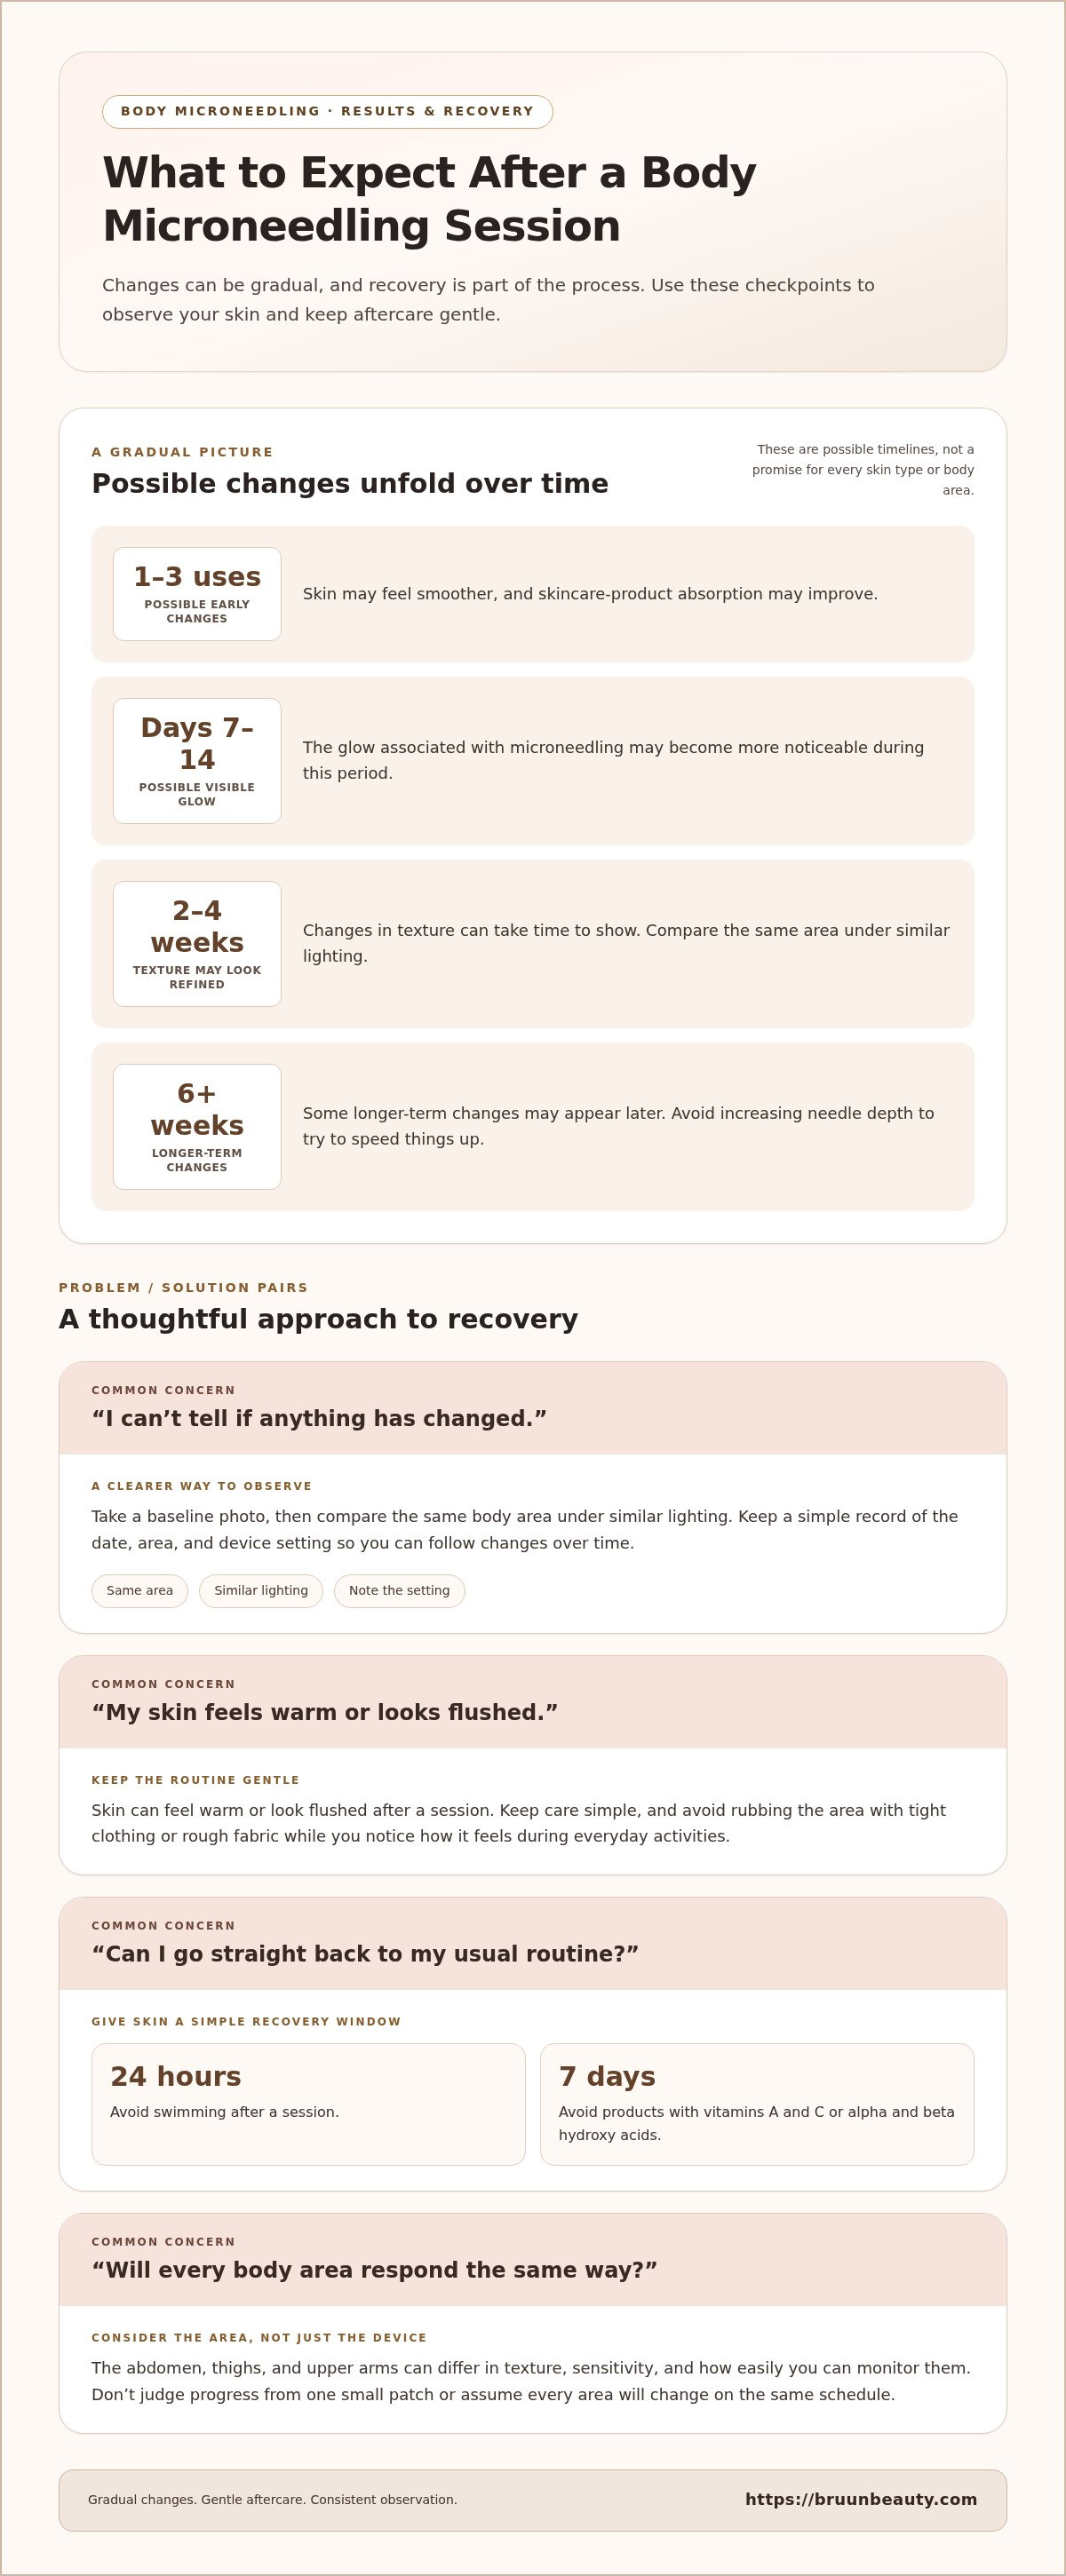
Results depend on the goal, device settings, and your skin’s response. After one to three uses, possible short-term changes include smoother-feeling skin and better skincare-product absorption. Texture may look more refined over two to four weeks, while longer-term changes may appear after six or more weeks. These are possible timelines, not a reason to increase needle depth.
A Dr. Pen M8 listing has six speed levels, while the M5 has five. Speed controls how quickly the device moves needles, but faster isn’t a shortcut to visible changes. Follow the instructions for your specific model, use a consistent technique, and don’t increase speed and depth at the same time. Changing one setting at a time makes your skin’s response easier to assess.
Nano-needling is generally described as a shallower approach than deeper microneedling. It’s described as allowing up to 97% product absorption, but that figure shouldn’t be read as a promise for every serum or skin type. Product choice matters: use formulas intended for this kind of application, and follow the device and product directions rather than applying any serum through freshly created channels.
Professional and at-home sessions differ in who performs the procedure, how the device is selected, and how the plan is adjusted. A professional can assess the body area and your skin concerns before choosing an approach. At home, follow your device manual for setup and use. Don’t copy professional settings or techniques unless your model’s instructions support them.
How much do professional body microneedling treatments cost in the US? There’s no single price for every session. The total depends on the body area, the provider’s approach, the device and products used, and whether the quoted service covers one session or a series.
Track your progress consistently. Take photos under similar lighting, note the body area and device settings, and record how your skin looks afterward. The Dr. Pen store says three procedures are needed to see general improvements, but session spacing and skin response still matter. Don’t judge results from a single session.
If you’re comparing serums for a needling routine, explore microneedling products and choose according to the product directions. Pairing a suitable formula with a measured device routine keeps the focus on gradual, well-observed changes.
Expected results and recovery
After microneedling, your skin’s appearance changes gradually, not all at once. The glow associated with microneedling may become more noticeable from days 7 to 14 onward. That timeline describes a possible visible change, not a promise that every body area will look different on the same day.
Body skin varies by location. The abdomen, thighs, and upper arms can differ in texture, sensitivity, and how easily you can monitor them. Wrinkles or crepey-looking texture may be concerns, but don’t judge progress from one small patch. Take a baseline photo and compare the same area under similar lighting.
Recovery is part of the process. After a session, skin can feel warm or look flushed. Keep your routine simple and avoid rubbing the area with tight clothing or rough fabric. Notice how the skin feels during everyday activities, such as showering or putting on a shirt.
Use a short tracking routine after each session:
- Record the date, body area, and device setting.
- Take a clear photo before needling, then use similar lighting later.
- Write down changes in redness, sensitivity, or texture.
- Pause further sessions if your skin remains uncomfortable.
Your notes can help distinguish a temporary surface response from a gradual change in appearance. For example, a thigh may feel sensitive before you notice a difference in texture. Don’t increase needle depth to seek faster visible results. A more aggressive setting can add irritation without making results appear sooner.
Keep expectations specific. Microneedling doesn’t make body skin identical to facial skin, and one session doesn’t show the full picture. Compare the same concern, such as the appearance of a small stretch-marked area, rather than unrelated parts of your body. Consistent photos make subtle changes easier to assess.
For the first days after a session, choose loose, comfortable clothing instead of friction-prone fabrics. Follow the device’s aftercare directions, and avoid experimenting with strong skincare ingredients on freshly needled skin. If you plan activities that expose the area to heat, friction, or water, consider your skin’s comfort and the aftercare guidance.
Seek medical advice if your skin develops worsening pain, spreading redness, unusual discharge, or another concerning change. These signs deserve attention, not another session. A dermatologist can assess persistent or changing marks, including areas where you’re unsure whether needling is appropriate.
Track the overall pattern across sessions, not just a single day. The days 7 to 14 glow window can help you choose when to compare photos, while your skin’s comfort guides recovery decisions. If your notes show ongoing sensitivity, wait rather than repeating the procedure on irritated skin.
Treatment frequency
For a Dr. Pen microneedling session, the interval matters as much as the device setting. Guidance places sessions every 4-6 weeks, depending on skin type and the concern being addressed. Another recommendation uses a 3-6-week interval. These ranges aren’t invitations to choose the shortest gap automatically; your skin’s condition and recovery should guide the next session.
Keep nano-needling separate from microneedling with longer needle settings. Nano-needling guidance allows sessions once per week, while standard microneedling recommendations use multiweek spacing. These schedules describe different approaches, so don’t apply a weekly nano schedule to deeper needling. Follow the instructions for your device and method.
Session count also depends on your goal. General improvement guidance describes three procedures, while collagen induction may require at least 3 treatments. Scar-focused plans are described as requiring between 3 and 6 treatments. A separate recommendation lists 7 to 8 microneedling treatments for all skin concerns. These figures reflect different goals, not one universal course.
For body texture, assess one area at a time. For example, track the thigh separately from the abdomen because each area can respond differently. Keep a simple record of each date, location, device setting, and skin response. Review your notes before planning the next session instead of adding sessions because you haven’t seen an immediate change.
After completing a series, maintenance guidance places sessions every 8 to 12 weeks. That interval differs from the closer spacing used during an initial series. Keep the maintenance schedule distinct, and don’t compress it into the initial-session plan. Your goal, skin type, and response determine which timing framework applies.
Use this planning sequence:
- Choose the specific body area and concern you want to monitor.
- Record the device method, settings, and session date.
- Allow the recommended 3-6 weeks or 4-6 weeks between microneedling sessions.
- Review your skin’s condition before scheduling another session.
- Use the 8-12-week maintenance interval only after the initial series.
A plan for Dr. Pen body treatments should keep sessions for each area distinct. Don’t combine schedules for different methods: weekly nano-needling, multiweek microneedling, and maintenance intervals serve separate roles. A calendar can prevent accidental overlap, especially if you’re treating several body areas. If you’re following a professional plan, stick to its recommended interval instead of substituting another schedule.
For visible texture changes, patience and spacing go together. Three procedures is one general-improvement reference, while 7 to 8 sessions is another recommendation covering varied concerns. Record progress across the full series, and use the same area and lighting for comparisons. This keeps your frequency plan tied to observable changes, not guesswork. Review your notes before scheduling another session, and keep the plan focused on the area you’re monitoring.
Aftercare and serum use
After microneedling, keep your routine simple while your skin feels sensitive. Freshly needled skin may react differently to products than intact skin. A serum that feels comfortable on an ordinary day may sting after needling. Don’t assume that channels mean every ingredient can safely penetrate or belongs in your immediate aftercare.
For the first seven days after the procedure, avoid products containing vitamins A and C, plus alpha and beta hydroxy acids. These active ingredients can irritate freshly needled skin. Check labels rather than relying on product names alone. If a formula contains one of these ingredients, set it aside until the seven-day period has passed.
Follow these practical steps after a session:
- Use gentle cleansing and avoid scrubbing the needled area.
- Choose simple skincare instead of layering several new formulas.
- Avoid swimming for 24 hours after the procedure.
- Wait 24-48 hours before LED light treatment if your skin feels very sensitive.
Serum timing matters. Use only a product intended for your microneedling routine, and follow its directions. Don’t apply a strong active just because the device created channels. For example, pause a vitamin A serum during the seven-day restriction, then return to your usual routine if your skin feels comfortable.
Pay attention to the treated area, not just your face-care habits. A thigh under tight clothing may experience friction, while an abdomen may rub against a waistband. Choose loose clothing and avoid activities that make the skin feel more irritated. Keep hands and rough fabrics away from the area.
Swimming needs a clear pause: avoid it for 24 hours after microneedling. This gives you a simple scheduling rule if you swim for exercise or recreation. Plan your session around that break rather than trying to fit swimming into the immediate aftercare window.
If you use an LED device, your skin’s sensitivity determines when to resume. Wait 24-48 hours before LED light treatment if your skin feels very sensitive. Don’t use the calendar alone; check how the area feels first. Keep the device’s own directions in mind, too.
Keep a short aftercare record for each session. Note the date, products used, and any sensitivity. This helps you spot which steps feel comfortable and avoid repeating a product that caused irritation. For a focused serum routine, browse microneedling skincare products.
Bruun Beauty: Advanced Microneedling Serum SD - Control Salmon DNA Ampoule Serum
Advanced Microneedling Serum SD - Control Salmon DNA Ampoule Serum is one product to consider when planning your microneedling routine. Use it only as directed, and follow your device’s instructions for product application after needling. The serum’s name alone doesn’t establish that it suits every skin type or recovery stage.
When comparing formulas for your routine, review product details and directions before use. Keep aftercare simple, and avoid applying products that conflict with your post-session guidance. Bruun Beauty also offers DR. PEN Microneedling Devices and Jelly Mask Kits for skincare routines.
Explore the Advanced Microneedling Serum SD, or visit Bruun Beauty to learn more.
Make Your Next Step a Thoughtful One
Before choosing a device or setting, decide what you want to focus on and how you’ll track your skin’s appearance. A clear goal helps you stay consistent instead of changing methods whenever you notice a new detail. For Dr. Pen body treatments, a thoughtful starting point can make each choice more intentional.
Use the device instructions as your guide, and align aftercare with your skin’s response. If you’re comparing skincare products for your routine, focus on formulas with clear directions for use. A steady, considered approach supports better decisions than adding steps without a reason.
Explore Bruun Beauty’s microneedling selection to find products that fit your routine and next steps.
Keep your plan simple, listen to your skin, and proceed with care.
Frequently Asked Questions
How does microneedling work?
Microneedling uses a pen to create a planned pattern across the skin. For a body area, mentally divide the surface into small sections before starting. This helps you keep coverage even and avoid concentrating passes in one spot. Follow your device instructions for guiding the pen rather than improvising a pattern or changing technique mid-session.
Does it hurt?
The sensation can be uncomfortable and may differ across body areas. Before beginning, make sure you understand the device controls and can reach the area without straining. If you feel unsure or uncomfortable during use, stop instead of pushing through. A calm setup and steady hand help you focus on controlled movement rather than rushing.
How often should you use a Dr.Pen?
Follow the schedule recommended for your specific device and method. Don’t repeat a session just because the last one felt easy or your skin looks unchanged the next day. Record each session and review your notes before planning another. If your skin still feels irritated, wait until it feels comfortable before considering further use.
Is microneedling painful?
Some people find the sensation manageable, while others find it uncomfortable. Don’t treat pain as a signal to press harder or speed up. Sharp or increasing pain is a reason to stop and reassess your technique and device instructions. If discomfort continues after use or concerns you, seek medical advice instead of attempting another session.
What needle size should I use?
Use the setting specified for your exact device and intended use. Before starting, confirm that the cartridge fits your pen and its instructions match your planned use. Don’t choose a needle size based on someone else’s routine or an unrelated body area. If the manual doesn’t explain a setting clearly, don’t guess or experiment on your skin.
Which appearance concerns may microneedling be used for?
People may consider microneedling for the appearance of uneven texture, visible marks, or wrinkles. These cosmetic goals don’t identify the cause of a skin change. A pen isn’t a way to assess a rash, lesion, or unexplained spot. If you’re unsure what you’re seeing, have a dermatologist assess it before using a device there.
What is a Dr. Pen microneedling device used for on the body?
A Dr. Pen is a skincare device that uses a needle cartridge to create a controlled pattern on the skin. On the body, users may focus on a specific cosmetic concern and track that area over time. The device doesn’t diagnose a skin issue or promise a particular outcome. Use it only for purposes described in its instructions.
Which body areas can be used with a Dr. Pen?
People may consider areas such as the legs, shoulders, or back if they can use the device steadily and follow its directions. Don’t work on a surface you can’t see or reach comfortably. A mirror or helper may improve visibility, but use the pen only if you can maintain controlled contact and follow the device instructions.
Microneedling for Hands: Results, Sessions and Candidacy
Microneedling for Hands: Results, Sessions and Candidacy
Related Posts

PDRN Benefits for Skin: Regeneration, Results and Safety

How to Dispose of Used Microneedle Cartridges Safely

Self-care rituals for better skin through mindful daily habits

How to Explain Microneedling Benefits for Skin and Scars

How to use a Korean 10-step skincare routine for hydration

Microneedling for atrophic scars: clinic or at-home results

V-Line Lifting Masks and Their Claimed Face-Shaping Effects
