

Dr. Pen A6S Manual & Setup Guide (PDF Download)
The Dr. Pen A6S manual PDF helps you prepare your skin and device, follow aftercare steps, and plan session spacing. Bruun Beauty recommends waiting 4 to 6 weeks between microneedling treatments.
Device settings matter, but preparation and aftercare shape your routine, too. This guide explains how to ready the treatment area, handle the A6S cartridge, and care for your skin afterward.
You’ll also learn how microneedling differs from nanoneedling when planning sessions. Use these steps to organize your setup, whether you’re an esthetician or an experienced at-home user.
Key Takeaways
- Prepare the treatment area by cleansing away makeup and lotions before you begin, and follow the device’s skin-preparation steps.
- Give your skin a simple post-session routine: avoid exercise, sweating, and makeup for 24 hours, and protect it from direct, prolonged sunlight.
- Plan microneedling sessions 4 to 6 weeks apart rather than repeating them too soon.
- Choose cartridges made for the A6S model family and learn how its 3-lock connector secures them.
- Explore microneedling serum options to find a product that fits your skincare routine.
Immediate post-treatment precautions
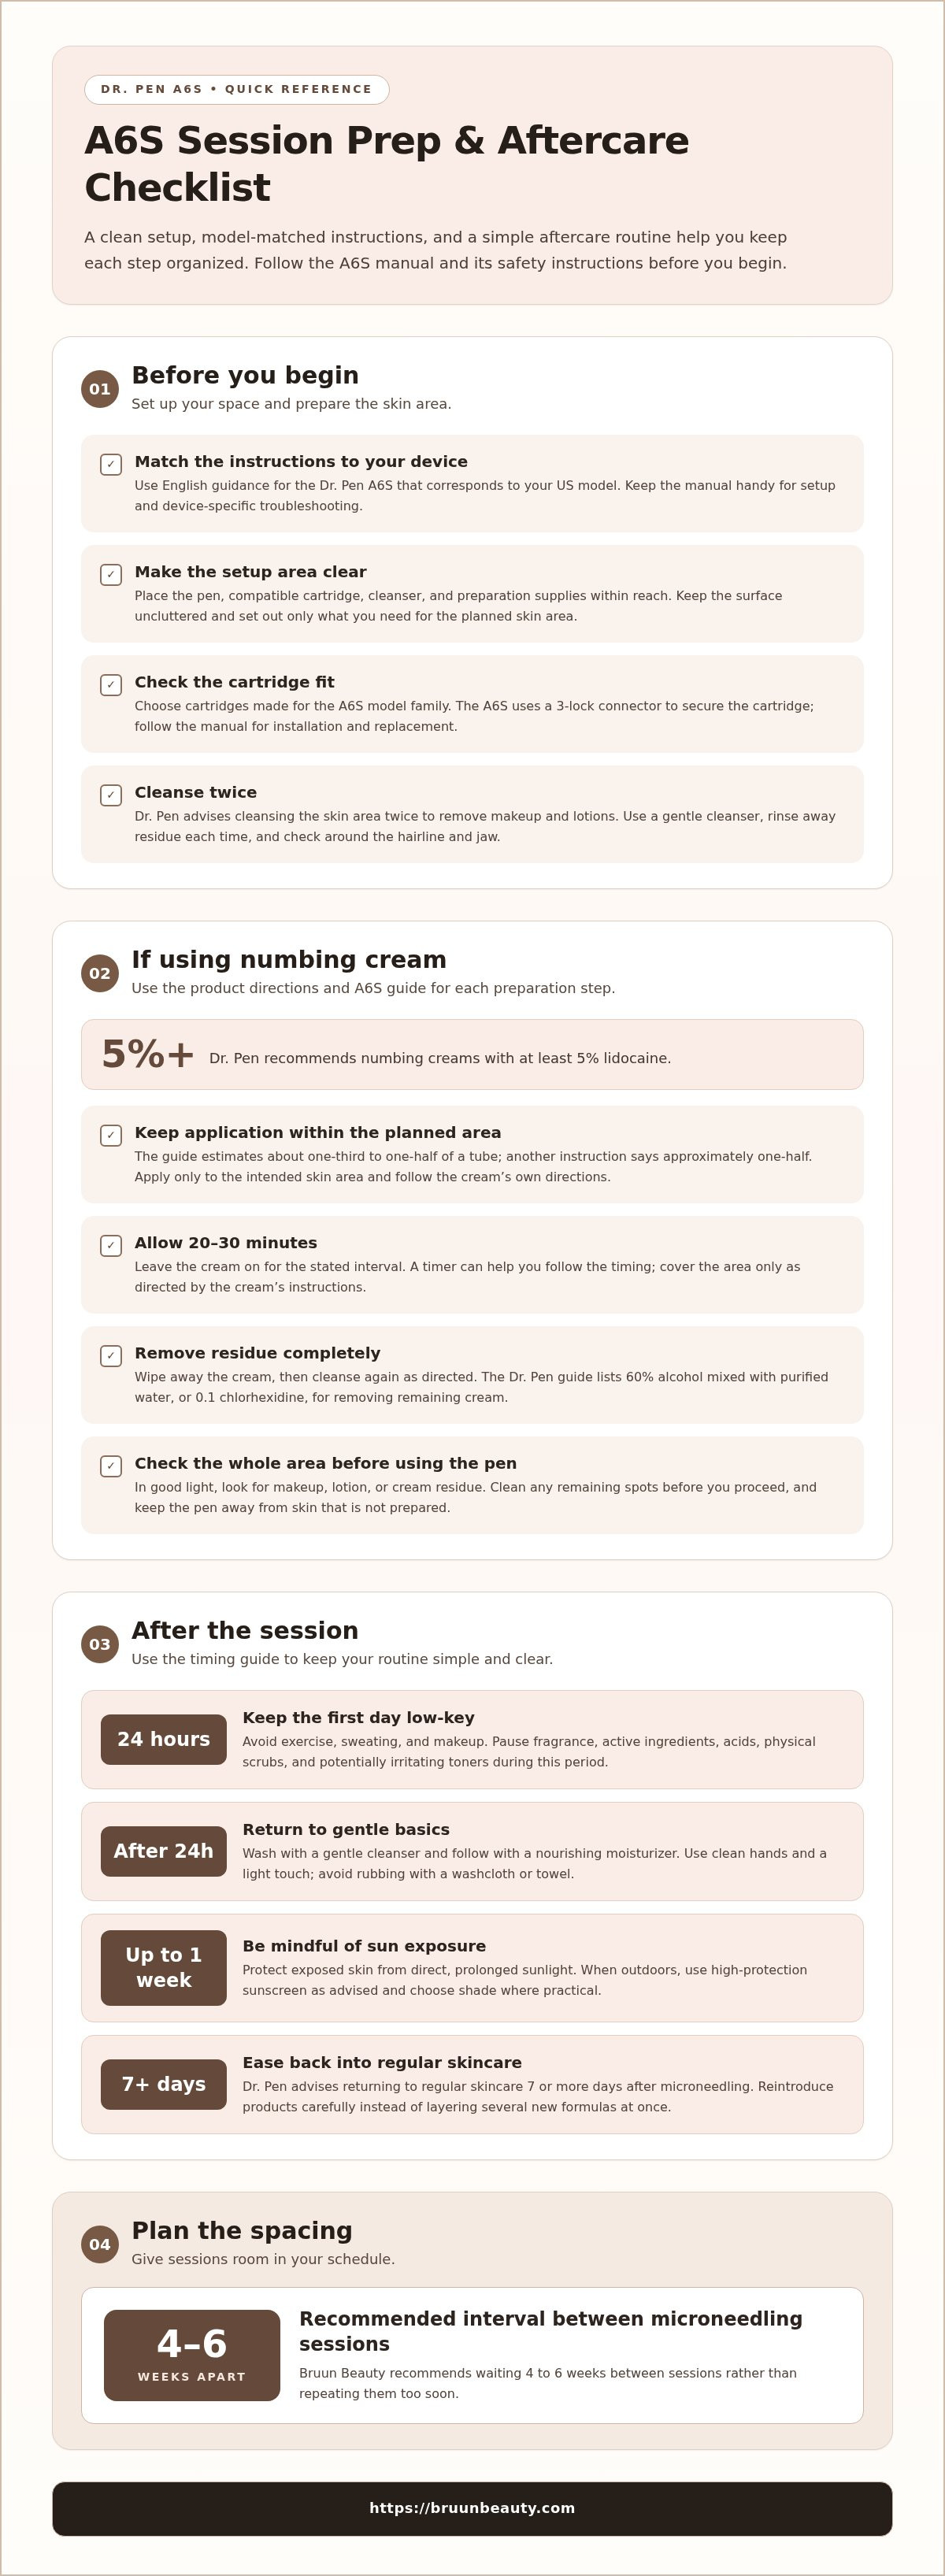
After microneedling, avoid exercise, sweating, and makeup for 24 hours. Protect exposed skin from direct, prolonged sunlight for up to 1 week.
Post-session warnings cover activity, sun exposure, cleansing, and skincare. They are not a list of medical contraindications, so read the device’s safety instructions before beginning.
The A6S manual is the reference for device troubleshooting. Match the manual to the A6S model, and use English instructions compatible with your US device.
- Keep the first 24 hours low-key. Skip workouts and other activities that make you sweat. Avoid makeup during this period, too. Sweat and cosmetics can irritate freshly needled skin, so keep your routine simple. If you need to go outdoors, use high-protection sunscreen as advised after microneedling.
- Cleanse and moisturize at the right time. After 24 hours, wash your face with a gentle cleanser. Follow with a nourishing moisturizer. Use clean hands and a light touch while washing. Avoid rubbing with a washcloth or towel, since friction can add irritation while your skin settles.
- Pause potentially irritating products for 24 hours. Avoid fragrance, active ingredients, acids, physical scrubs, and toners that may irritate. Check product labels before applying anything to the treated area. For example, set aside exfoliating acids and grainy scrubs during this window. Resume products cautiously, rather than layering several new formulas at once.
- Limit direct sunlight for up to 1 week. High-protection sunscreen matters when you go outside, but also avoid direct, prolonged sun exposure. Choose shade where practical and keep outdoor time brief. This one-week precaution extends beyond the first day, so don’t treat the 24-hour skincare pause as the end of sun care.
- Keep your routine gentle as your skin settles. Avoid adding strong actives, scented formulas, or exfoliation during the initial 24 hours. Choose the gentle cleanser and nourishing moisturizer instead. Check how your skin feels before returning to products that may sting or cause discomfort, especially exfoliating formulas.
- Return to your regular routine gradually. Dr. Pen advises returning to regular skincare 7 or more days after microneedling. Don’t confuse that timeline with the 24-hour pause for specific irritants. Keep sun precautions in place for up to 1 week, and reintroduce products with care.
- Separate skin concerns from device problems. The precautions above address your skin after a session, not pen performance. For an A6S issue, follow model-specific troubleshooting instructions. Don’t attempt to solve a device fault by changing your aftercare routine or repeating a session.
- Keep the instructions matched to your device. Use English guidance that identifies the Dr. Pen A6S and corresponds to your US model. Model-specific directions matter for safe operation. Read the safety warnings before use, and keep aftercare directions handy for the first 24 hours and following week.
Preparing skin and treatment area
- Set up a clean, uncluttered treatment area. Place the Dr. Pen, cartridge, cleanser, and preparation supplies within reach before starting. Keep the treatment surface clear so you can focus on the skin area being prepared. Read the A6S instructions first, and follow the device-specific directions throughout your setup.
- Cleanse the treatment area twice. Dr. Pen advises cleansing twice before microneedling to remove makeup and lotions. Use a gentle cleanser for both passes, and rinse away residue each time. Check areas near the hairline and jaw, where makeup or skincare can remain. Start only after the skin is clean and free of visible product.
- Apply numbing cream only as directed. Dr. Pen recommends numbing creams with at least 5% lidocaine. The guide suggests applying approximately one-third to one-half of a tube to the treatment area; another instruction says approximately half a tube. Spread the cream over the intended area, rather than applying it beyond the planned treatment zone.
- Allow the cream to sit for the stated interval. Leave numbing cream on for 20 to 30 minutes before removing it and cleansing the skin. Use a timer so you don’t cut the interval short or leave the cream on longer than directed. Keep the treatment area covered only as the cream’s own directions specify.
- Remove the numbing cream completely. Wipe it away before microneedling, then cleanse the skin again as directed. Dr. Pen’s guide lists 60% alcohol mixed with purified water, or 0.1 chlorhexidine, for wiping away remaining cream. Follow the preparation directions for the option you use, and avoid leaving cream residue behind.
- Inspect the skin before bringing out the pen. Look over the entire treatment area in good light after cleansing. Check for remaining makeup, lotion, or numbing cream, especially around the nose and hairline. If you find residue, clean that spot before proceeding. Keep the pen away from unprepared skin until the area is ready.
- Keep the intended treatment area clear. Work methodically across the area you prepared, rather than extending the session onto skin that still has makeup or lotion. For a facial session, check the forehead, cheeks, chin, and jawline separately. This simple area-by-area check helps you prepare consistently before using the A6S.
- Gather compatible supplies before beginning. Keep your chosen cleanser and preparation items separate from used materials. If you’re organizing products for a microneedling routine, browse microneedling supplies alongside the A6S instructions. Set out only what you need for the planned area, and keep the preparation steps in sequence.
Preparing to use a Dr. Pen microneedling device
Prepare the device, cartridge, and treatment settings before starting. Use the A6S instructions to identify its controls and setup steps.
-
Install or Replace Needle Cartridges
Choose a cartridge made for the A6S family, then align it with the pen’s 3-lock connector. Secure it according to the device instructions, without forcing the connection. Before use, check that the cartridge sits firmly and appears undamaged. Replace it whenever you begin a new session, and don’t reuse a cartridge.
-
Select Needle Depth and Speed Settings
Set depth for the treatment area, not simply for convenience. Dr. Pen recommends 0.5 mm for legs and up to 1.5 mm for fattier body areas. Those body recommendations aren’t a universal facial setting. The A6S Professional Plus has six speed settings; start with its manual’s guidance for the chosen area, and don’t assume a faster setting means better results.
-
Clean and Maintain the Microneedling Pen
Prepare sterilization equipment with an isopropyl alcohol solution of 70% or above. Keep the cartridge separate while preparing the pen, and follow its instructions for cleaning device surfaces. Don’t immerse the pen or allow liquid into openings. After cleaning, inspect the body and connector for residue or visible damage before storing the device.
-
Interpret Buttons, Display, and Indicator Lights
Use the A6S manual’s labels to identify each button, display reading, and indicator light before powering the pen. Match the displayed speed to the selected setting, then confirm the device responds as described. Don’t infer a light’s meaning from its color alone; use the model-specific diagram and avoid operating the pen if its display conflicts with the instructions.
- Prepare your body before the session. Dr. Pen advises avoiding anti-inflammatory medication, alcohol, and fish oil tablets for 3 days before treatment to minimize bleeding. Follow this preparation step before setting up the pen. Keep the device instructions nearby, so you can review settings without interrupting your setup.
- Check the setup in sequence. Confirm the cartridge connection, selected depth, and speed before bringing the pen to skin. For the A6S, verify the selected speed against the display and manual. If you’re preparing body areas, keep the specific depth recommendations in view. This final check helps prevent carrying a setting from one area to another.
Before beginning, check the supplied items for the Dr. Pen Ultima A6S Professional Plus Microneedling Pen: it is supplied with 2 lithium-ion batteries and includes 2 round nano-pin cartridges. Confirm these are present as you prepare the device, and keep the cartridge type in mind when reviewing the setup instructions. Check the warranty terms for your specific pen before relying on coverage. Dr. Pen devices other than the A20 and T6 have a 2-year warranty, so check which warranty applies to the specific device rather than assuming all models share the same coverage.
When planning the treatment, avoid microneedling over bony areas, especially the legs, as Dr. Pen advises. Dr. Pen recommends moving the pen vertically, horizontally, and diagonally in both directions. Before starting, consider these movement directions and areas to avoid, along with the selected depth and speed, so your preparation accounts for the device and treatment area.
Recommended interval between microneedling treatments
Schedule microneedling 4 to 6 weeks apart, and no more than once per month. Nanoneedling follows a separate 1-2-week interval, so label each procedure clearly.
- Name the procedure before choosing a date. Write “microneedling” or “nanoneedling” beside each calendar entry. This distinction matters because the recommended intervals differ. Don’t use a nanoneedling date to calculate your next microneedling session, or vice versa. Clear labels help keep your calendar tied to the procedure you actually plan.
- Record the date of each session. Add the procedure type and date to one calendar or treatment log immediately afterward. Use that record to calculate the next eligible date, rather than relying on memory. If you track several areas or device sessions, identify each entry plainly so you don’t mistake one appointment for another.
- Schedule microneedling inside its recommended window. Choose a date 4 to 6 weeks after the prior microneedling session. Dr. Pen also advises no more than once per month. Treat these as linked scheduling limits, not separate reasons to book more frequently. A calendar reminder can flag the window without automatically setting an appointment.
- Plan a series using the stated spacing. Visible improvements in fine lines and wrinkles have been seen after 3-6 treatments spaced about 4-6 weeks apart. If you’re mapping a series, place each planned session within that spacing. Keep the dates flexible within the recommended window instead of compressing the course to finish sooner.
- Keep nanoneedling on its own schedule. The recommended nanoneedling interval is once every 1-2 weeks. Make a separate calendar entry for it, and don’t substitute that shorter interval for microneedling. When both procedures appear in your records, write their names in full rather than using a single shared reminder.
- Review your calendar before setting a new session. Check the previous entry’s procedure and date first. Then calculate the next date using that procedure’s interval. This small review catches common scheduling mix-ups, such as counting from a nanoneedling session when planning microneedling.
- Keep the treatment record useful. Alongside dates, note the procedure and the device settings used. These details help you distinguish sessions when reviewing your routine later. Don’t use a record of past appointments to justify shortening the recommended interval; use the schedule stated for the procedure you’re planning.
Before booking a future appointment, check your calendar against the monthly limit. The guide recommends microneedling no more than once per month, so keep your schedule within that boundary.
How do I install and replace Dr. Pen A6S needle cartridges?
Use cartridges made for the A6S family. The pen connects cartridges through a 3-lock connector, so match the cartridge and connection before starting.
- Identify the exact pen model. Read the device label and confirm it says Dr. Pen A6S. The A6S uses its own cartridge family, so don’t choose a cartridge based only on appearance. Matching the model family is the first check before installation or replacement.
- Select an A6S-compatible cartridge. Check the cartridge packaging for A6S compatibility before opening it. The A6S package includes 2 16-pin cartridges. Other A6S cartridge options include 11-pin, 16-pin, and 42-pin styles. Choose the type intended for your planned use, rather than assuming every cartridge fits.
- Review the connector before fitting. Locate the pen’s 3-lock connector and inspect the cartridge base. Compare its shape with the A6S instructions. Keep the connection area clear of packaging and residue. A correct family match matters, since a cartridge that looks similar may belong to another pen model.
- Align the cartridge with the connector. Hold the cartridge by its base, keeping the needle end pointed away from your fingers. Position its base at the A6S connector as shown in the manual. Use the 3-lock design to secure the cartridge, following the model’s fitting directions rather than forcing or improvising the motion.
- Check that the cartridge is seated. Look at the connection from more than one angle. Confirm it sits evenly and stays in place with a light check. If it appears crooked or loose, remove it and review the alignment. Don’t start the device with a cartridge that hasn’t attached correctly.
- Replace a cartridge by reversing the fitting process. Follow the A6S instructions to release the cartridge from its 3-lock connection. Hold its base, not the needle end, while removing it. Keep the exposed needle away from your skin and work surface. Set the removed cartridge aside without trying to fit it again.
- Match every replacement to the model. Before installing another cartridge, read its label again. Confirm A6S compatibility, then align and secure it at the connector. This repeat check is useful when you have several cartridge types nearby, such as 11-pin and 42-pin options.
- Pause if the connector doesn’t align. Don’t push, twist, or operate a cartridge that resists fitting. Recheck the A6S model and cartridge family, then follow the manual’s connection diagram. Correct alignment and a secure fit are the practical checkpoints before using the pen.
Bruun Beauty: Advanced Microneedling Serum SD - Control Salmon DNA Ampoule Serum
Advanced Microneedling Serum SD - Control Salmon DNA Ampoule Serum is a skincare option to consider as you build a microneedling routine. Use it according to its product directions, and keep your immediate post-session routine gentle: avoid potentially irritating products during the first 24 hours, as outlined above.
Once your skin is ready for your regular skincare routine, this Salmon DNA ampoule serum can be part of your product lineup. Pairing a device routine with thoughtfully chosen skincare helps you keep your steps organized without adding products too soon. Follow the serum label and the A6S manual for device use.
Visit Bruun Beauty to explore the serum or contact the team with questions.
Build a Routine You Can Follow With Confidence
Turn your A6S setup into a routine you can repeat with care. Keep your device instructions close, prepare your supplies before each session, and write down the settings and products you use. A simple record helps you notice what works for your routine and avoid relying on memory when planning your next step.
Keep the Dr. Pen A6S manual PDF accessible alongside those notes. Use it as your reference when reviewing cartridge fit, device controls, or setup directions. For skincare choices, follow each product’s directions and introduce changes thoughtfully, rather than adding several new steps at once.
As you build your routine, choose products that suit your goals and preferred approach. A considered setup can help keep each session organized and support a consistent skincare routine.
Keep learning, pay attention to your skin, and take your next step with confidence.
Frequently Asked Questions
Where can I download the Dr. Pen A6S manual PDF?
Look for an A6S-specific PDF in the documentation or support materials associated with your Dr. Pen device. Confirm its title identifies the A6S and its diagrams match your pen. Save the document for offline reference, then keep it beside your setup notes so model-specific details stay easy to find.
Is there an official Dr. Pen A6S user manual on the manufacturer’s website?
To identify an official manual, use a PDF explicitly issued or hosted by Dr. Pen and labeled for the A6S. Compare its model name and illustrations with your device. A general microneedling guide or instructions for another Dr. Pen model shouldn’t replace model-specific operating directions.
What are the setup and operating instructions for the Dr. Pen A6S?
Use the A6S manual to guide setup, then compare device information with its instructions before operation. The A6S is listed with 3 independent motors. That specification describes the device configuration, not a substitute for selecting settings according to the manual. Keep the guide available as you learn the controls.
What motor speed is listed for the Dr. Pen A6S?
The Dr. Pen Ultima A6S Professional Plus Microneedling Pen is listed with a motor speed of 16,000-18,000 RPM. Treat that figure as a device specification, not a personalized setting recommendation. For actual operation, use the speed guidance in the instructions for your model and intended treatment area.
What battery rating is listed for the Dr. Pen A6S?
A6S batteries are rated at 600 mA. That rating identifies battery capacity information, not the pen’s selected speed or remaining charge. Use the A6S manual’s display and charging directions during operation, and don’t infer battery status from the 600 mA figure alone.
Microneedling for Chest Sun Damage: Potential Benefits and Care
Microneedling for Chest Sun Damage: Potential Benefits and Care
Related Posts

PDRN Benefits for Skin: Regeneration, Results and Safety

How to Dispose of Used Microneedle Cartridges Safely

Self-care rituals for better skin through mindful daily habits

How to Explain Microneedling Benefits for Skin and Scars

How to use a Korean 10-step skincare routine for hydration

Microneedling for atrophic scars: clinic or at-home results

V-Line Lifting Masks and Their Claimed Face-Shaping Effects
