

My dr pen is not turning on: Everything You Need to Know
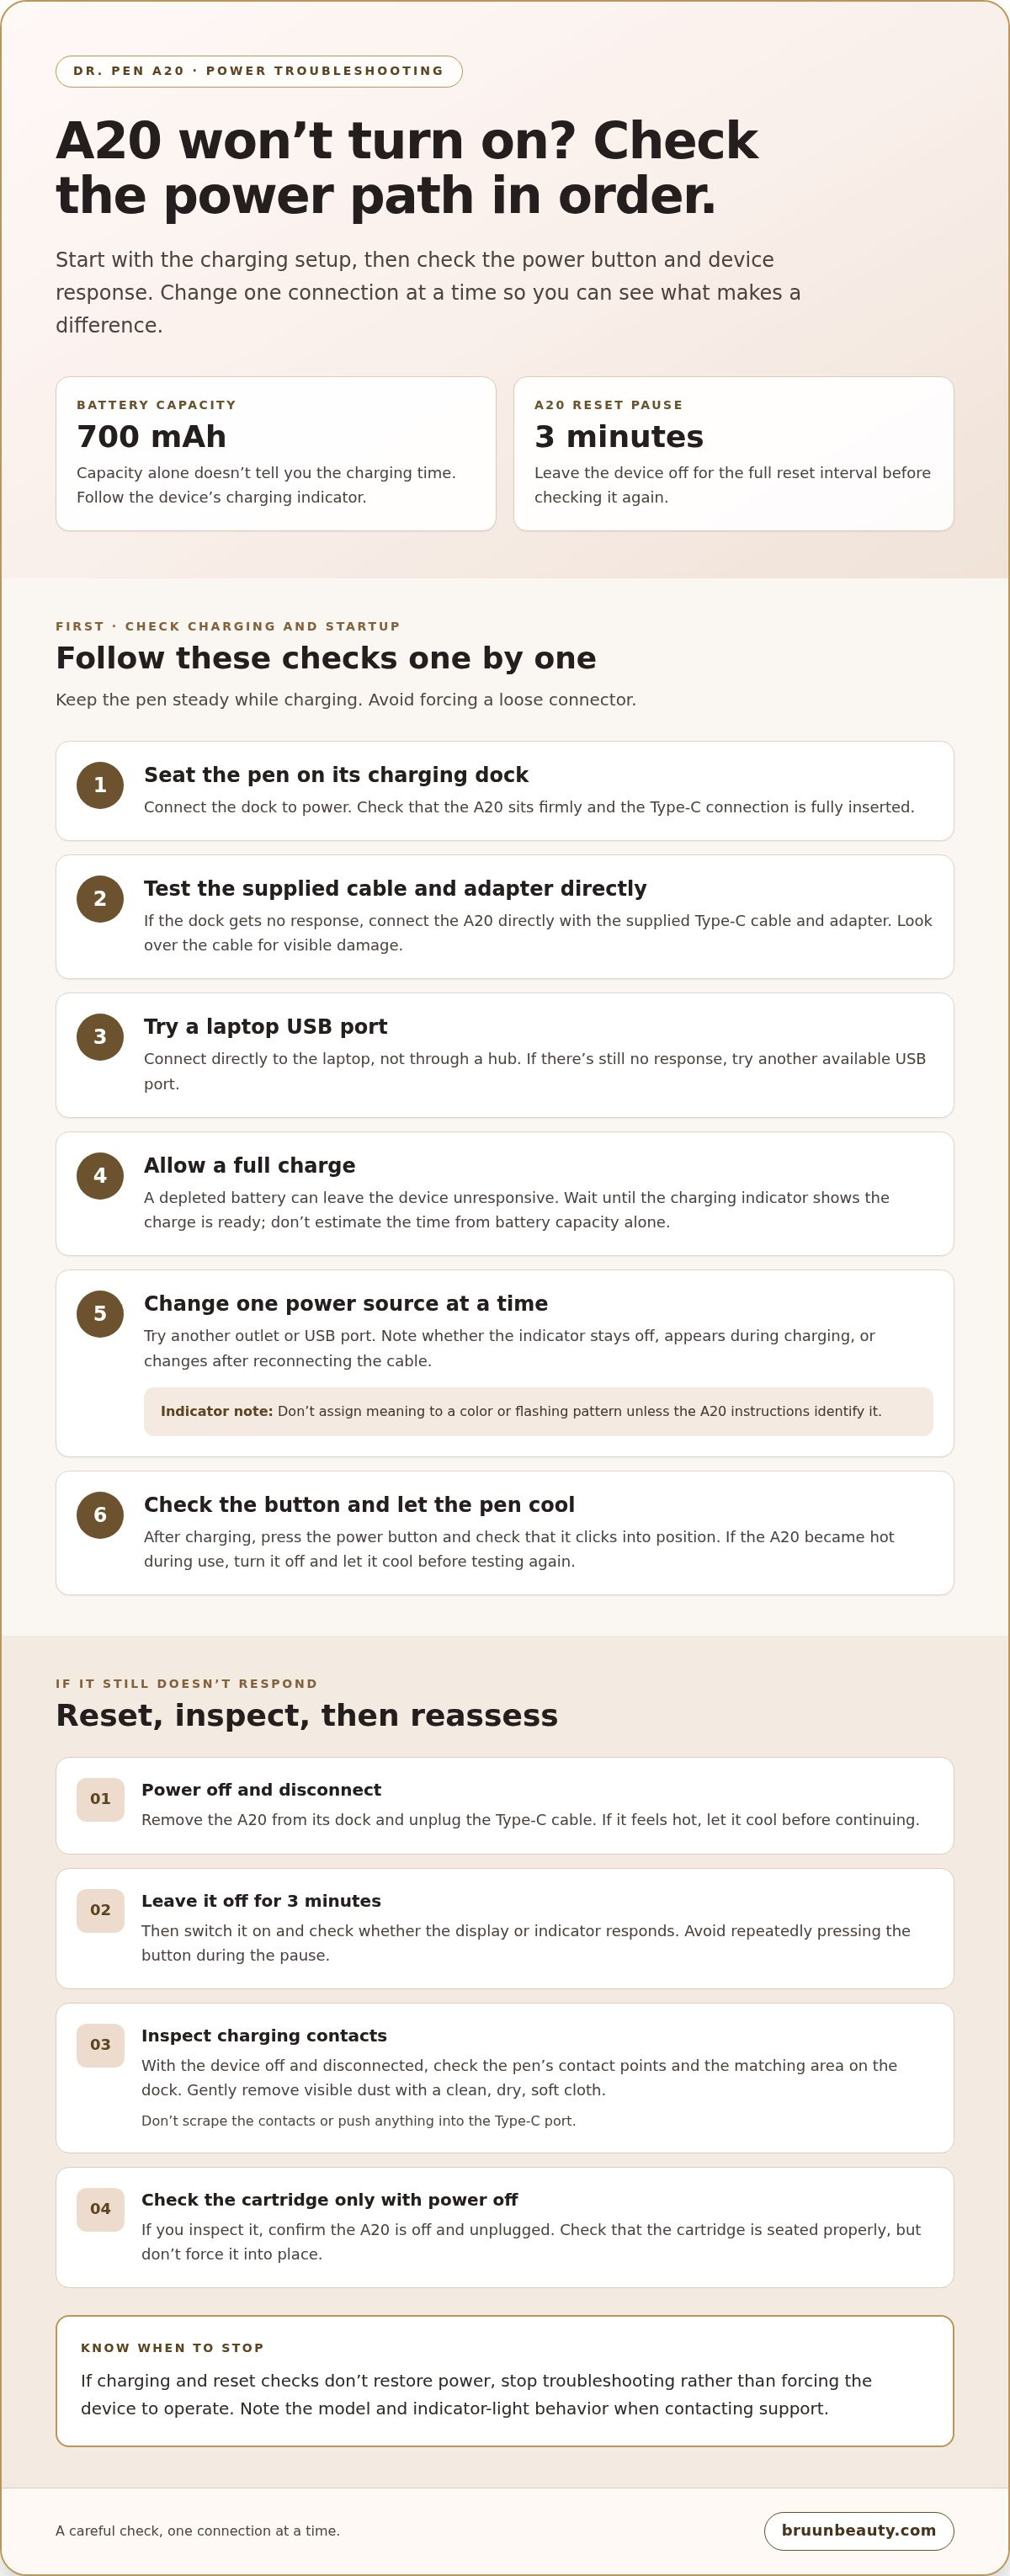
A reset may not be the first fix if my Dr. Pen is not turning on; start by fully charging it and checking the power connection. If an A20 doesn’t respond on its dock, try the supplied Type-C cable and adapter directly, then check that the power button clicks into position.
A dark screen or unresponsive button can be frustrating, especially when you’re ready to use your Dr. Pen. A loose connection, debris on the contact points, or a low charge may be behind the problem, so a few careful checks can help narrow it down.
This guide covers charging and cable checks, cleaning the contact points, restarting the device, and checking the cartridge connection. You’ll also learn when to stop troubleshooting and seek support, so you can choose a sensible next step.
Key Takeaways
- Fully charge an A20 on its dock first; if it doesn’t respond, try the supplied Type-C cable and adapter directly.
- Check that the power button clicks into position, then inspect the charging contact points for dust or debris.
- A brief power-off and restart may help; the A20 reset procedure takes three minutes.
- Note the device model and any indicator-light behavior so you can describe the issue clearly when contacting support.
- If charging and reset steps don’t restore power, stop troubleshooting and contact support rather than forcing the device to operate.
Troubleshooting an A20 that will not turn on or charge
Start with the A20’s charging setup before testing the power button. Work through these checks in order, so you can identify whether the dock, cable, power source, or device is causing the problem.
-
Check the Charging Dock and Type-C Connection
Place the A20 securely on its charging dock and connect the dock to power. Check that the pen sits firmly in place and that the Type-C connection is fully inserted. If the A20 doesn’t respond on the dock, try the supplied Type-C cable and adapter directly. Inspect the cable for visible damage, since a faulty cable can interrupt charging. Avoid forcing a loose connector.
-
Try Charging from a Laptop USB Port
Connect the supplied Type-C cable to a laptop’s USB port and the A20, then watch for a charging response. This gives you another power source to test if the dock or wall adapter seems unresponsive. Connect directly to the laptop rather than through a hub, and keep the pen steady while charging. If nothing changes, try another available USB port before moving on.
-
Review Battery Life and Charging Duration
Allow the A20 to charge fully before troubleshooting or use; a depleted battery can leave the device unresponsive. The A20 has a 700 mAh battery, but don’t guess the charging time from that capacity alone. Follow the device’s charging indicator, and wait until it shows the charge is ready. If the indicator never responds, return to the cable and power-source checks.
-
Check Power Sources and Indicator Signals
Try a different outlet or USB port, changing one power source at a time. Note whether the indicator stays off, appears during charging, or changes after you reconnect the cable. These observations help distinguish a power-source issue from a device that still won’t respond. Don’t assign a meaning to a color or flashing pattern unless your A20’s instructions identify it.
-
Confirm the Button and Let the Device Cool
After charging, press the power button and check that it clicks into position. A button that doesn’t engage may prevent startup even when the battery has charged. If the A20 became hot during use, turn it off and let it cool before testing again. Keep it away from wet skincare surfaces while checking its power connection.
Resetting the device and cleaning contact points
If your Dr. Pen still won’t respond after charging, try a simple restart before inspecting its connection. For an A20, the reset takes three minutes; clean contact points only after switching the device off and disconnecting it from power.
- Turn the device off and disconnect it. Remove the A20 from its charging dock, then unplug its Type-C cable. Keep the pen switched off while you inspect it. This prevents you from handling the contact points while the device is powered or connected. If the pen feels hot, let it cool before continuing.
- Complete the A20’s three-minute reset. Leave the device off for three minutes, then switch it on again. A brief shutdown and restart may clear a temporary power problem. Don’t press buttons repeatedly during the pause; give the reset its full three minutes before checking whether the display or indicator responds.
- Inspect the charging contacts for debris. Look at the A20’s contact points and the matching area on its dock. Dust or debris can interfere with the connection, even if the pen appears properly seated. Use a clean, dry, soft cloth to gently remove visible surface dust. Don’t scrape the contacts or push anything into the Type-C port.
- Reconnect the parts carefully. Switch off the pen and set it on its dock, checking that it sits evenly. If the dock doesn’t respond, disconnect it and connect the pen directly using the supplied Type-C cable and adapter. Change one connection at a time to see whether the dock or cable affects charging.
- Check the needle cartridge only with power off. If you need to inspect the cartridge, first confirm the A20 is switched off and unplugged. Check whether the cartridge is seated properly, but don’t force it into place. After inspection, reconnect power and observe whether the charging indicator responds before attempting another restart.
- Separate a reset issue from an ongoing fault. If the A20 responds after cleaning, note which contact needed attention and keep the charging area free of dust between treatments. If it remains unresponsive after the reset and connection checks, stop repeating the same steps. Once the device is working, microneedling supplies can help you prepare for your next session.
Use the restart as a first check rather than as proof that the underlying issue has been fixed. Turning a Dr. Pen device off, waiting briefly, and restarting it may resolve a power problem, but the result is only useful if you observe what happens afterward. If the device responds, note that the restart changed its behavior and continue to handle charging connections carefully. If it does not respond, avoid assuming that repeating the same power cycle will solve the problem; return to the connection checks already described and assess whether the response changes. Keeping the restart separate from other adjustments makes it easier to tell whether the brief shutdown was associated with a change. If there is still no response, treat the power problem as unresolved rather than relying on repeated restarts.
Dr. Pen not turning on
If your pen won’t start, check its power response separately from cartridge performance. A loose or damaged cartridge can cause inconsistent needle speed, but its fit alone doesn’t confirm a power fault.
-
Check the Pen’s Power Response
Press and hold the power button for a few seconds, then release it and observe the device. On an M8, check whether the indicator light shows that the pen is ready. If the button doesn’t click into position, note that before trying again. Avoid rapid repeated presses, which make it harder to tell whether the pen responded.
- Separate startup from charging symptoms. If the pen shows no response, note whether its indicator changes while it’s connected to power. If it shows a ready signal but won’t start, focus on the button response rather than repeatedly adjusting the charging cable. If the light stays unchanged, record that detail instead of assuming the cartridge is the cause.
-
Inspect Cartridge Fit and Condition
Switch off the pen before checking its cartridge. Look for a loose fit, visible wear, or damage, then seat the cartridge correctly without forcing it. A cartridge that’s incorrectly attached or worn may cause inconsistent needle speed during use. These signs point to a cartridge issue, not proof that the power button has failed.
- Keep cartridge checks separate from power checks. Remove the cartridge only when the device is off, then inspect the cartridge and its connection point. Don’t test the moving needle against your skin while diagnosing startup. First establish whether the device powers on. Assess needle movement only after the pen starts and the cartridge is properly fitted.
- Let a hot pen cool before another attempt. If the device became too hot during a session, stop using it and let it cool. Once it has cooled, check the power button and indicator again. Don’t continue a session with a pen that becomes too hot. This helps distinguish a temporary heat interruption from a persistent startup problem.
- Record what happens at each step. Write down the model, whether the button clicks, the indicator response, and the cartridge’s condition. For example, “M8 indicator shows ready, button doesn’t start the pen” is more useful than “it won’t work.” If the pen starts but the needle speed varies, record that as a separate cartridge symptom.
When to contact support
Don’t open or attempt to repair a Dr. Pen yourself. Switch it off, disconnect the power, and seek support if basic checks don’t restore normal operation.
- Stop after repeatable power checks fail. If the device remains unresponsive after charging, restarting, and checking its connections, stop testing it. Repeating the same steps won’t identify an internal fault. Record what happened, such as “the indicator stays off with the supplied cable,” and share that detail with support.
- Seek support for heat or unusual behavior. Stop using a Dr. Pen immediately if it becomes too hot during a session. Let it cool, then describe when it started heating up and what the device was doing. If it makes unusual noises, shuts down, or behaves differently from one start to the next, include those observations.
- Keep the casing closed. Don’t remove screws, pry open the housing, or try to replace internal parts. A home repair could damage the device or make the original fault harder to assess. Limit your inspection to accessible areas, such as the charging cable, external contacts, power button, and removable cartridge.
- Share a clear symptom report. Note the model name, when the issue began, and the steps you’ve already tried. For example, report whether the indicator lights up, whether the power button clicks, and whether the pen responds with its cartridge removed. These details can help support distinguish a charging problem from a startup or cartridge issue.
- Pause microneedling until the power is reliable. Don’t use a pen that starts inconsistently, stops mid-session, or becomes too hot. An interrupted device can make it difficult to maintain a steady routine across the skin. Set it aside rather than using it to assess changes in appearance or texture.
- Keep the device and accessories together. Have the Dr. Pen, its charging cable, dock, and cartridge nearby when describing the problem. Don’t send or discard parts unless support instructs you to. If a cable or cartridge appears damaged, describe the part and what you observed instead of attempting an internal repair.
- Follow support’s next steps before using the pen again. Explain whether the pen powers on, charges, or works only intermittently. Ask for guidance specific to your model, then follow the instructions provided. If the device still behaves abnormally, stop using it and report the result rather than resuming microneedling.
Needle cartridges should be checked for wear and replaced when necessary. The Dr Pen M8 can last approximately 3 years or more when cared for properly; however, if you experience persistent power issues with your device purchased through Bruun Beauty, our customer support team is ready to assist you with troubleshooting or warranty options.
For a pen that will not turn off, the M8 power button should be held for 3 seconds when troubleshooting. If you need replacement cartridges or have questions about warranty coverage for your device in the United States, please reach out to Bruun Beauty support directly for our standard replacement and return guidelines.
What do Dr. Pen indicator lights or error signals mean?
Read the light together with the model and charging state. The M8’s indicator shows when it’s ready, but don’t assume a color or flashing pattern means the same thing across Dr. Pen models.
- Identify your model before interpreting a light. Check the label or device instructions for the model name, such as M8 or A20. Indicator behavior can differ between models, so the name matters before you interpret a signal. Note whether the pen is connected to its charger, switched on, or disconnected when the light appears.
- Use the M8 ready indicator as a charging checkpoint. Charge the M8 until its indicator shows that it’s ready. Observe the signal during charging and after disconnecting power, then record what changes. If the light never indicates readiness, don’t treat a brief flash or momentary glow as proof that charging is complete.
- Record the exact light pattern. Note whether the indicator stays lit, flashes, changes, or remains off. Include when it happens, such as immediately after connecting the charger or after pressing the power button. A written description is more useful than saying “the light looks wrong,” especially if the pattern repeats.
- Compare the signal with the device instructions. Find the section for your exact Dr. Pen model and match the observed behavior to its indicator guidance. Don’t apply an M8 interpretation to an A20, or infer an error code from color alone. Keep the instructions beside the device while checking the signal.
- Separate a charging signal from a startup response. Note whether the indicator appears only while the pen is connected to power or also responds when you press the power button. A charging light and a startup response are different observations. Write down both, even if one seems normal and the other doesn’t.
- Stop if an unexpected signal comes with heat or interruption. If the pen becomes too hot during use, stop immediately. Record the signal and what the device was doing just before it appeared. Don’t continue a session to see whether the light changes while the device is unusually hot.
- Send support a precise signal report. Include the model, charging setup, button response, and a description of the light’s timing. For example, note whether the M8 indicator reaches its ready state or remains unchanged. This gives support concrete details without guessing at an error code.
Bruun Beauty: Advanced Microneedling Serum SD - Control Salmon DNA Ampoule Serum
Once your Dr. Pen is working and you’re planning your microneedling routine, consider Advanced Microneedling Serum SD - Control Salmon DNA Ampoule Serum. It won’t resolve charging or startup problems, so troubleshoot the device separately and don’t use it while the pen behaves unpredictably.
Bruun Beauty also offers DR. PEN Microneedling Devices, Jelly Mask Kits, and BB Glow Treatment Supplies. Choose products to suit the routine you’re preparing, and follow the directions provided with each item.
Contact Bruun Beauty if you have questions about its offerings.
Make Your Next Skincare Step With Confidence
If your Dr. Pen still isn’t turning on, keep it out of your routine until its power and operation are reliable. Separate device troubleshooting from skincare planning: resolve the equipment issue first, then choose products for your next session and follow their directions.
A device problem doesn’t have to derail your broader skincare plans. Use the pause to review your routine, prepare the products you already rely on, and note any questions to raise before using the pen again. Clear information about the device’s behavior can also make your next support conversation more useful.
When you’re ready to plan your microneedling routine, explore products that fit your skincare approach and intended use. Choose thoughtfully, keep the device instructions close, and take your next step with care.
With a steady plan and reliable equipment, you can move forward feeling prepared and confident.
Frequently Asked Questions
How do I troubleshoot a Dr. Pen that won’t turn on?
If your Dr. Pen is not turning on, note whether the problem happens every time or only after a session. That pattern can help distinguish an intermittent issue from a consistent startup failure. Write down any recent changes, such as using a different setup or noticing a new sound. Share those observations with support rather than repeatedly testing the pen.
How can I tell if my Dr. Pen is charging, and how long should charging take?
Use the charging guidance for your exact model to interpret its indicator. Don’t assume every Dr. Pen uses the same signal. Charging duration depends on the device’s starting charge and power conditions, so a fixed time may not tell you whether it’s ready. Note when charging begins and what the indicator does, then compare those details with the model instructions.
How do I check whether the battery or charging port is faulty?
You can note symptoms, but an external check can’t confirm an internal battery fault. Record whether the device loses charge unusually quickly after a full charge or whether charging seems interrupted while the cable stays still. Don’t bend the connector to test it or insert tools into the port. Share your observations with support for assessment.
How do I reset or power on different Dr. Pen models?
Match the instructions to the model name printed on your device instead of using a button sequence from another Dr. Pen. Keep the manual or original instruction sheet with the pen so you can refer to the correct controls. If the model name or controls differ from your paperwork, describe the difference when seeking help rather than trying an unfamiliar reset.
How do I contact Dr. Pen support or request a repair or replacement in the United States?
Use the support contact information provided with your purchase, then ask which steps apply to your specific device and location in the United States. Before sending anything, request instructions for handling the device and any documentation needed. Keep copies of your messages and purchase records. Don’t ship the pen until you receive directions for the next step.
Can You Microneedle Over Active Acne? An Esthetician’s Guide to Safe Glowing Skin
Can You Microneedle Over Active Acne? An Esthetician’s Guide to Safe Glowing Skin
Related Posts

PDRN Benefits for Skin: Regeneration, Results and Safety

How to Dispose of Used Microneedle Cartridges Safely

Self-care rituals for better skin through mindful daily habits

How to Explain Microneedling Benefits for Skin and Scars

How to use a Korean 10-step skincare routine for hydration

Microneedling for atrophic scars: clinic or at-home results

V-Line Lifting Masks and Their Claimed Face-Shaping Effects
