

Dr. Pen Settings for Stretch Marks: A Step-by-Step Guide
Most topical creams only sit on the surface, which is why your stretch marks haven't budged despite months of consistent application. To see real change, you need to reach the dermal layer where the tissue has actually stretched. Finding the right dr pen settings for stretch marks involves using deeper needle lengths, often between 1.5mm and 2.5mm for body areas, paired with higher device speeds to safely stimulate collagen in thicker skin.
It's completely normal to feel a bit nervous about adjusting these settings yourself. You want professional results without the clinic price tag, but the fear of causing skin damage is a common concern. We understand that frustration and want to help you use your advanced skincare technology with total confidence and safety.
This guide provides the exact needle depths and speeds you need for different areas like the stomach, hips, or thighs. You'll also learn which professional-grade serums, such as Salmon DNA or specialized peptides, work best to improve skin texture and appearance. Let's get started on your journey to smoother, nourished, and glowing skin.
Key Takeaways
- Master the logic behind dr pen settings for stretch marks to ensure you use the correct needle depth and speed for thicker body tissue.
- Learn why 12-pin cartridges are the preferred choice for deep dermal scarring and how they differ from high-pin count cartridges used for surface texture.
- Discover why Salmon DNA (PDRN) is considered the gold standard serum for supporting the skin's natural remodeling process during microneedling.
- Follow a professional preparation routine that includes proper sanitization and double-cleansing to maintain a sterile and safe treatment environment.
- Find out how to soothe post-treatment redness and heat using professional jelly masks for a more comfortable and hydrated recovery.
Understanding Microneedling for Stretch Marks
Stretch marks, or striae, are a form of deep dermal scarring. They occur when the skin stretches rapidly, causing the collagen and elastin fibers in the middle layer of your skin to snap. Because this damage is deep, topical creams often fail to reach the area effectively. This is where microneedling changes the game by working from the inside out.
By creating thousands of tiny, vertical channels, your device triggers collagen induction therapy. This natural wound-healing response encourages your body to produce new, healthy fibers to remodel the damaged ones. Using a Dr. Pen device is far more effective than using manual rollers. Rollers enter the skin at an angle, which can cause unnecessary tearing and longer recovery times. A Dr. Pen provides precise, vertical penetration, allowing you to customize the dr pen settings for stretch marks to match the specific thickness of your skin.
It's vital to set realistic expectations for your journey. While you'll likely see a visible reduction in texture and color, this isn't a one-time fix. Most people need a series of 4 to 6 sessions spaced several weeks apart to see professional-grade results. Consistency is your best friend when remodeling scar tissue.
Why Body Skin Requires a Different Approach
The skin on your stomach, thighs, and glutes is significantly thicker than the skin on your face. This means the 0.5mm depth you might use for a facial glow won't reach the dermis on your body. To effectively stimulate the deep dermis, you need "controlled trauma" that penetrates through the tougher outer layers. Blood supply also varies by area; your thighs might heal at a different rate than your abdomen. Adjusting your dr pen settings for stretch marks ensures you're reaching the right depth without overtaxing the skin's ability to recover.
Who Should (and Should Not) Microneedle Stretch Marks
Ideal candidates include those with striae rubra (newer red or purple marks) or striae alba (older white or silvery marks). Both types respond well to the remodeling process. However, safety comes first. You should avoid this treatment if you have active skin infections, a history of keloid scarring, or if you are currently pregnant. Your skin's natural elasticity also plays a role in how often you should perform the treatment. Giving your skin enough time to rest between sessions is vital for building those new, strong collagen bonds.
Dr. Pen Settings: The Optimal Depth and Speed for Body Skin
Finding the correct dr pen settings for stretch marks is the most important step in your body transformation journey. Unlike the delicate skin on your face, body tissue is resilient and varies greatly in thickness. Your golden rule should always be to start shallow. Even if you plan to reach deeper layers, beginning with a more conservative setting allows you to see how your skin reacts before you increase the intensity.
Older, white stretch marks (striae alba) often require more stimulation because the tissue is more established. Newer, red marks (striae rubra) are still in an active phase and might respond well to slightly shallower depths. No matter the age of the marks, never exceed a 2.5mm depth for at-home sessions. Staying within this limit ensures you trigger the necessary remodeling without causing unnecessary trauma to the skin's deeper structures.
Recommended Needle Depth by Body Area
Precision is key when selecting your depth. Since the skin on your abdomen is much thicker than the skin on your chest, your device needs to be adjusted as you move between zones. Here are the professional benchmarks for body microneedling:
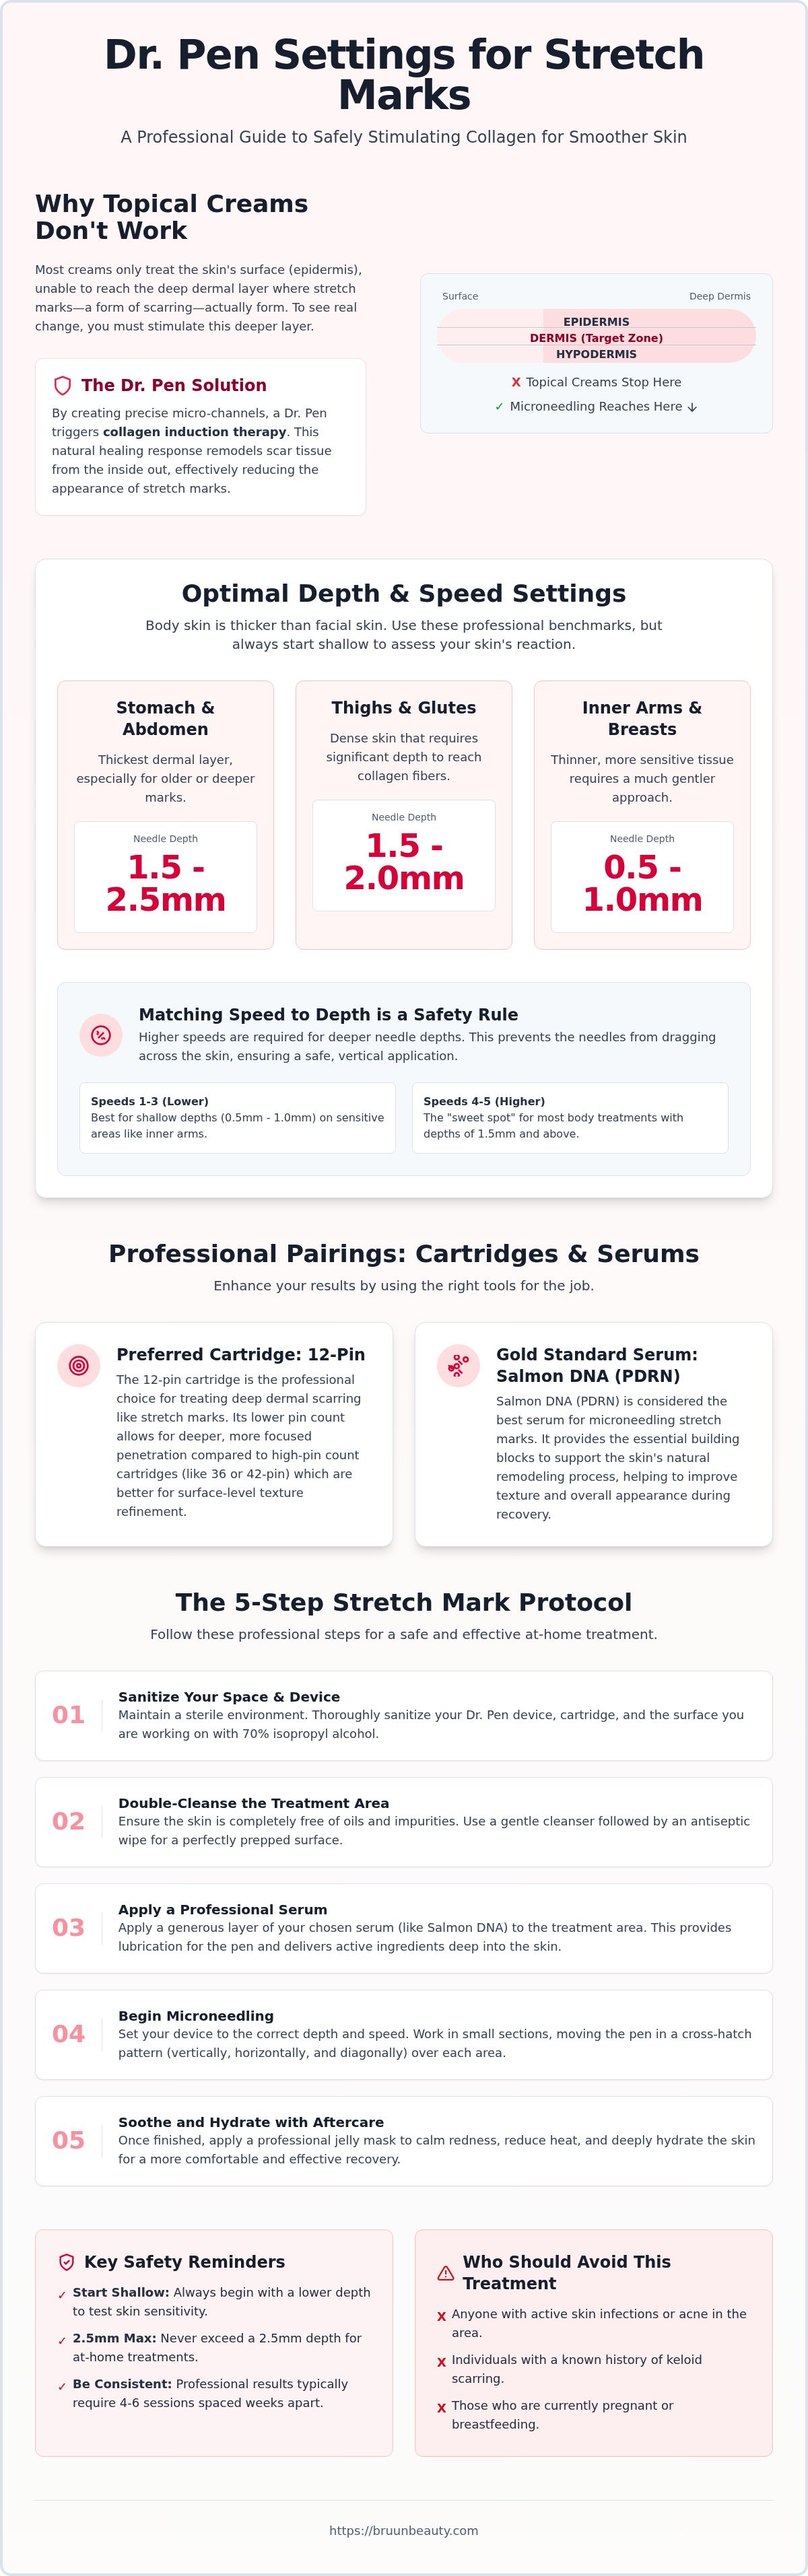
- Stomach and Abdomen: Aim for 1.5mm to 2.5mm. This area typically has the thickest dermal layer, especially if the stretch marks are older or deeper.
- Thighs and Glutes: Use 1.5mm to 2.0mm. The skin here is dense, requiring significant depth to reach the collagen fibers.
- Inner Arms and Breasts: Keep it between 0.5mm and 1.0mm. These areas have much thinner tissue and a higher concentration of nerve endings, so a gentle touch is required.
Matching Speed to Depth
Speed isn't just about how fast the session goes; it's about safety. When you use deeper dr pen settings for stretch marks, you must use higher speeds. This prevents the needles from "dragging" or "hooking" the skin as you move the device. If you're ready to start your journey, choosing the right professional microneedling tools is just as important as the device speed.
- Speed 1-3: These lower settings are perfect for shallow prep work or when working on very thin, sensitive skin areas like the inner arms.
- Speed 4-5: This is the "sweet spot" for most body treatments. It provides enough power for depths of 1.0mm to 1.5mm.
- Speed 6: Use maximum power for depths of 2.0mm and above. This ensures the needles enter and exit the skin cleanly and vertically.
The Step-by-Step Stretch Mark Protocol
Success with body microneedling depends on your preparation and technique just as much as your device. Before you even touch your skin, your environment needs to be clinical-grade. Sanitize your workspace and lay out your Dr. Pen device on a fresh paper towel or sterile tray. Since body skin often carries heavy lotions and natural oils, double-cleansing the treatment area is essential to prevent any surface bacteria from being pushed into the micro-channels.
If you're using deeper dr pen settings for stretch marks, comfort is a priority. Applying a 5% Lidocaine cream for 20 to 30 minutes on zones like the stomach or thighs makes the process much easier. Once the area is numb, wipe away the cream with alcohol before starting. You must never use the pen on dry skin. You need a high-quality serum to provide 'slip,' which prevents the needles from causing surface tears or dragging across the skin.
Professional Movement Patterns
To get even results, you should use the cross-hatch technique. This means moving the pen vertically, then horizontally, and finally diagonally across the stretch mark. For relatively smooth skin, a slow gliding motion works well. However, if you're dealing with very deep or textured scars, switching to a 'stamping' motion is safer. Instead of sliding the pen, you lift it and place it down firmly in each spot. This ensures the needles enter at a perfect 90-degree angle and prevents them from catching on the uneven edges of the scar tissue. Maintaining this perpendicular angle is vital for precise penetration and faster healing.
Sanitization and Cleanup
Safety doesn't end when the device is turned off. You must dispose of your needle cartridges immediately after a single use. Reusing needles can lead to infections and blunt tips that damage your skin. After the session, wipe down the body of your Dr. Pen with 70% isopropyl alcohol to keep it sterile for your next use. Finally, avoid touching the treated area with unsanitized hands for at least 24 hours. Your skin is vulnerable while those micro-channels are still closing, so keeping the area clean is your top priority for preventing irritation.
Professional Pairings: Cartridges and Serums
Selecting the right needle cartridge is just as vital as dialing in your dr pen settings for stretch marks. While the device provides the power, the cartridge determines how that energy is distributed across your skin. You want a pairing that maximizes collagen production without causing unnecessary surface trauma. Using the wrong pin count can lead to subpar results or increased downtime, so it's important to match your tools to your specific skin goals.
Beyond the needles, the serums you use act as the "building blocks" for your new skin. Since microneedling creates open channels, your skin will absorb up to 80% more product than usual. This is the perfect time to introduce high-performance K-beauty ingredients that support the remodeling of dermal tissue. Choosing professional-grade serums ensures you aren't pushing fillers or fragrances deep into your skin.
Choosing the Right Cartridge Pin Count
The number of needles in your cartridge changes how the device interacts with your skin. For body treatments, you'll generally choose between two main types:
- 12-Pin Cartridges: These are the gold standard for deep tissue work. Because there are fewer needles, each one can penetrate tough scar tissue more easily. They're perfect for older, stubborn stretch marks on the stomach or thighs.
- 36-Pin Cartridges: These have a higher needle density, which spreads the pressure across a larger surface area. They're excellent for addressing surface texture and overall skin tone on larger areas like the glutes.
- Nano-needling: You should avoid nano-cartridges for stretch marks. They don't penetrate deep enough to reach the dermis, so they won't trigger the collagen induction needed for scar remodeling.
K-Beauty Serums for Advanced Results
When it comes to regenerative skincare, Salmon DNA (PDRN) is a total game-changer. PDRN consists of bio-compatible molecules that mimic human DNA, helping to speed up the skin's natural repair process. It's particularly effective for improving the appearance of deep marks because it provides the "instructions" your skin needs to build stronger, more organized fibers.
Always start with a pure Hyaluronic Acid base to provide the necessary "slip" for your device. You can then layer in peptides and growth factors to boost the collagen-building message. A word of caution: don't use Vitamin C or Retinol during the actual needling process. These active ingredients are too aggressive for open micro-channels and can cause significant irritation. Stick to soothing, regenerative formulas during the treatment and save your actives for your daily routine once the skin has closed. This approach ensures your dr pen settings for stretch marks deliver the best possible outcome for your skin.
Aftercare and Managing Your Results
Once you finish your session, your skin will likely feel warm and tight, similar to a moderate sunburn. This "sunburn" phase usually lasts for 24 to 48 hours. It's a sign that your body is beginning the remodeling process triggered by your dr pen settings for stretch marks. During this window, focus on keeping the area clean and deeply hydrated to support the skin barrier. Avoid hot showers, intense exercise, or anything that causes excessive sweating for the first two days.
Professional estheticians often use professional jelly masks immediately after microneedling. These masks provide instant cooling and help reduce redness. Because body treatments involve deeper penetration, providing this immediate relief is essential for a comfortable recovery. You should wait at least 4 to 6 weeks between sessions. This timeline is critical because collagen remodeling takes time. Needling too frequently can actually disrupt the process rather than speed it up.
The Role of Jelly Masks in Body Aftercare
Jelly masks are unique because they create a vacuum-like seal over the skin. This seal forces the active ingredients from your serums and the mask itself deeper into the micro-channels. When choosing a mask for body areas, look for calming ingredients like Centella Asiatica, Aloe Vera, or Hyaluronic Acid. These ingredients help to quench the "heat" often felt after a deep body session.
For large areas like the stomach or thighs, apply the mask in a thick, even layer. You want the edges to be slightly thicker to make the peeling process easier. Let it set for 15 to 20 minutes before peeling it off to reveal calmed, hydrated skin. This step is a favorite in professional clinics for its ability to instantly transform the skin's post-procedure appearance and comfort levels.
Long-Term Maintenance and Success
Sun protection is non-negotiable if the treated area is exposed to light. UV exposure on vulnerable skin can lead to post-inflammatory hyperpigmentation (PIH), which can darken the appearance of your stretch marks. Always use a broad-spectrum SPF if you're heading outdoors. Between your microneedling sessions, continue to nourish the skin with rich body oils and hydrating lotions. Keeping the skin occluded with a thick moisturizer in the first few days helps prevent transepidermal water loss.
Tracking your progress is the best way to stay motivated. Take high-quality photos every 4 weeks under the same lighting conditions. Remodeling is a slow process, and you might not notice the daily changes. When you look back at your month-one photos, you'll see the gradual improvement in texture and tone that consistent use of the correct dr pen settings for stretch marks provides. This professional approach ensures your skin stays nourished and glowing throughout the entire process.
Achieve Smoother Skin with Confidence
Mastering your dr pen settings for stretch marks is the foundation of a successful body transformation. By matching the correct needle depth to your skin's thickness and using professional-grade serums like Salmon DNA, you're giving your skin the exact tools it needs to remodel. Remember to honor the 4 to 6 week healing window to let those new collagen fibers grow strong and healthy.
We're here to provide the same professional-grade inventory trusted by top estheticians. Our advanced K-beauty serums have earned 5-star reviews for their results-focused formulas. To ensure you can start your journey without delay, we provide fast US-based shipping from our locations in Miami and Los Angeles.
You don't have to settle for surface-level results that don't work. With the right settings and a little patience, you're well on your way to clear, nourished, and glowing skin.
Frequently Asked Questions
How many sessions of Dr. Pen do I need for stretch marks?
Most people see a visible improvement after 4 to 6 sessions, spaced 4 to 6 weeks apart. If you're working on deep or older stretch marks, you might need up to 8 sessions to achieve your desired look. Consistency is your best friend here because collagen remodeling is a slow biological process. Your skin needs this time to build new, healthy fibers from the inside out.
Does microneedling for stretch marks hurt?
While body areas like the stomach or thighs have thicker skin, the treatment depths are also greater. We highly recommend applying a topical numbing cream with 5% Lidocaine for 20 minutes before you begin. This simple step makes depths between 1.5mm and 2.5mm very tolerable. You'll feel a vibrating sensation, but the numbing cream ensures you stay comfortable throughout the entire process.
Can I use Dr. Pen on red stretch marks?
Yes, you can use your device on striae rubra, which are newer red or purple marks. It's best to be gentle and use shallower dr pen settings for stretch marks, around 0.5mm to 1.0mm, during your first few sessions. These marks are still in an active phase and often respond very well to stimulation. Starting with a conservative depth allows the skin to remodel without adding too much stress to the area.
Which Dr. Pen cartridge is best for stretch marks?
The 12-pin cartridge is often the best choice for deep, established scarring because it penetrates tough tissue with more precision. If you're focusing on general texture or covering larger areas like the glutes, the 36-pin or 42-pin cartridges are excellent options. These higher pin counts provide broad coverage and stimulate overall collagen production. Choosing the right cartridge ensures your dr pen settings for stretch marks work effectively for your specific skin goals.
What should I avoid after microneedling my body?
You should avoid hot showers, saunas, swimming pools, and intense exercise for at least 48 hours after your session. It's also important to stay out of direct sun and skip harsh exfoliants like body scrubs or AHAs for one full week. These precautions give your skin barrier the time it needs to recover fully. Keeping the area clean and protected ensures you get the best possible results without unnecessary irritation.
How soon can I see results on my stretch marks?
You might notice a slight tightening or a healthy glow within the first week, but real results typically appear between 4 and 8 weeks. This timeframe matches the biological cycle of new collagen fibers maturing and replacing damaged tissue. Patience is vital during this phase. While the micro-channels close quickly, the remodeling happening beneath the surface is a gradual process that continues long after your session ends.
Can You Microneedle Over Active Acne? An Esthetician’s Guide to Safe Glowing Skin
Microneedling for Hyperpigmentation: Professional Home Guide
Related Posts

How Many Times Can You Use a Dr. Pen Cartridge? The Single-Use Answer

Best Dr. Pen Needle for Fine Lines: Cartridge Guide

Calming Skincare for Post-Procedure Skin: How to Choose the Right Routine

Does At-Home Microneedling Hurt? What to Expect

Best Korean Ampoule for Mature Skin: How to Choose in 2026

Botanical Stem Cell Serum for Anti-Aging: What to Know

Skincare Ingredients to Avoid After Microneedling: A Practical Checklist
