

Microneedling Without Numbing Cream: Pain and Healing
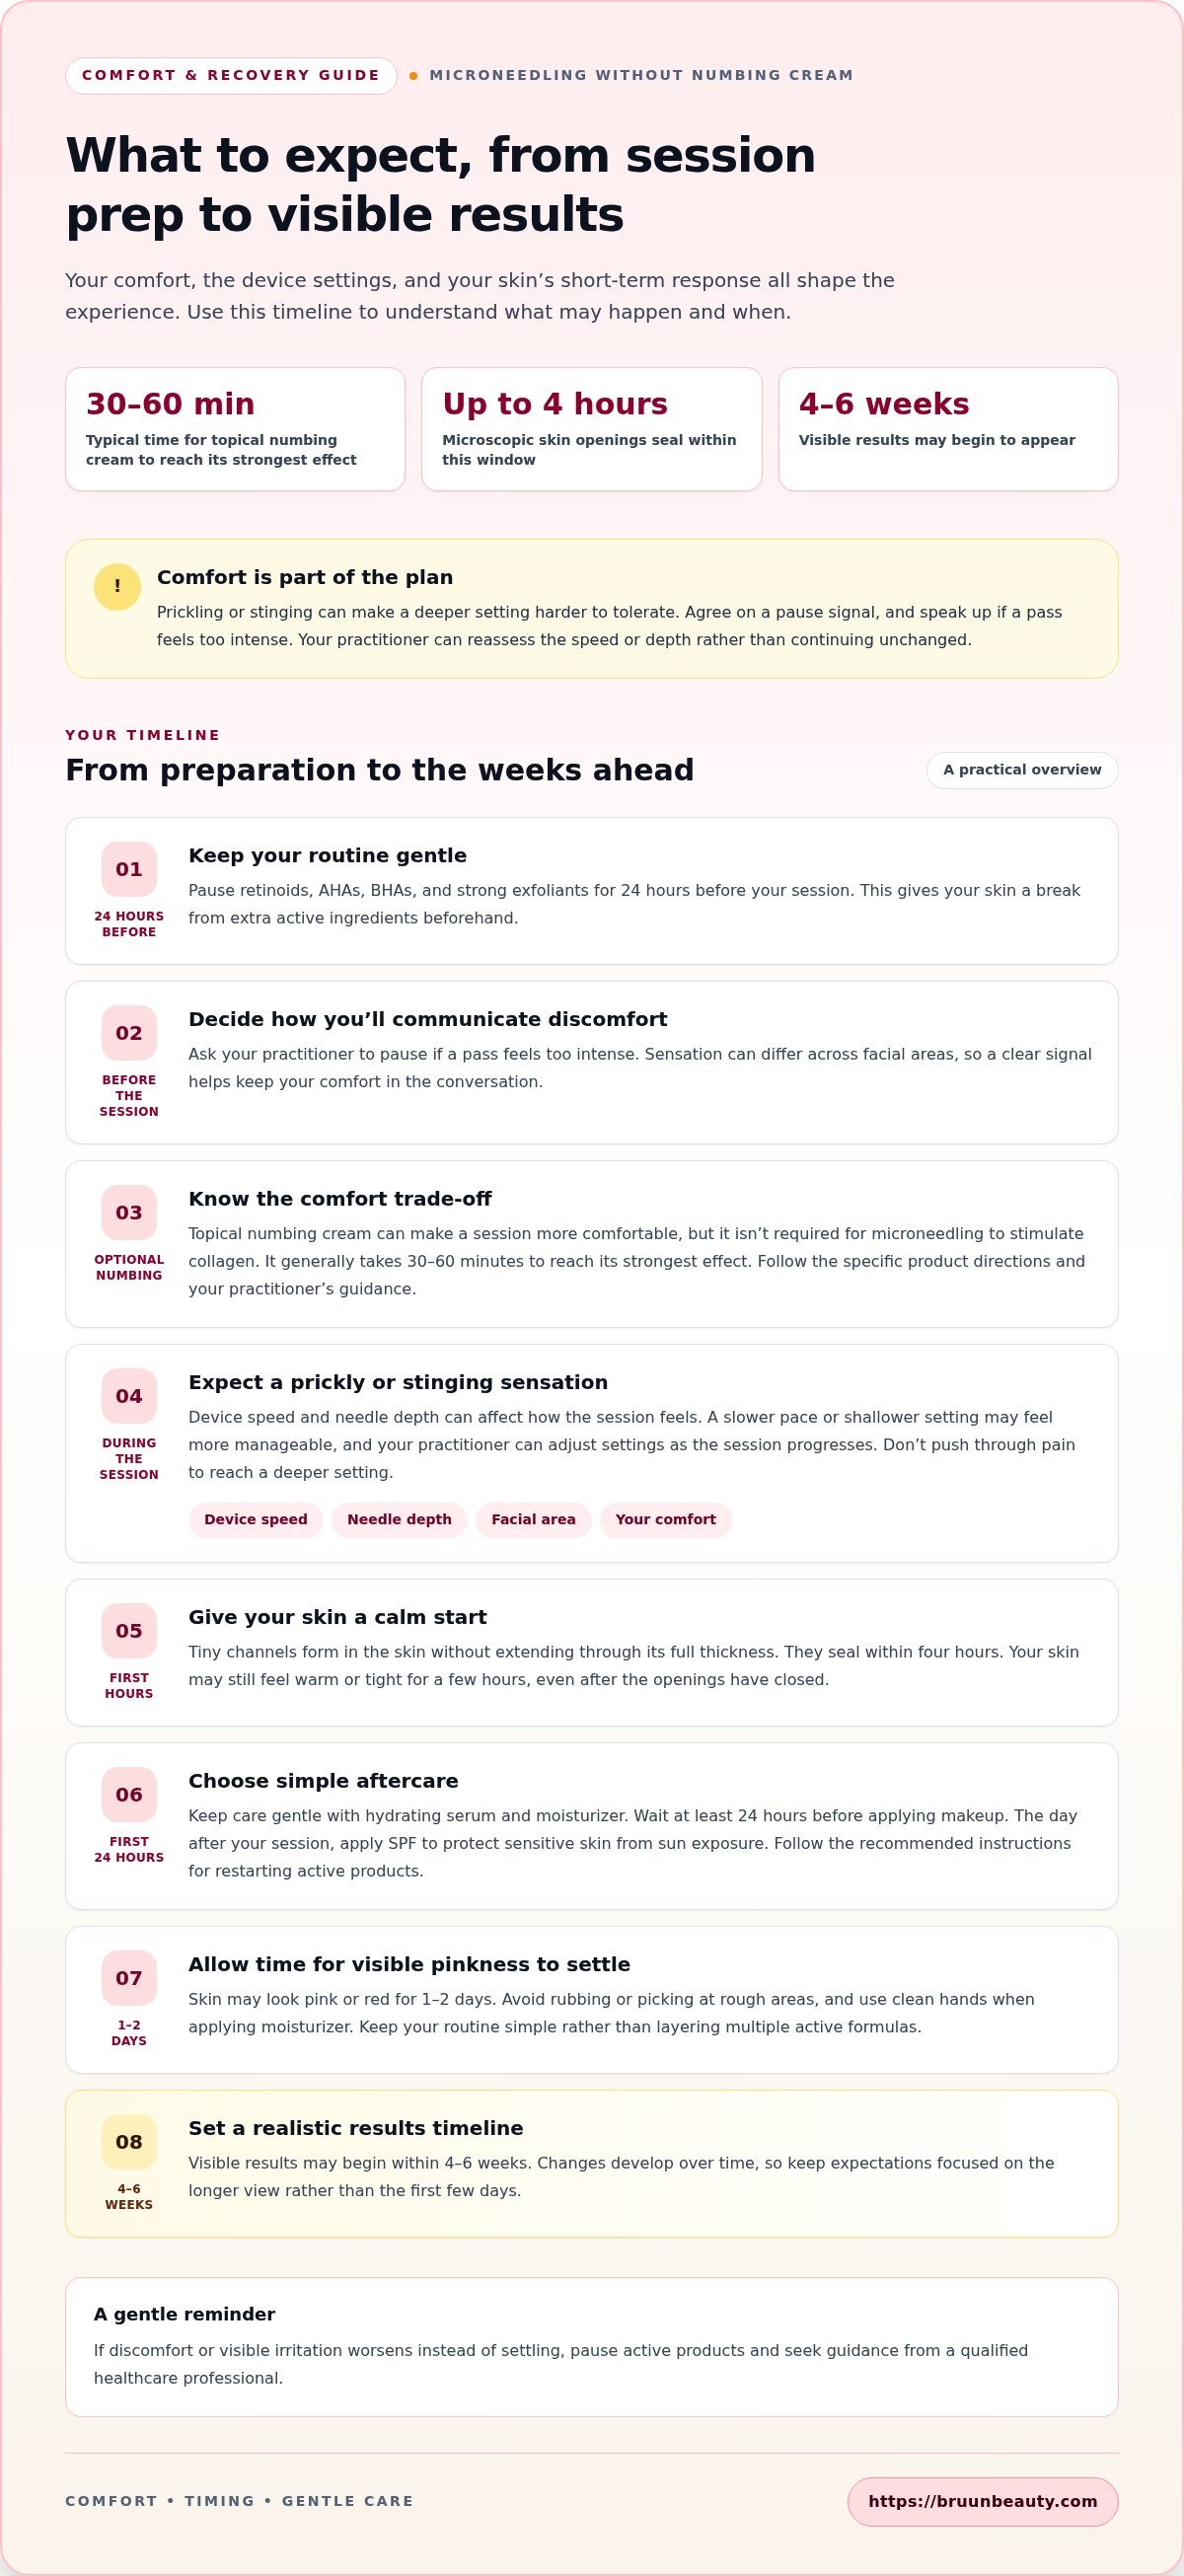
Microneedling without numbing cream can feel prickly or mildly painful, and discomfort may affect the depth you can tolerate. Your skin may look pink or red for 1-2 days, while visible results may begin within 4-6 weeks.
It’s natural to wonder whether numbing cream is essential, especially if you’re unsure how microneedling will feel. Microneedling without numbing cream can still stimulate collagen, while numbing may make a session more comfortable. Your comfort and the treatment depth both matter.
Learn what to expect, including the sensations, recovery, and factors that affect comfort. You’ll also find practical aftercare guidance to help you make informed choices about your skincare routine.
Key Takeaways
- Without numbing cream, the sensation can range from prickling to discomfort; device speed and depth can influence how it feels.
- Microneedling creates tiny channels that don’t extend through the full skin thickness, and those openings seal within four hours.
- Numbing cream can improve comfort, but it isn’t essential for microneedling to stimulate collagen.
- Pause retinoids, AHAs, BHAs, and strong exfoliants for 24 hours before treatment, and keep post-treatment care gentle.
- Results can develop over time, so understanding the expected timeline helps you set realistic expectations for a series of treatments.
Microneedling pain and comfort
Microneedling without numbing cream can feel prickly or mildly painful, and discomfort may limit the depth you can tolerate. Understanding what affects the sensation can help you discuss a comfortable approach before treatment.
Sensation during treatment
During a session, you may feel repeated prickling or stinging as the device passes over your skin. Discomfort can make a deeper setting harder to tolerate, even though numbing cream isn’t required for collagen stimulation. Sensation may also vary across facial areas, so describe what feels manageable as the procedure progresses.
The device speed and needle depth can be adjusted to make treatment more comfortable. A slower pace or shallower setting may feel more manageable, though it also changes the treatment intensity. The right balance depends on the area and your comfort during each pass, not on pushing through pain.
The cheeks may feel different from more sensitive areas. A practitioner can adjust device settings as the session progresses, rather than keeping the same speed and depth across your whole face. Browsing a microneedling equipment collection can help you recognize the tools used, but settings and technique shape the experience.
Risks without numbing cream
The main challenge without numbing cream is discomfort, which may limit the depth you can comfortably tolerate. This matters because the treatment plan should account for your response instead of assuming every setting will feel the same. Microneedling may also leave skin pink or red for 1-2 days.
Afterward, your skin may feel slightly tight or hot for a few hours. These short-term sensations can occur with microneedling and don’t mean that skipping numbing cream created an additional risk. Don’t treat pain as a reason to increase depth. If the sensation becomes difficult, the practitioner can reassess the speed or settings.
How much does professional microneedling cost in the United States? There isn’t one standard price to quote here. Cost depends on factors such as the treatment area, provider, and whether you’re considering one session or a series.
Comfort can also affect the pace of a session. Skipping numbing cream may save application time, but adjustments may be needed if the sensation becomes difficult. Tell the practitioner when an area feels too uncomfortable so they can reassess the speed or depth instead of continuing unchanged.
Before starting, agree on how you’ll communicate discomfort during treatment. For example, ask the practitioner to pause if a pass feels too intense. A clear signal makes it easier to respond promptly and keeps comfort part of the plan throughout the session.
Microscopic skin openings and skin recovery
Microneedling needles create tiny channels in the skin, but don’t pass through its full depth. These microscopic openings start closing after the procedure and seal within four hours. This short window helps explain why your skin may look pink or feel sensitive even after the channels have closed.
Closure doesn’t mean your skin’s surface immediately looks or feels unchanged. Redness or pinkness can last 1-2 days, and your skin may feel warm or tight for a few hours. These visible sensations are part of the short-term response, while the skin’s repair processes continue beyond the moment the openings seal.
Keep your routine simple after microneedling. Gentle hydrating serums and moisturizers help limit extra irritation, while strong exfoliating products can feel harsh on recently treated skin. Avoid retinoids, AHAs, BHAs, and strong exfoliants for 24 hours before treatment, then follow the recommended post-procedure instructions for restarting active products.
Makeup can wait until at least 24 hours after treatment. The day after, apply SPF to protect sensitive skin from sun exposure. Those practical timing steps give your skin a calmer recovery period without adding more layers or friction immediately after the procedure.
Research on human skin fibroblasts found that lidocaine and mepivacaine inhibited processes relevant to skin repair. This finding concerns cells in a study setting. It doesn’t establish that numbing cream delays recovery after every microneedling procedure. It does show why numbing agents have effects beyond temporarily reducing sensation, so their use should fit the treatment plan.
For the first hours, resist picking at flakes or rubbing areas that feel rough. Use clean hands when applying moisturizer, and avoid layering multiple active formulas to speed visible changes. If you’re preparing a post-procedure routine, browse microneedling skincare options with a focus on gentle hydration rather than extra exfoliation.
Track what you notice over the first 1-2 days: redness, tightness, and how your skin responds to moisturizer. These observations help you describe your recovery accurately and adjust your usual routine. If discomfort or visible irritation worsens instead of settling, pause active products and seek guidance from a qualified healthcare professional.
Topical numbing cream and discomfort
Topical numbing cream temporarily reduces sensation where it’s applied. It can make microneedling more comfortable, but comfort, treatment depth, and your skin’s response all matter when deciding whether to use it.
The cream works by reversibly blocking nerve signals in the skin, creating a superficial loss of sensation. Topical anesthetics generally take 30-60 minutes to reach their strongest effect. One doctor recommends applying numbing cream an hour before a microneedling procedure, but timing depends on the specific product and directions.
Reduced sensation may help you tolerate a more intensive session. That can matter if discomfort would otherwise limit the depth you can comfortably handle. However, numbing itself doesn’t add a collagen benefit. Microneedling can stimulate collagen with or without anesthetic.
There’s also a practical trade-off. Skipping numbing cream saves application time, while using it may make the procedure more comfortable. A dermatologist suggests a lighter application or shorter application time to limit possible effects on circulation while keeping the session tolerable. Follow the product directions and the practitioner’s instructions rather than adjusting use on your own.
Some topical anesthetics can sting or burn where applied. They may also affect small skin capillaries and change how likely they are to bleed. These effects differ from the needle sensation itself, so mention any previous reactions or sensitivity before the procedure begins.
Excessive use can cause systemic toxicity. Possible warning signs include agitation, elevated blood pressure, heart rhythm disturbances, and muscle twitching. Allergic reactions can remain localized or become widespread, including anaphylaxis. Use only as directed, and seek urgent medical help for severe or rapidly worsening symptoms.
Evidence about numbing and results points in more than one direction. Some dermatologists favor numbing because greater comfort may allow a more intensive session. Others note that numbing doesn’t change the controlled skin response intended to stimulate collagen. Practical effects on circulation and results are usually considered minimal.
For microneedling without numbing cream, device speed and depth can be adjusted to support comfort. If you’re comparing equipment for a procedure, explore microneedling tools and supplies as one part of understanding the setup. The decision about anesthetic should account for comfort, product directions, and the planned procedure.
A study of microneedling for stretch marks reported that the procedure was safe and effective without topical local anaesthetic, and that patients tolerated it well.
Expected timeline for results
Visible changes from microneedling may begin within 4-6 weeks, while a fuller assessment takes longer. Separate early impressions from progress across a planned series.
Progression of results
Progress means noticing gradual changes over time, rather than expecting a dramatic shift after one appointment. This distinction helps you judge your skin against a realistic timeline and avoid changing your routine based on a single early impression.
Results may begin to appear within 4-6 weeks, and optimal results are reported over multiple sessions. At least 3 microneedling treatments are normally advised for the best results. Your response depends on the concern being addressed and the plan for your skin, so use the recommended course as context rather than expecting identical progress from every session.
One example describes six treatments once a month over six months for a pictured patient. That schedule illustrates one course, not a promise or universal calendar. Visible progress is assessed over a series, with time between sessions to observe changes before the next appointment.
Recovery after treatment
Here, recovery means the time between an appointment and your next opportunity to assess longer-term changes. Keeping those stages separate matters because an immediate impression can distract from gradual progress across the full course.
Rather than judging the results after every appointment, choose a consistent point in your course to review changes. Keep a brief log of the skin concern you’re monitoring and note what you observe between visits. This gives you a clearer comparison than relying on memory or comparing different concerns at different stages.
For example, if you’re tracking acne-scar appearance, focus your notes on that concern instead of adding unrelated goals midway through the series. Use the same description each time, such as whether the area looks smoother or unchanged. Consistent observations make gradual patterns easier to recognize without treating one session as the final measure.
Plan your expectations around the full course, not a single calendar date. Results may start within 4-6 weeks, while optimal results are reported over multiple sessions. A course may include at least 3 treatments, and one described example spans six monthly sessions. Keep your assessment tied to your own planned series and the specific concern you’re monitoring.
What microneedling without numbing cream involves
Yes, professional microneedling in the United States can be performed without numbing cream. Microneedling without numbing cream means the practitioner proceeds without first applying a topical anesthetic, while adapting the device and treatment plan to your comfort.
There isn’t one needle depth for every session. The appropriate setting depends on the treatment area, skin concern, device, and your comfort during the procedure. A professional adjusts these factors rather than choosing a depth solely because numbing cream is absent.
Device type also changes the depth available. Professional microneedling tools can penetrate about 6 times deeper into the skin than at-home devices. That difference is one reason an at-home setting should not be treated as interchangeable with a professional treatment plan.
Preparation starts before the device touches your skin. Cleanse thoroughly before treatment to remove makeup, oil, and dirt. Avoid retinoids, AHAs, BHAs, and strong exfoliants for 24 hours before treatment. These steps help limit extra irritants around the planned procedure.
Tool cleanliness matters, too. Thoroughly clean the microneedling tool before use, following the device’s directions. Don’t assume a clean-looking cartridge or device is ready without proper preparation. The treatment area, device, and technique all contribute to the overall experience.
During a professional session without anesthetic, the practitioner can modify device speed and depth to make the procedure more comfortable. Clearly communicate if a pass feels difficult to tolerate. Adjusting the settings may be more appropriate than continuing at the same pace or depth despite discomfort.
Microneedling may be performed around the eyes and mouth with the right device, but those areas can’t be treated as deeply as the cheeks. The skin there is thinner, so treatment depth must account for location. This is another reason one depth number can’t describe every facial area.
The practical takeaway: preparation, device choice, treatment area, and comfort all shape a session without numbing cream. The absence of anesthetic doesn’t determine a universal depth or technique. For at-home use, follow the device directions and keep the intended setting distinct from professional tools that can reach about 6 times deeper.
Give skin cleansing a deliberate place in preparation, rather than treating it as a last-minute formality. The aim is to remove oil, dirt, and makeup thoroughly before microneedling. Take care to address the full area intended for treatment, and do not leave any of those substances in place simply because the skin appears clean at a glance. A considered cleanse keeps the preparation focused on the skin itself, before attention turns to the device, settings, and treatment area. If you are unsure whether you have cleansed thoroughly, return to that basic step before proceeding. This is a straightforward part of preparing for microneedling, whether the session includes numbing cream or not.
Bruun Beauty: Advanced Microneedling Serum SD - Control Salmon DNA Ampoule Serum
Advanced Microneedling Serum SD - Control Salmon DNA Ampoule Serum is one serum option for your skincare routine. Its name identifies it as a Salmon DNA ampoule serum, but follow the product directions and your practitioner’s guidance on when to use it after a procedure.
When choosing products around microneedling, focus on gentle care and avoid adding active formulas simply to speed visible changes. A serum is a product choice, not a substitute for appropriate technique or aftercare. Read the directions before use, especially if your skin feels sensitive after a session.
Explore the serum details, or visit Bruun Beauty to learn more about its skincare offerings.
Choose a Comfortable, Thoughtful Next Step
Let your comfort guide the conversation before your next appointment. Tell your practitioner which sensations you can manage, which areas feel most sensitive, and whether you’d like to discuss numbing options. That input helps shape a session around your needs instead of treating one setting as right for everyone.
If you’re considering microneedling without numbing cream, focus on a balanced plan, not on proving you can tolerate discomfort. Keep your skincare routine simple and follow directions for post-procedure use. A calm, consistent approach can help you care for your skin as you work toward a fresh, nourished look.
Explore microneedling tools and skincare products to support your next step.
Keep your goals realistic, your routine gentle, and your next step grounded in what feels right for you.
Frequently Asked Questions
Is topical numbing cream essential when microneedling?
No, numbing cream isn’t essential for microneedling. It can reduce sensation, but the procedure can still stimulate collagen without it. Your decision may depend on your comfort, the treatment area, and the planned device settings. If you use a topical anesthetic, follow its directions carefully and tell your practitioner about any previous reaction to numbing products.
Should you numb your skin before microneedling?
Choose based on how you respond to discomfort and the planned session. For example, if needle sensations make you tense or interrupt the procedure, numbing may make the experience easier to manage. If you prefer to skip it, discuss that choice beforehand so the practitioner can plan around your comfort rather than assume you want the deepest setting.
What is microneedling without numbing cream?
It’s a microneedling session performed without first applying topical anesthetic to reduce sensation. You can still feel the device as it passes over the treatment area. The practitioner can adapt the technique to your comfort, and you can speak up if a particular area feels difficult. It describes a preparation choice, not a different type of microneedling device.
Is microneedling painful without numbing cream?
It can feel uncomfortable, but the sensation isn’t the same for everyone. You might notice prickling, stinging, or pressure as the device moves across different areas. For instance, one cheek may feel manageable while a more sensitive area feels sharper. Tell the practitioner what you feel during the session so they can adjust their approach.
How painful is microneedling without numbing cream on a 1-10 scale?
There isn’t a reliable single 1-10 score that describes everyone’s experience. Pain ratings are personal, and the same person may rate cheek treatment differently from treatment near the mouth. Rather than relying on someone else’s number, describe the sensation in real time, such as mild prickling or pain that makes you want the practitioner to pause.
What factors affect pain during microneedling without numbing cream?
Comfort can vary with the treatment area, device speed, needle depth, and your individual sensitivity. A faster pass or an intense setting may be harder to tolerate than a slower, shallower approach. Sensation can also vary across the face during one appointment. Sharing which areas feel most sensitive gives the practitioner useful, specific feedback.
How does microneedling without numbing cream compare with numbing cream for comfort and results?
Numbing cream generally makes a session more comfortable, while skipping it avoids the application time. Both approaches can support collagen stimulation, since numbing cream isn’t required for that response. Greater comfort may allow a more intensive session, but a deeper setting isn’t automatically the right choice. The useful comparison is how your comfort and the planned treatment approach fit your needs.
How can you reduce discomfort during microneedling without numbing cream?
Before the appointment, tell the practitioner about your sensitivity and any areas you expect to find uncomfortable. During the session, speak up if a pass feels too intense so the device speed or depth can be adjusted. Don’t apply extra anesthetic yourself. Clear communication helps the practitioner respond to your comfort without guessing.
Your Ultimate Dr. Pen Needle Depth Chart: A Safe Guide to Professional Results
Your Ultimate Dr. Pen Needle Depth Chart: A Safe Guide to Professional Results
Related Posts

Consistent Microneedling and the Long-Term Changes to Expect

Aftercare choices to lower infection risk at home after microneedling

How to Create a Relaxing At-Home Spa Day With Simple Rituals

Sunscreen Recommendations After Microneedling: How to Protect Healing Skin

Investing in my skin for the future: what deserves my budget

Post-microneedling skincare routine for masks, makeup, and recovery

Skin Peeling After Microneedling: What to Avoid and When to Resume Makeup
