

Complete Dr Pen M8 Instructions: Guide for Success
A careful microneedling routine starts with a well-planned setup and consistent technique. To follow the Dr. Pen M8 instructions for use, choose a compatible cartridge, select settings suited to the treatment area, and follow the device’s model-specific directions. Leave 4 to 6 weeks between sessions.
It’s understandable to focus on how to operate the pen, but setup and aftercare matter, too. This guide covers cartridge handling, needle-depth selection, device controls, session spacing, and how to support your skin after treatment.
You’ll also learn how to keep your technique controlled and what to prioritize in your post-treatment routine. Whether you’re an experienced esthetician or an advanced at-home user, these steps can help you build a more informed, consistent routine while keeping the M8’s own instructions central.
Key Takeaways
- Choose a fresh cartridge that matches your exact Dr. Pen model, and handle it carefully when attaching it.
- Use the M8’s controls according to its model-specific instructions, adjusting your approach to the treatment area.
- Plan sessions with adequate recovery time between them, and prepare your skin with a simple, gentle routine.
- After treatment, focus on hydration and moisturizer, and be mindful of sun exposure and products that may irritate freshly treated skin.
- Follow the device instructions and aftercare guidance to support a consistent routine between sessions.
Cartridge handling and needle-depth selection
Choose a fresh cartridge compatible with your exact Dr. Pen model, then follow that model’s directions for settings and treatment areas. Check cartridge condition and plan session spacing before you start.
-
Check Cartridge Compatibility
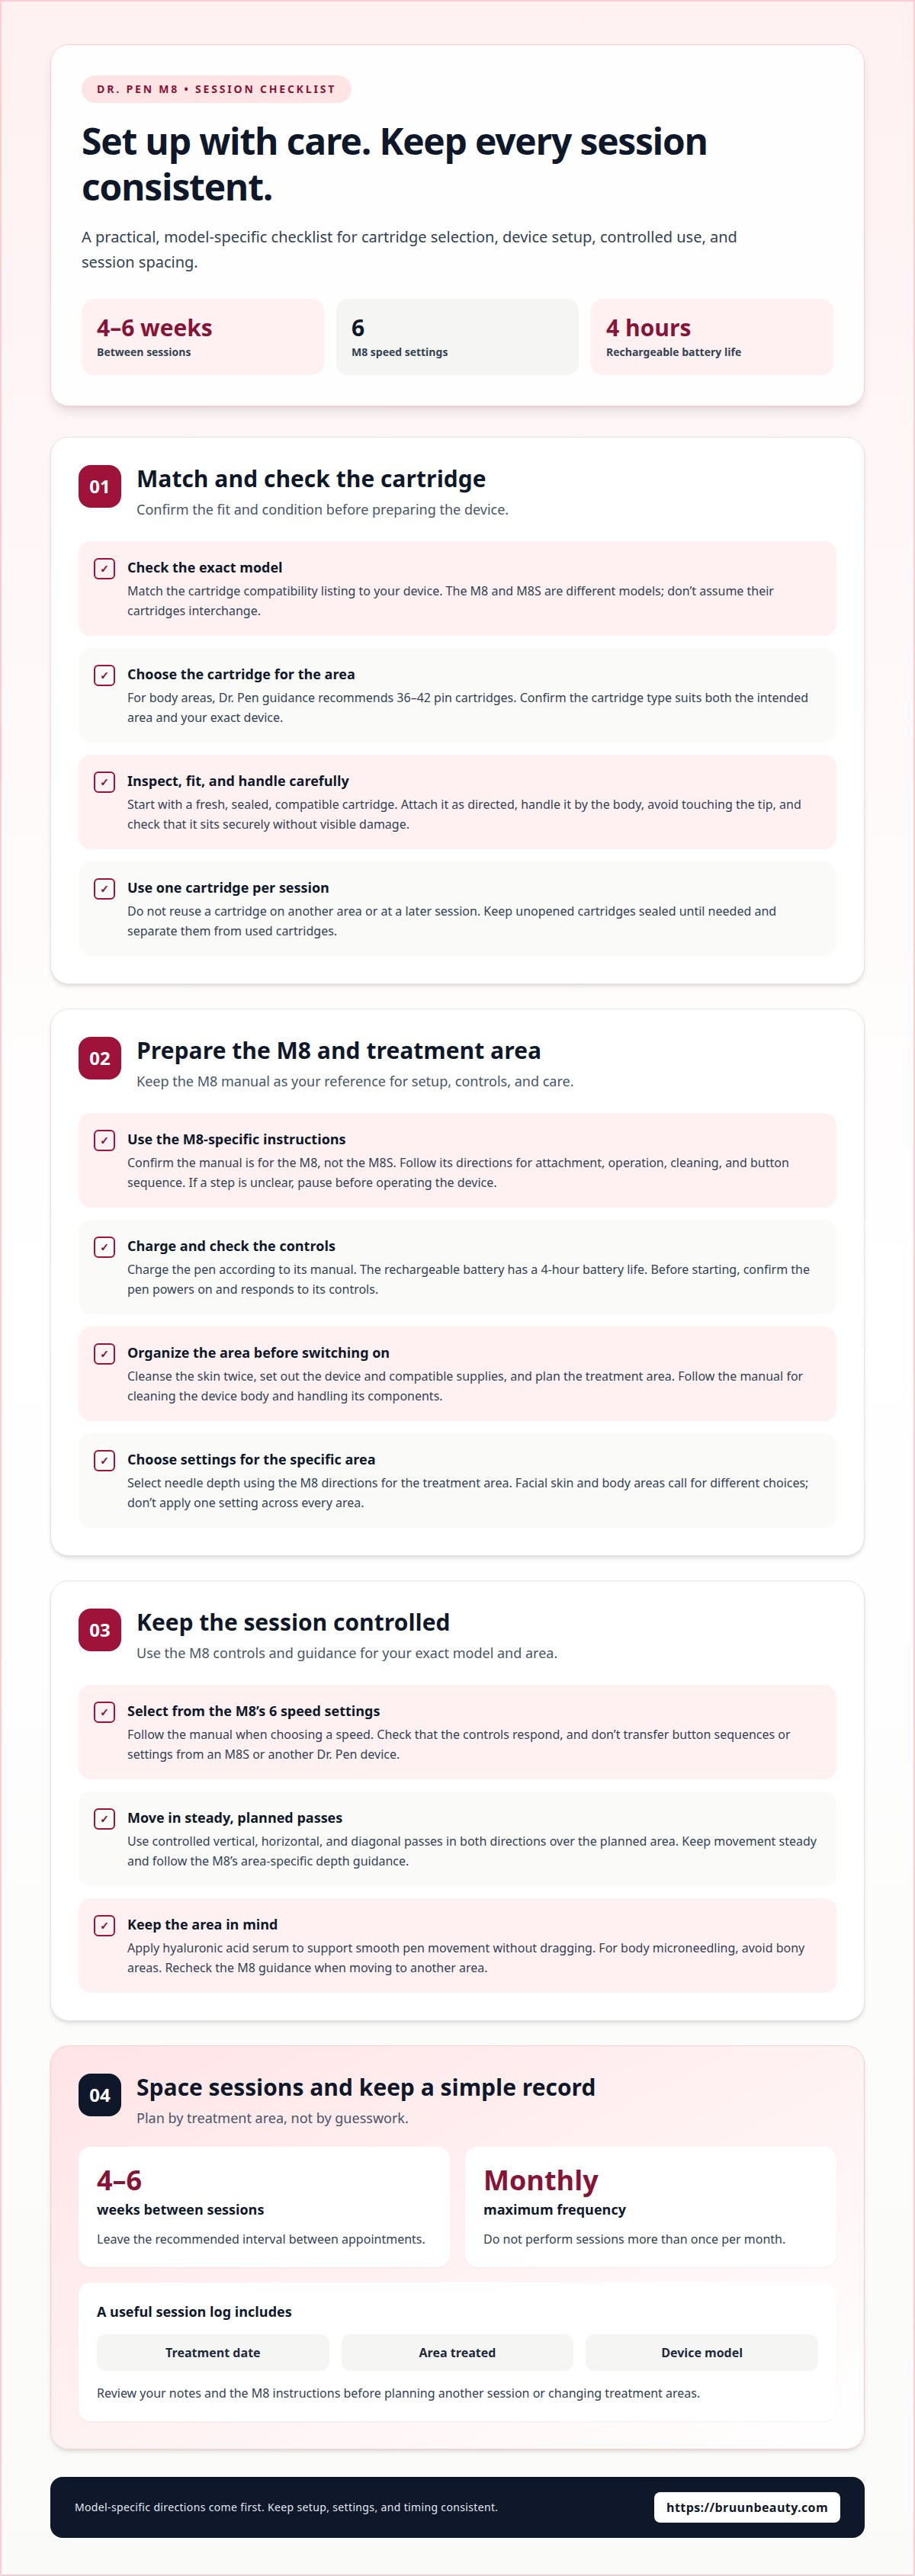
Start by matching the cartridge to your exact device model. Dr. Pen M8 and M8S are different models, so don’t assume their cartridges interchange. Compare the model name against the cartridge’s compatibility listing before opening the package. For body areas, Dr. Pen guidance recommends 36-42 pin cartridges; choose the cartridge type for your intended area and device.
Choose a fresh, sealed cartridge clearly marked as compatible with your model. If the package is open or the model listing doesn’t match, set it aside rather than guessing. These checks help you avoid using a cartridge not designed for your pen. Keep the model name in view while selecting supplies.
-
Fit and Check the Cartridge
Attach a compatible cartridge according to the instructions for your specific Dr. Pen model. Avoid touching the cartridge tip while fitting it. Check that it sits securely and that its package was sealed before opening. Don’t force a cartridge that resists fitting; first recheck the model match and attachment directions.
Handle the cartridge by its body as you prepare the device. Before starting, check for visible damage or a loose fit. Use a fresh cartridge for one treatment session only, not for another area or a later date. Keep unopened cartridges sealed until needed.
-
Select the Needle Depth
Choose the needle-depth setting using the instructions for your exact device and treatment area. The M8 has an adjustable range, but that doesn’t mean every setting suits every area. Follow the relevant model guidance rather than selecting a setting simply because it is available. Facial skin and body areas call for different choices.
Don’t apply one setting across the face and body. Consider the area you plan to treat, then follow the M8 directions for that area. If you move between areas during a routine, pause to make sure your device settings still match the instructions for the next area.
-
Review Cartridge Frequency and Reuse
Use each cartridge for one treatment session, then dispose of it. Don’t reuse it, even on a different area or at your next appointment. Start the next session with a fresh cartridge. Keeping unopened cartridges separate from used ones helps prevent mix-ups while preparing supplies.
Plan microneedling sessions 4 to 6 weeks apart, and don’t perform them more than once per month. Leave the recommended interval between appointments instead of scheduling based only on how your skin looks immediately afterward. If you’re planning a series, record each treatment date and area before choosing the next session.
Device controls and model-specific instructions
Set up the M8 using its model-specific directions, then prepare your treatment area before operating it. Use the manual as your reference for setup, controls, and care.
-
Consult the M8 Instruction Manual
Use the official Dr. Pen M8 instruction manual PDF for setup and operation. Confirm it identifies the M8, not the M8S, since model controls can differ. Keep it nearby while preparing the pen and follow its steps for attachment, operation, and cleaning. The Dr. Pen M8 instructions for use should guide your decisions, rather than directions for another model.
Follow the manual’s button sequence instead of guessing. If a step is unclear, pause before operating the device.
-
Charge and Check the Device
Charge the M8 according to its model instructions before treatment. Its rechargeable battery has a 4-hour battery life. Follow the manual for charging time, since the device directions determine the proper charging process. Before starting, confirm the pen powers on and responds to its controls.
If the device won’t start, review the charging and startup steps. Check the power connection and confirm the pen has charged. If the controls still don’t respond, stop and consult the M8 instructions instead of forcing the device or continuing with treatment.
-
Prepare the Device and Treatment Area
Prepare the area before operating the pen. Cleanse the skin twice, then set out the device and compatible supplies. Follow the M8 manual for cleaning the device body and handling its components. Keep the device’s cleaning directions separate from cartridge disposal instructions.
Plan the treatment area before switching on the M8. Apply hyaluronic acid serum to support smooth pen movement without dragging. For body microneedling, avoid bony areas. These preparation steps help you organize the session before using the controls.
-
Use the Device Controls
Turn on the M8 and select from its 6 speed settings according to its manual. Confirm that the controls respond before placing the pen on skin. Use the instructions for your exact model; don’t transfer button sequences or settings from an M8S or another Dr. Pen device.
For face and body, move in controlled passes, vertically, horizontally, and diagonally in both directions. Keep movement steady over the planned area, and follow the model’s depth guidance rather than using one setting everywhere. A microneedling skincare routine can complement a consistent setup.
Recommended time between microneedling sessions
- Use a calendar to plan sessions by treatment area instead of relying on one vague reminder. Record the area treated, such as your face, legs, or scalp, along with the date and device model. This helps you distinguish areas and review your routine before planning another session.
Keep the M8’s instructions alongside your notes. If you change the treatment area, review the directions for that area instead of assuming your previous plan applies. A clear record helps you stay consistent without adding extra sessions simply because a date is open.
- Before each session, decide which area you’ll treat and what your routine will include. Set out your supplies and keep the treatment plan focused on that area. For body sessions, avoid bony areas as directed. Mapping the area beforehand can help you plan controlled passes without extending treatment to unintended spots.
Keep a separate note of changes to your routine, such as switching from face to body. This lets you review what you did previously without relying on memory. Keep preparation practical and follow the device instructions for the selected area.
- Keep post-session skincare gentle and avoid introducing new active products during the immediate aftercare period. If your routine includes exfoliating formulas, strong acids, or retinoids, set them aside and choose simple hydration instead. This builds on the aftercare steps covered earlier without adding unfamiliar products or extra layers.
Before your next session, review the products you used and note any that felt uncomfortable. Keep the record factual, noting the product name and when you applied it. A simple log can help make your routine more consistent from one session to the next.
- Treat scalp microneedling as a separate routine from facial or body sessions. Microneedling does not determine the cause of hair loss or guarantee hair growth. Don’t increase needle depth or session frequency in pursuit of a stronger result. Follow the device instructions for the scalp and record the area and settings used.
If hair loss is your main concern, don’t treat a pen session as a substitute for understanding what may be contributing to it. Keep expectations grounded, use the device only as directed, and don’t change your schedule based on a hoped-for outcome. Scalp and skin routines each deserve a thoughtful plan.
Before a session, the Dr. Pen guide recommends cleansing the skin twice. The Dr. Pen UK guide advises avoiding anti-inflammatory medication, alcohol, and fish oil tablets for 3 days before microneedling to minimize bleeding; it recommends leaving numbing cream on for 20 minutes, then removing it thoroughly. The Dr. Pen guide also recommends hyaluronic acid serum to help the pen glide without dragging, and moving it vertically, horizontally, and diagonally in both directions. For fattier body areas, it recommends a needle depth of up to 1.5 mm.
Using skincare products after treatment
Keep post-treatment care simple: follow the first-day restrictions, then return to gentle cleansing and moisturizing. Take care to limit sun exposure during the week after microneedling.
- Set aside makeup, exercise, and activities that cause sweating for 24 hours after microneedling. This gives you a clear window for uncomplicated aftercare. For example, plan a workout or makeup application for the following day, not immediately after your session. Avoid adding extra skincare steps during that first 24-hour period.
Keep the timing simple: note when treatment ends, then count 24 hours before resuming those activities. If you treated your face, remember that foundation and other makeup count too. Avoid scheduling a session just before an event that requires makeup or strenuous activity.
- Wait 24 hours before washing your face, then use a gentle cleanser and nourishing moisturizer. Choose familiar, mild products rather than experimenting with a new routine. Apply moisturizer without adding exfoliating steps, and keep the cleanser gentle instead of scrubbing the treated area.
After the first wash, continue focusing on hydration and moisture. Dr. Pen guidance advises avoiding active ingredients, acids, scrubs, and toners after treatment. Set aside exfoliating toners and acid products rather than layering them with moisturizer. A shorter routine makes it easier to avoid accidentally adding an active formula.
- Limit direct and prolonged sunlight for up to 1 week after microneedling. Plan outdoor time around shade where possible, and use clothing that covers the treated area. For facial treatment, a hat can provide a practical barrier during time outdoors. Avoid planning extended sun exposure during this period.
Consider the full week after treatment when choosing your session date. A beach day or lengthy outdoor event may make another date more convenient. The aim is to reduce direct, prolonged exposure, not to compensate with extra skincare products or more frequent cleansing.
- Build a simple routine for the days after treatment, and keep it consistent. For example, use a gentle cleanser and nourishing moisturizer after the first 24 hours, while avoiding acids, retinoids, scrubs, and toners. Don’t restart several active products at once; keep the routine focused on hydration and moisture.
Make a short aftercare note with the treatment date, the time your first wash is due, and the end of the sun-exposure window. These reminders help you follow the 24-hour and 1-week guidance without guessing. Choose products based on gentle hydration, not exfoliation.
Bruun Beauty
Bruun Beauty offers skincare and equipment to complement a thoughtful microneedling routine. When choosing products or a device for home use or professional practice, consider how each item fits your routine and treatment plan, and follow the manufacturer’s instructions. Product selection can support your setup, but it doesn’t replace model-specific directions or careful aftercare.
Bruun Beauty offers DR. PEN Microneedling Devices. Use the instructions for your exact model to guide cartridge compatibility, controls, and operation. A product name alone doesn’t determine which settings or cartridge to use. Match the device to its own directions, then plan treatment areas and session spacing before you begin.
Skincare is another part of your overall routine. Bruun Beauty offers Advanced Microneedling Serum SD - Control Salmon DNA Ampoule Serum. Consider it as a skincare option and follow its product directions alongside your device instructions. Keep your routine focused by choosing products intentionally rather than adding several new formulas at once.
Bruun Beauty also offers Jelly Mask Kits and BB Glow Treatment Supplies. These are separate product categories, so choose them according to the service or skincare routine you’re planning. Don’t assume every product is appropriate immediately after microneedling. For post-treatment care, prioritize the gentle, hydrating approach described earlier and follow the relevant directions for each product.
A simple way to decide what fits is to separate your choices into three questions:
- Device: Which DR. PEN Microneedling Device matches your intended use and model instructions?
- Skincare: Which product fits the routine you’re building without adding unnecessary steps?
- Timing: Does the product suit the stage of your routine, especially during aftercare?
For licensed estheticians and spa or clinic owners, this approach helps keep device selection separate from skincare planning. For advanced at-home users, it offers a practical way to choose equipment and products without treating a purchase as a substitute for technique. In either setting, the device manual remains the reference for operating the pen.
Bruun Beauty is a useful next step when you’re ready to explore microneedling equipment and skincare options in one place. Review the product details and choose items that fit your routine and the instructions you’re following. A considered setup starts with a compatible device, clear directions, and products chosen for a purpose, not a crowded regimen.
For questions about Bruun Beauty’s products, contact Bruun Beauty.
Make Your Next Session More Intentional
Make your routine repeatable rather than a series of guesses. Before your next session, record the treatment area, device settings, products used, and how your skin responds afterward. These notes can help you spot patterns and make thoughtful adjustments while keeping your approach consistent.
Keep the Dr. Pen M8 instructions for use as your reference whenever you change your setup. If you’re still building your routine, choose products that fit the steps you’ve planned rather than adding items without a clear purpose. A calm, considered approach supports confident decisions at home or in a professional setting.
Explore options to complement your microneedling routine and support your next step.
Stay thoughtful, keep your routine consistent, and give your skincare practice room to grow.
Frequently Asked Questions
How do you assemble and operate the Dr. Pen M8 microneedling pen?
Follow the M8 manual to attach the cartridge and operate the controls. Before starting, confirm that the cartridge matches the device and that it sits securely. A useful setup habit is to place the manual beside your supplies, then follow its steps in order. Don’t rely on instructions for another Dr. Pen model, even if its design looks similar.
How do you adjust needle depth and speed on the Dr. Pen M8?
Use the M8’s controls and manual to choose depth and speed for your treatment area. The pen has six speed settings, but that doesn’t mean every setting suits every area. Avoid copying a setting from another model or using one approach across your face and body. Keep your selection tied to the M8 instructions and the specific area you plan to work on.
How do you replace and install Dr. Pen M8 needle cartridges?
Switch off the device and follow the M8 manual’s cartridge attachment directions. Choose a fresh cartridge that’s listed as compatible with the M8, then handle it by its body during installation. Avoid touching the tip or forcing a cartridge that doesn’t fit smoothly. After your session, remove and discard the cartridge rather than storing it with your device.
How often can you use the Dr. Pen M8 at home?
At home, schedule microneedling no more than once per month, allowing 4 to 6 weeks between sessions. Use a calendar to record the date and treatment area, especially if you alternate between your face and body. Don’t add an extra session because you’re preparing for an event. Follow the model directions and leave time between planned appointments.
What needle depth should you use on different areas?
There isn’t one setting for every area. Follow the M8 instructions for your specific treatment area, and don’t carry a face setting over to your legs or other body areas. The device’s adjustable range isn’t a recommendation to use every setting. If the manual doesn’t give you clear direction for your intended area, don’t guess or increase the setting.
How do you prepare for a Dr. Pen M8 session?
Choose a time when you can follow your planned routine without rushing. Keep the M8 manual beside your supplies, confirm that your cartridge matches the device, and follow the model-specific setup directions. Use a calendar to note the session date and treatment area, so you can keep track of your routine and planned appointments.
Can Dr. Pen M8 needle cartridges be reused?
No. Use a cartridge for one session only, then discard it. Don’t clean or save it for another treatment area, another person, or a future appointment. For your next session, start with a fresh cartridge that matches the M8. This keeps your setup straightforward and avoids confusing a previously used cartridge with an unopened one.
Dr. Pen M8 official instruction manual PDF
Use the official Dr. Pen M8 instruction manual PDF, and confirm it identifies the M8 rather than the M8S. Follow its model-specific setup, operation, and cleaning directions.
Cica vs Niacinamide for Redness: Which Calms Skin Faster
Cica vs Niacinamide for Redness: Which Calms Skin Faster
Related Posts

Cica vs Niacinamide for Redness: Which Calms Skin Faster

PDRN Benefits for Skin: Regeneration, Results and Safety

How to Dispose of Used Microneedle Cartridges Safely

Self-care rituals for better skin through mindful daily habits

How to Explain Microneedling Benefits for Skin and Scars

How to use a Korean 10-step skincare routine for hydration
