

Microneedling Healing Process Day by Day: Your 2026 Recovery Guide
What if that tight, flushed sunburn sensation looking back at you in the mirror isn't a sign of damage, but proof of cellular renewal? Understanding the microneedling healing process day by day removes the guesswork, showing you exactly how fresh microchannels transform into radiant, plump skin. According to clinical dermatology reviews, roughly 80% to 85% of visible social recovery wraps up within just 48 to 72 hours.
You probably expected some mild redness, but the sudden heat and sandpaper-like dryness can make anyone second-guess their routine. Your skin renewal thrives on proactive, supportive hydration rather than passive waiting, and using the right ingredients at the right hour changes everything.
In this recovery guide, you'll discover exactly what visual symptoms to expect from Day 1 through Day 7, alongside safe formulas that comfort your barrier and enhance your results. We'll map out each daily milestone, detail ingredient do's and don'ts, and reveal the exact timeline for resuming makeup, workouts, and sunshine with total confidence.
Key Takeaways
- Understand the underlying biological phases that guide your skin from initial redness to deep structural renewal.
- Track the microneedling healing process day by day to spot normal shifts in texture, tightness, and tone.
- Avoid harsh active ingredients, heavy sweating, and direct UV rays during the critical early recovery window.
- Soothe your skin's moisture barrier with pro-grade hydrators like Salmon DNA ampoules and cooling alginate jelly masks.
- Maximize long-term collagen synthesis by maintaining strict four to six-week spacing between your sessions.
Understanding the Microneedling Recovery Stages: What Happens Beneath Your Skin
The microneedling recovery process is your skin's innate response to controlled physical microchannels. When micro-fine needles gently pierce the stratum corneum, your tissue does not simply sit idle. It activates a coordinated cascade of growth factors and cellular signals designed to renew your complexion from the inside out. Following the microneedling healing process day by day means understanding the precise biological events taking place beneath your surface.
The Three Biological Phases of Post-Needling Renewal
Every session of collagen induction therapy sets off three distinct, overlapping physiological stages:
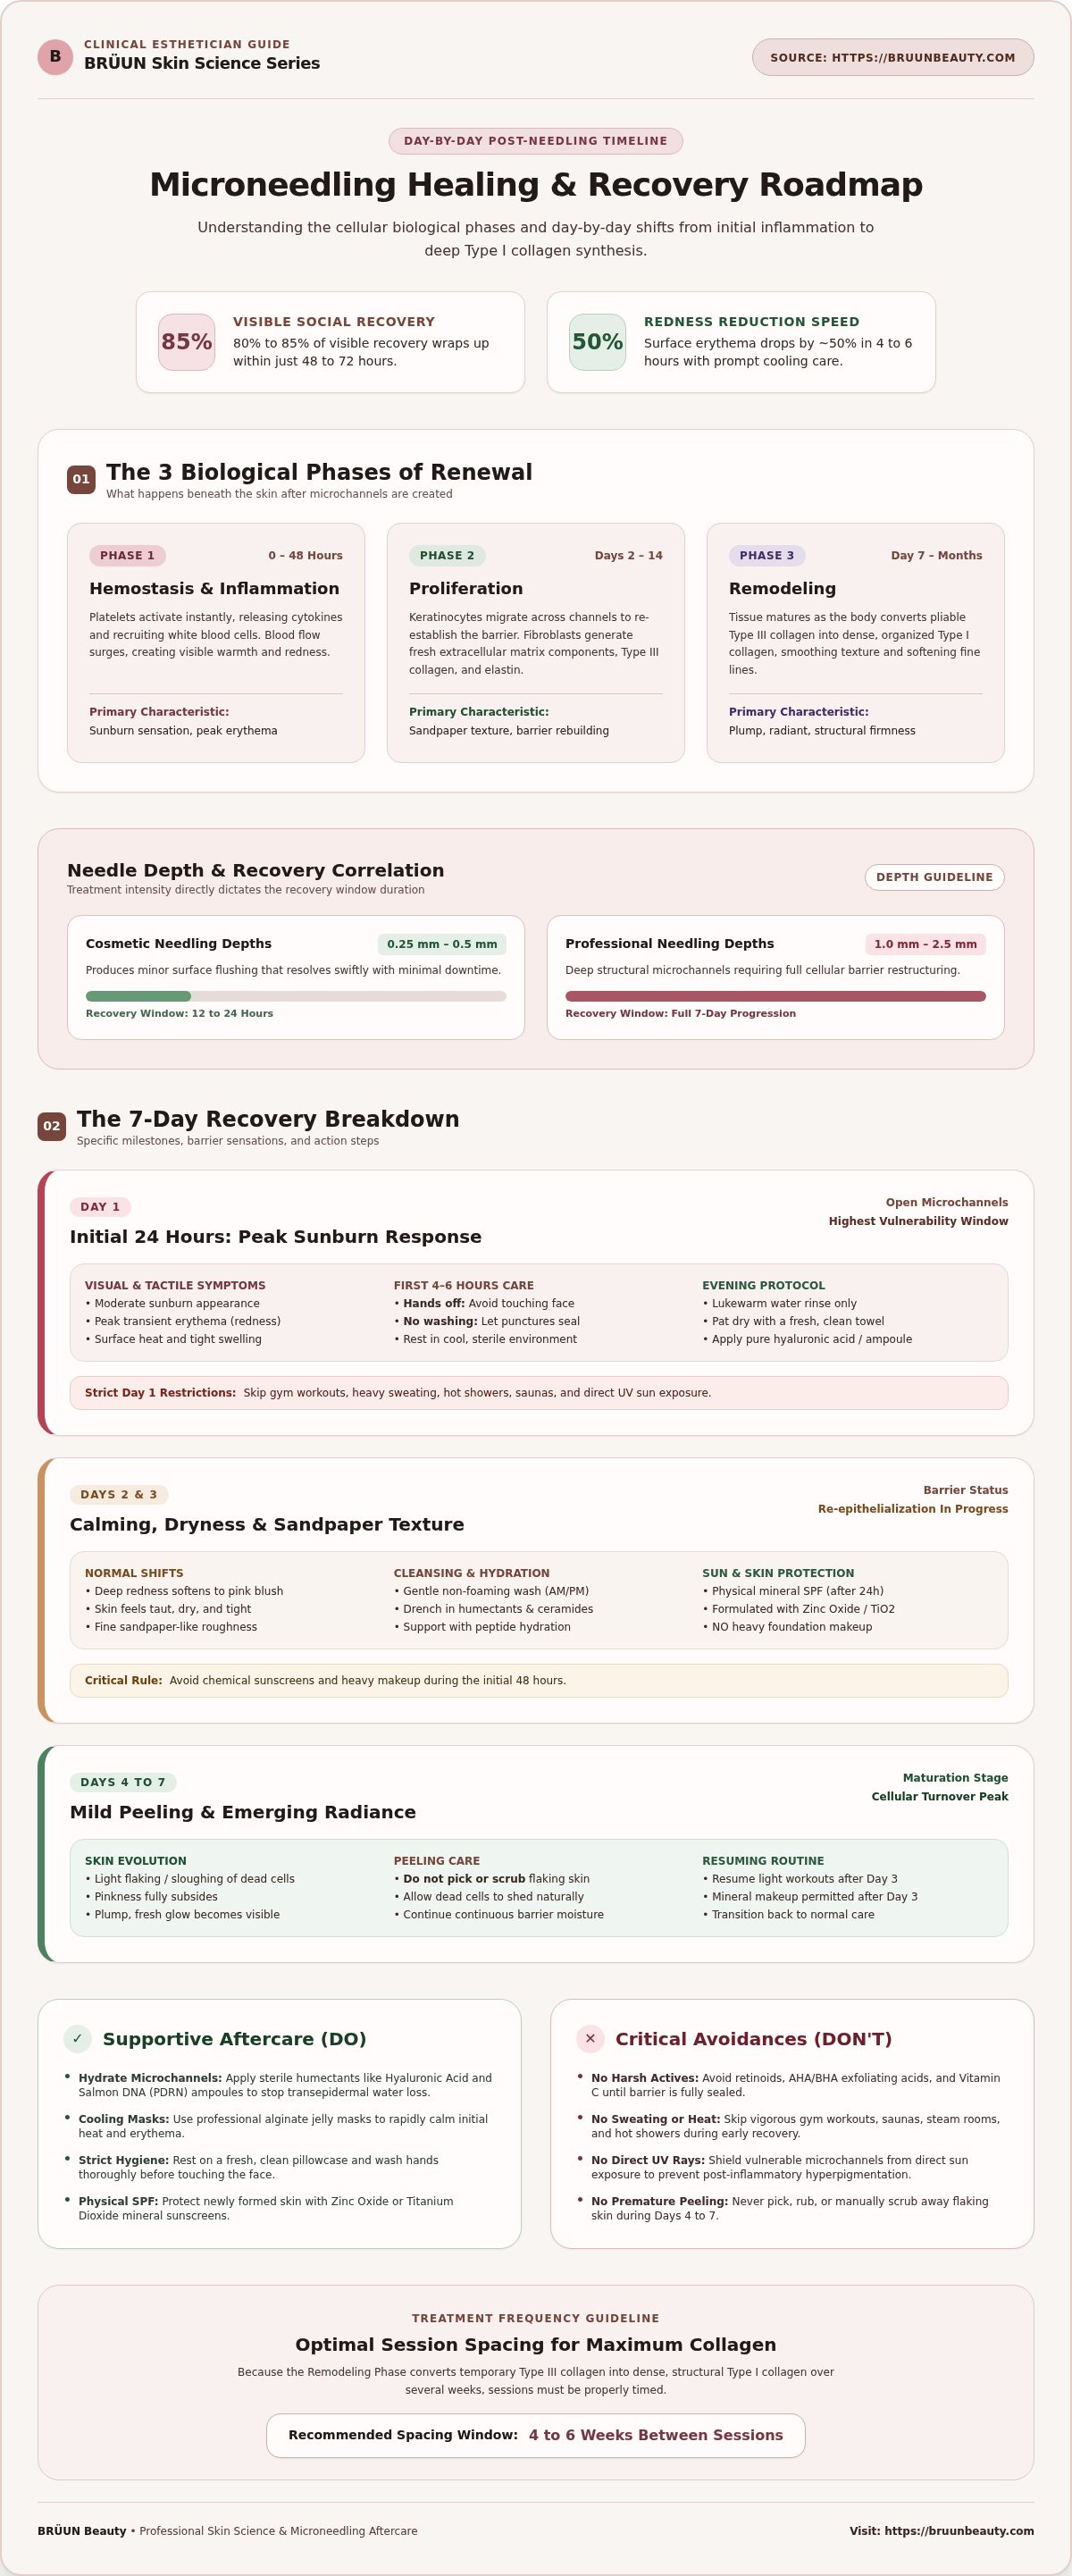
- Phase 1: Hemostasis and Inflammation (0 to 48 Hours): Platelets activate instantly, releasing cytokines and recruiting white blood cells. This initial surge increases blood flow to support the skin surface, bringing visible warmth and erythema (redness).
- Phase 2: Proliferation (Days 2 to 14): Keratinocytes migrate across the microchannels to re-establish your protective barrier, while fibroblasts produce fresh extracellular matrix components, including temporary Type III collagen and elastin fibers.
- Phase 3: Remodeling (Day 7 to Several Months): The newly formed tissue matures. Your body gradually converts pliable Type III collagen into dense, organized Type I collagen, smoothing uneven texture and softening fine lines over time.
Why Microchannels Require Deliberate, Gentle Protection
Those thousands of microscopic punctures remain open for several hours after a session, dramatically boosting the absorption of topical solutions. While this makes it the perfect moment to nourish the skin, it also leaves your barrier temporarily compromised. Harsh chemicals, airborne bacteria, and dirty phone screens can quickly trigger unwanted irritation or granulomas if they enter open pores.
You can protect these vulnerable pathways by practicing strict hygiene and applying sterile formulas. Washing your hands thoroughly before touching your face and resting on a fresh pillowcase keeps your developing skin cells shielded. Layering pure humectants like hyaluronic acid or specialized Salmon DNA ampoules restores vital hydration and halts transepidermal water loss. By intentionally supporting this delicate window, you allow your skin to move smoothly through each phase of the microneedling healing process day by day, setting the stage for a plump, radiant outcome.
Microneedling Healing Process Day by Day: Your 7-Day Timeline
Every recovery journey follows a predictable biological rhythm. Tracking the microneedling healing process day by day lets you distinguish between healthy inflammatory responses and steps that require extra hydration. Depth choices play a role here; cosmetic depths of 0.25 mm to 0.5 mm create minor flushing that fades within 12 to 24 hours, while professional depths from 1.0 mm to 2.5 mm involve a full week of visible shifts.
Day 1: The Initial 24 Hours Post-Treatment
Your complexion will look and feel like it has a moderate sunburn. Transient erythema, mild puffiness, and skin tightness peak during these initial hours. Research from the National Institutes of Health confirms that surface redness drops by roughly 50% within 4 to 6 hours when supported by prompt cooling.
- First 4 to 6 Hours: Keep your hands off your face. Avoid washing entirely to let initial micro-punctures seal undisturbed.
- Evening Routine: Rinse gently using lukewarm water only. Pat dry with a fresh towel and apply sterile, pure hyaluronic acid or a gentle ampoule.
- Strict Boundaries: Skip gym workouts, hot showers, saunas, and direct sun exposure.
Days 2 to 3: Calming and Tightness
Waking up on day two brings noticeable relief. As detailed in the Cleveland Clinic's guide to microneedling, deep redness normally softens into a mild pink blush within 24 to 48 hours. Your skin may feel taut, dry, and slightly rough to the touch, resembling fine-grit sandpaper.
Cleanse morning and night using a gentle, non-foaming wash. Drench the barrier in humectants, ceramides, and peptides to ease tightness. Avoid heavy foundations or chemical sunscreens; after 24 hours have passed, protect your skin using a physical mineral SPF with zinc oxide or titanium dioxide.
Days 4 to 7: Mild Peeling and the Emerging Glow
Around days four and five, accelerated cell turnover brings delicate micro-flaking (desquamation). Never pick, scrub, or peel these loose flakes, as forced peeling risks post-inflammatory hyperpigmentation. Continuous, soothing hydration keeps the flaking soft and manageable.
By days six and seven, peeling wraps up completely. Microchannels are fully sealed, the barrier is reinforced, and your face reveals a refreshed, radiant luminosity with visibly refined texture. Once you see that healthy glow emerging, explore professional-grade solutions within the BRÜUN microneedling essentials collection to keep supporting your skin's ongoing transformation.
Essential Do’s and Don’ts for Your Recovery Journey
Guiding your skin through post-treatment renewal requires equal parts patience and discipline. While the temptation to speed up results is real, applying the wrong product too soon can compromise your barrier and trigger post-inflammatory hyperpigmentation. Staying aligned with the microneedling healing process day by day means knowing exactly what to put on pause and what daily habits keep your skin comfortable.
Ingredients and Activities to Pause Immediately
Your open channels absorb everything with heightened intensity. Potent exfoliants and stimulating actives must stay out of your routine for a minimum of 72 hours, though waiting five to seven full days is ideal for deeper sessions.
- Direct Exfoliating Acids and Retinoids: Set aside glycolic acid, salicylic acid, lactic acid, and prescription retinoids or retinol. These strip vulnerable lipids and disrupt cellular rebuilding.
- Pure L-Ascorbic Acid (Vitamin C): Highly acidic antioxidants can cause severe stinging, irritation, and granulomas in unsealed channels. Reintroduce them around day seven.
- Heavy Sweating and Heat: Skip intense cardio, hot yoga, steam rooms, and saunas for at least 48 hours. Sweat introduces bacteria into micro-punctures and traps heat in already inflamed tissue.
- Direct Sunlight and Chemical Filters: Shield your skin from UV rays completely for the first few days. Keep wide-brimmed hats handy whenever you step outdoors.
Daily Best Practices for Optimal Comfort
Small physical hygiene choices create a safe environment for your skin cells. Checking the FDA guidance on microneedling device safety reminds us that avoiding microbial contamination is vital while the stratum corneum recovers. Simple household habits can make all the difference:
- Fresh Bedding: Slip a clean silk or satin pillowcase onto your pillows before bed on treatment night to minimize friction and bacterial transfer.
- Sanitized Tech: Disinfect your smartphone screen with an alcohol wipe before taking calls, or switch to speakerphone for the first 48 hours.
- Mineral-Only Protection: Beginning on day two, apply a broad-spectrum mineral sunscreen formulated with zinc oxide or titanium dioxide to defend against environmental stress without stinging.
- Clean Application: Wash your hands thoroughly for twenty seconds before applying any hydrators or soothing topicals.
Respecting these essential boundaries keeps your barrier calm and prevents setbacks. By pairing smart hygiene with ingredient discipline, the microneedling healing process day by day feels smooth, predictable, and remarkably rewarding.
Nourishing Aftercare Protocol: Soothing Ingredients for Radiant Results
Passive waiting leaves your skin parched, but deliberate hydration fuels cellular vitality. Because microscopic channels increase transdermal delivery exponentially, the products you apply during the first week dictate how comfortably you recover. Incorporating targeted, biocompatible formulas into the microneedling healing process day by day transforms a tight, tender complexion into supple, dewy glass skin.
The Power of PDRN and Peptide Ampoules
Standard moisturizers often carry heavy mineral oils or emulsifiers unsuitable for open microchannels. Instead, lightweight humectants like multi-molecular hyaluronic acid quench acute thirst, drawing ambient water into the stratum corneum to relieve persistent tightness.
To elevate your results, professional K-beauty protocols rely heavily on polydeoxyribonucleotide (PDRN). Sourced from salmon DNA, PDRN shares remarkable biocompatibility with human tissue, activating adenosine A2A receptors to support natural cell proliferation. Applying a specialized Salmon DNA Ampoule delivers concentrated nucleotides and firming peptides directly where they are needed most. Peptides signal your fibroblasts to fortify the extracellular matrix, helping your skin feel resilient, dense, and deeply replenished.
Soothing Redness with Cooling Jelly Masks
Traditional sheet masks dry out rapidly and frequently contain synthetic preservatives that sting freshly punctured skin. Professional alginate jelly masks create an airtight, vacuum-like seal across your facial contours. This cooling barrier locks in active ampoules, halts transepidermal water loss, and immediately drops surface heat after a procedure.
Spreading a freshly blended mask over your face on day two or day three eases lingering tightness and softens the dry, sandpaper texture before peeling begins. Explore professional, electrolyte-infused treatments in Bruun Beauty's jelly mask collection to calm visible redness and enhance your microneedling healing process day by day.
Maximizing Your Results: Professional Devices and Long-Term Care
A flawless post-treatment glow depends as much on equipment standards and long-term spacing as it does on immediate hydration. While your skin works through the microneedling healing process day by day, underlying cellular remodeling continues for months. Spacing sessions four to six weeks apart respects this natural collagen cycle, giving newly laid Type III fibers ample time to mature into resilient Type I structures without overwhelming tissue defenses.
Selecting Reliable Tools and Sterile Cartridges
Precision technology prevents unwanted trauma. High-performance motorized pens deliver rapid, vertical stamps that enter and exit cleanly without the micro-scratching or epidermal dragging common with manual rollers. Trusted systems like authentic Dr. Pen devices, including models like the A11 and M9, feature high-speed motors reaching up to 18,000 RPM alongside integrated anti-backflow silicone membranes to prevent fluid cross-contamination.
Sterility remains your top safety checkpoint. Always open individually sealed, gamma-sterilized replacement cartridges right before you begin, and discard them immediately after use into a proper sharps container. Reusing or attempting to sanitize single-use needles blunts the fine points and exposes open channels to harmful pathogens.
Maintaining Your Healthy, Nourished Glow Between Sessions
Once you pass the initial seven-day mark, your skin barrier is fully re-established and primed for sustained rejuvenation. Maintaining your new luminosity requires consistent, intentional care:
- Gradual Actives Reintroduction: Reintroduce mild exfoliating acids (like lactic or mandelic) and stabilized vitamin C slowly around day seven to ten, testing tolerance with patch applications first.
- Deep Daily Hydration: Continue layering humectant-rich toners and peptide serums twice daily to support skin density and suppleness between treatments.
- Physical UV Shielding: Keep up daily mineral SPF 30+ applications rain or shine, preventing ultraviolet radiation from undoing your newly synthesized collagen.
Professional results are achieved through patient repetition, safe tools, and high-purity topicals. Stock your kit with trusted microneedling essentials, backed by reliable domestic shipping from BRÜUN's Miami and Los Angeles hubs, to support your complexion through every stage of the microneedling healing process day by day.
Embrace Your Journey to Clear, Radiant Skin
Patience and proactive nourishment turn simple micro-punctures into long-lasting skin vitality. Understanding the microneedling healing process day by day gives you complete control over your routine, whether you are managing temporary Day 1 warmth or enjoying your Day 7 glow. By pausing harsh exfoliants, maintaining clean hygiene, and drenching your barrier in biocompatible hydration, you set your complexion up for true radiance.
Every step of your recovery becomes simpler when you rely on trusted, professional-grade tools. BRÜUN supports your skincare goals with genuine Dr. Pen devices, sterile cartridges, specialized Salmon DNA ampoules, and soothing jelly masks trusted by licensed estheticians and spa professionals nationwide. With fast domestic shipping directly from warehouses in Miami and Los Angeles, everything you need for post-treatment care arrives right at your door.
Celebrate the process, treat your skin with gentle kindness, and look forward to the luminous, revitalized tone waiting just beneath the surface.
Frequently Asked Questions
How long does redness last after a microneedling treatment?
Redness typically peaks during the first 24 hours and fades within 48 to 72 hours. Standard cosmetic depths (0.25 mm to 0.5 mm) resolve much faster, often within 12 to 24 hours. Deeper needle passes (1.0 mm to 2.5 mm) cause erythema that gradually transitions to a light pink tint by Day 2 or 3. Proper cooling immediately after treatment significantly cuts down persistent heat and visible flushing.
Can I wash my face the morning after microneedling?
Yes, you can gently wash your face the morning after your treatment once 12 to 24 hours have passed. Stick strictly to lukewarm water or a mild, non-foaming, sulfate-free cleanser. Avoid washcloths, cleansing brushes, or harsh scrubbing motions. Pat your skin dry using a clean towel. Following this step in the microneedling healing process day by day protects your fragile lipid barrier while keeping newly sealed channels free from residue.
Is it normal for skin to peel or flake on day three?
Yes, mild flaking or peeling is completely normal between Days 3 and 5 as cellular turnover speeds up. As fresh keratinocytes migrate upward, old stratum corneum cells shed naturally, creating a sandpaper-like texture. Never pick, scratch, or scrub these dry flakes away, as doing so can trigger post-inflammatory hyperpigmentation. Instead, apply deeply hydrating serums to soften rough patches and let shedding occur at its own pace.
When is it safe to wear makeup after microneedling?
You should wait at least 24 hours before applying any makeup to your skin. Applying cosmetics too early allows pigments and non-sterile binders to penetrate open microchannels, risking clogged pores and irritation. When you do resume cosmetics on Day 2 or Day 3, choose clean, breathable mineral-based makeup. Ensure your makeup brushes or beauty sponges are thoroughly sanitized before they touch your recovering face.
What should I do if my skin feels extremely tight and dry?
Layer pure humectants and barrier-reinforcing moisturizers multiple times throughout the day to replenish depleted moisture reserves. Transepidermal water loss spikes after micro-needling, which causes that taut, sunburned sensation. Generously apply pure hyaluronic acid followed by a soothing peptide cream or a cooling alginate jelly mask. A jelly mask seals in moisture and relieves surface tension without stinging sensitive skin or leaving a heavy, pore-clogging film.
Can I use hyaluronic acid and Salmon DNA serums immediately after?
Yes, pure hyaluronic acid and specialized Salmon DNA (PDRN) ampoules are ideal for immediate post-procedure hydration. These biocompatible solutions absorb effortlessly into freshly opened channels without stinging. Salmon DNA delivers essential nucleotides and peptides that support cellular renewal and boost hydration right away. Integrating sterile, pro-grade serums into the microneedling healing process day by day revitalizes dull tissue and keeps your moisture barrier balanced without irritation.
Why should I avoid working out for 48 hours after needling?
Strenuous exercise induces heavy sweating and elevates your internal body temperature, which worsens acute inflammation. Sweat contains natural salts and bacteria that easily penetrate open microchannels, triggering stinging, redness, or breakouts. Increased circulation also intensifies post-treatment facial warmth and swelling. Give your body two full days of rest before resuming workouts so your skin can focus all its energy on barrier rebuilding and structural renewal.
How to Speed Up Healing After Microneedling: A Professional Recovery Guide
How to Combine Microneedling with Other Treatments for Radiant Skin
Related Posts

Alternating Microneedling and Chemical Peels: Complete Protocol Guide (2026)

How to Combine Microneedling with Other Treatments for Radiant Skin

How to Speed Up Healing After Microneedling: A Professional Recovery Guide

Can I Use Retinol After Microneedling? The Esthetician’s Guide to Safe Timing

Jelly Mask After Microneedling: The Ultimate Guide to Post-Procedure Recovery

When Can I Wear Makeup After Microneedling? A Complete Recovery Guide
