

How to Sterilize Cartridges and Avoid Reuse
Trying to sterilize a used microneedling cartridge is the wrong safety shortcut. The safest approach to how to sterilize microneedling cartridges is not to reuse them: discard each used single-use cartridge in an appropriate biohazard waste container and start with a new one for the next treatment. Cleaning the device and handling equipment in a clean environment help minimize cross-contamination risks, but they don’t make a used cartridge reusable.
It makes sense to ask how to sterilize microneedling cartridges when you’re carefully preparing the rest of your setup. The key distinction is that cartridges are single-use, while some device components can be cleaned and disinfected according to the manufacturer’s instructions.
This guide explains how to prepare your equipment, care for reusable device parts, and air-dry cleaned components before storage. It also explains why rinsing or soaking a used cartridge isn’t a substitute for replacing it, so you can follow a clear, practical routine for each session.
Key Takeaways
- Prepare a clean work area and gather gloves, a sealed cartridge, isopropyl alcohol, and a clean container before beginning.
- Follow the device manufacturer’s instructions for cleaning reusable components, and use only disinfectants compatible with the equipment.
- Let cleaned components air-dry fully before storing them in a clean, dry place.
- Keep a consistent maintenance routine, including documenting equipment cleaning and replacing worn reusable parts as needed.
- Choose a fresh, single-use cartridge for each session; cleaning or soaking does not make a used cartridge reusable.
Why is it important to sterilize your microneedling cartridges?
Treat every cartridge as single-use, and don’t rely on alcohol to make one reusable. Clean surroundings and careful handling help reduce cross-contamination risks during a microneedling session.
Distinguishing Cleaning, Disinfection, and Sterilization
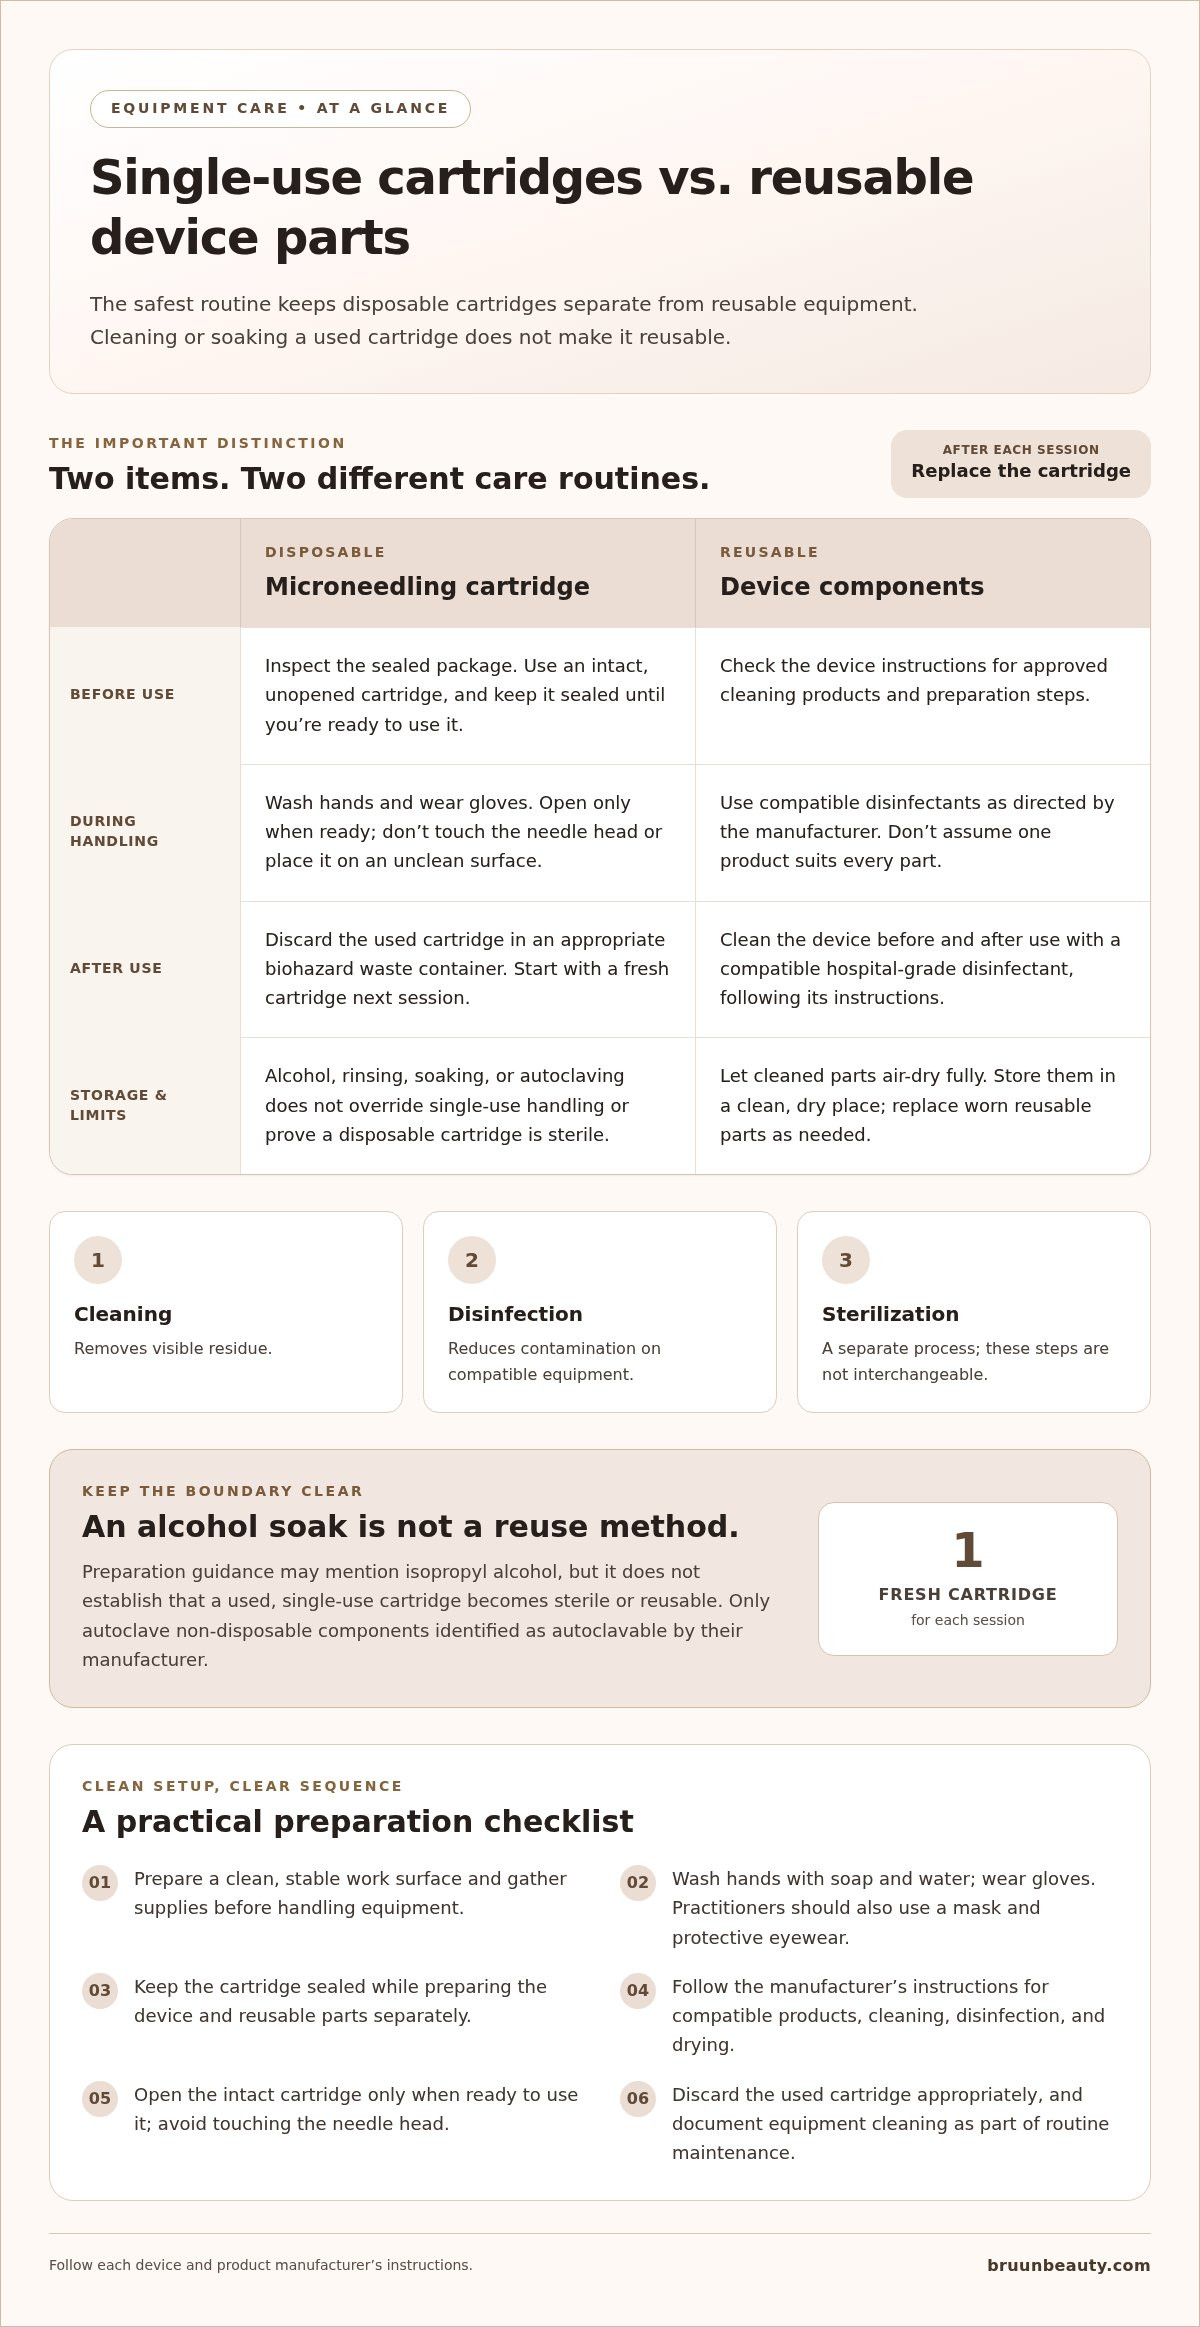
- Understand the terms before preparing equipment. Cleaning removes visible residue; disinfection reduces contamination on compatible equipment; sterilization is a separate process. These steps aren’t interchangeable, and wiping or soaking a used disposable cartridge doesn’t make it safe to reuse.
An autoclave should not be used on a disposable cartridge unless its manufacturer identifies it as autoclavable. Only autoclavable, non-disposable components should be autoclaved before reuse. To verify a cartridge is sterile and packaged properly, inspect its sealed pack and packaging condition before opening; use an intact, unopened cartridge.
Sanitizing with Isopropyl Alcohol
- Prepare the cartridge according to its manufacturer’s instructions, and distinguish a new cartridge from a used one. Preparation guidance recommends having 70% or higher isopropyl alcohol available and describes soaking the cartridge needle head for a couple of minutes. That guidance does not establish that a used, single-use cartridge becomes sterile or reusable.
Alcohol is not a substitute for a fresh cartridge. A clean environment matters because it reduces opportunities for cross-contamination while you handle the device and supplies.
- Choose alcohol or a medical-grade disinfectant according to the component being prepared. For compatible, non-disposable device parts, use a medical-grade disinfectant suitable for the equipment and follow its manufacturer’s instructions. Soak times depend on those directions; don’t apply a product’s instructions to a cartridge unless the manufacturer approves it.
- Wash your hands with soap and water before handling the device or preparing for a procedure. Wear gloves when handling cartridges and equipment. Keep the cartridge sealed until you’re ready to use it, then avoid touching its needle head or placing it on an unclean surface.
- Keep the steps distinct: follow cleaning and disinfection instructions for reusable components, and discard used cartridges after treatment in an appropriate biohazard waste container. An alcohol soak may be described as cartridge preparation, but it doesn’t override single-use handling or prove sterility.
- Use microneedling supplies as part of a setup that keeps cartridge handling and device care separate. Check packaging before opening, use a fresh cartridge for each session, and follow the device manufacturer’s directions for compatible disinfectants and reusable parts.
Perform microneedling treatments in a clean environment to minimize cross-contamination risks, and handle equipment carefully throughout the procedure.
Preparing equipment for cartridge sanitizing
Set up a clean work area before opening a cartridge or starting treatment. Keep preparation steps for disposable cartridges separate from those for reusable equipment.
- Gather supplies before handling the device: a sealed cartridge pack, isopropyl alcohol, and a clean container. Place them on a clean, stable work surface. Having supplies ready means you won’t need to search for them after opening the pack or handling prepared equipment.
- Wash your hands with soap and water before touching the microneedling device or preparing for treatment. Put on gloves before handling cartridges. Practitioners handling or preparing equipment should also use personal protective equipment, including a mask and protective eyewear.
- Keep the cartridge sealed while arranging the other supplies. Inspect its package and set it in a clean area. Open it only when you’re ready to use the cartridge, then handle it without touching the needle head.
- Prepare the device separately from the cartridge. Clean the microneedling device before and after each use with a hospital-grade disinfectant, following the manufacturer’s directions. Use a disinfectant compatible with the equipment, and don’t assume a product suitable for one component works for every device part.
- Check the manufacturer’s instructions before preparing any reusable component. They identify compatible cleaning products and explain how to prepare the equipment. Keep the disinfectant label nearby and follow its directions rather than relying on a routine intended for another device.
- For a fixed-head derma stamp, first identify it as reusable equipment rather than a disposable cartridge. Preparation guidance recommends 70-90% isopropyl alcohol and a 10-minute soak for a derma stamp. Follow the stamp manufacturer’s instructions, and don’t apply this method to a cartridge or device part without approval.
- Arrange the clean container and alcohol before placing the derma stamp in its soak. Keep the container on the prepared work surface, away from items that could contaminate the equipment. After the recommended soak, handle the stamp with clean gloves and let it air-dry before storage.
- Build your setup around the equipment you actually use. If you’re organizing a microneedling station, Bruun Beauty microneedling supplies can help you plan cartridge and device preparation together. Keep disposable cartridges separate from reusable tools, and follow each item’s instructions throughout setup.
Wear gloves when preparing to sanitize a microneedling or nano-needling cartridge. Practitioners handling or sterilizing microneedling equipment should also use personal protective equipment, including gloves, a mask, and protective eyewear. Keep these protections in mind as part of setup: gloves apply to both recommendations, while masks and protective eyewear are specified for practitioners handling or sterilizing the equipment.
Device replacement and maintenance
Between clients, discard the used cartridge and prepare a fresh one. Clean the device between uses, then follow the manufacturer’s directions for disinfecting and maintaining reusable parts.
Maintaining the Device
Clean the device before and after each use with a hospital-grade disinfectant compatible with its materials. Follow the manufacturer’s instructions for contact time and handling rather than applying one routine to every component.
Autoclave a non-disposable component before reuse only if it is identified as autoclavable. After cleaning and disinfection, store equipment in a clean, dry environment and document the procedure to keep your maintenance routine consistent.
Changing Cartridges Between Clients
Remove the used cartridge after each client and discard it in an appropriate biohazard waste container. Wash your hands, put on gloves, and clean the device before preparing for the next session.
Attach a fresh cartridge according to the device instructions. Don’t reuse a cartridge or rely on disinfection to make a used, single-use item suitable for another client.
- Finish the session before handling the next client’s supplies. Keep the used cartridge pointed away from your work area and avoid touching its needle head. Place it directly into an appropriate biohazard waste container after use.
- Wash your hands with soap and water before handling the device again. Put on clean gloves, then clean the device with a compatible hospital-grade disinfectant. Follow the label and manufacturer’s directions; don’t shorten or change the cleaning procedure.
- Inspect reusable components after cleaning. Look for visible residue or damage, and set aside any part that needs attention according to the manufacturer’s instructions. Don’t return a component to service if it needs further cleaning or can’t be prepared as directed.
- Use an autoclave only for non-disposable components identified as autoclavable. Autoclaving or alcohol exposure doesn’t make a cartridge reusable. Keep single-use cartridges separate from equipment intended for cleaning, disinfection, or sterilization.
- Once the device and work area are ready, take the next cartridge from its sealed pack. Handle it by its housing, not its needle head. This keeps cartridge handling separate from device cleaning and helps prevent contact with used supplies.
- Store cleaned equipment in a clean, dry environment. Record the cleaning and sterilization procedures, including the component prepared and the method used. Clear records help keep your routine consistent across sessions.
- Replace a derma stamp every 3-4 months or after 10-15 uses, whichever comes first. Keep that replacement schedule separate from cartridge disposal, since used single-use cartridges go into biohazard waste after each session.
- As you organize supplies for the next session, microneedling equipment and supplies can help you keep cartridges and device components together while maintaining separate handling steps.
Rinsing and air-drying
Follow the manufacturer’s directions to determine whether a component needs rinsing after cleaning. Set up a separate drying area so moisture and handling don’t interfere with the next preparation step.
Rinsing the Cartridge
- Check the cartridge and device instructions before adding a rinse step. If they call for rinsing after a preparation solution, use the specified method and keep the needle head from touching the sink, container edges, or other surfaces.
If the instructions don’t call for rinsing, don’t add it out of habit. Rinsing is a preparation step, not a substitute for following the cartridge’s labeled handling directions.
Air-Drying the Cartridge
- After any instructed preparation, place the cartridge in a clean area and allow it to air-dry before use. Position it so the needle head doesn’t touch the drying surface, and avoid touching that part while it’s damp.
Don’t use a towel to speed up drying. Follow the product directions to determine when the cartridge is ready for the next step.
- Choose a drying spot before beginning the rinse. Clear the surface, keep it away from splashes, and set out only the clean container needed. This limits unnecessary handling while the component dries.
- Position each item according to its design. Don’t touch a cartridge’s needle head, and give a derma stamp enough open space for air to reach its surfaces. Don’t stack equipment or place damp components against one another.
- For a derma stamp, allow complete air-drying for 30 minutes to an hour. Check the needle area and handle before storage. If moisture remains in a recessed area, continue drying rather than closing the stamp away damp.
- Let the component dry without interruption. Avoid moving it between surfaces or repeatedly picking it up to check. If you need to handle it, use clean gloves and touch the handle or housing, not the needle area.
- After drying, store reusable equipment in a clean, dry environment. Keep the drying space separate from skincare products, used towels, and other items that could contact the component. This helps manage the transition from preparation to storage.
- Use the same sequence each time: consult the manufacturer’s directions, rinse only when instructed, and air-dry as directed. Allow a prepared cartridge to dry before use. For a derma stamp, follow the stated drying interval and confirm it is fully dry before storage.
Avoiding cartridge reuse
In the United States, don’t infer permission to reuse a cartridge from a device’s FDA status. Follow the cartridge labeling and device instructions for handling. Place used cartridges in an appropriate biohazard waste container and follow your facility’s waste procedure.
- Set up separate, clearly identified areas for clean supplies and used materials before a session. Keep the distinction visible throughout your workflow. For example, reserve one side of the treatment station for unopened supplies and another for waste handling.
- Identify the cartridge type from its packaging before opening it. If you store several designs together, keep each in its original labeled package until you select it. This helps prevent attaching a cartridge that doesn’t match the device or intended procedure.
- After selecting a cartridge, keep its packaging with the session supplies until setup is complete. This makes it easy to identify the cartridge and check its labeling if needed. Don’t place loose cartridges in shared trays with other components.
- Keep the designated waste container within reach of the treatment area, but away from clean supplies. Check its label and follow your facility’s disposal procedure. Don’t leave a used cartridge on a tray while resetting the station.
- At the end of a session, place the cartridge directly into the appropriate biohazard waste container without passing it over clean equipment. In a shared room, tell the next staff member when the station is ready to reset.
- Make sure everyone using the room understands the waste container’s purpose. Don’t use it to store clean tools or unopened supplies. If your facility separates waste streams, follow its designated process for microneedling cartridges rather than choosing a container by appearance.
- Document the session according to your facility’s established recordkeeping process. Record the device and cartridge type when relevant to your workflow. Clear entries can help distinguish equipment used in one appointment from supplies prepared for another.
- Before the next appointment, scan the work area for misplaced packaging or loose components. Confirm clean supplies remain in their designated area and that the waste container is used only as intended. This final visual reset helps prevent mix-ups during a busy schedule.
In the United States, a device’s FDA status alone doesn’t indicate that its cartridge may be reused. Follow the cartridge labeling and device instructions for handling.
Bruun Beauty: Advanced Microneedling Serum SD - Control Salmon DNA Ampoule Serum
Advanced Microneedling Serum SD - Control Salmon DNA Ampoule Serum is a skincare option for your post-session routine. Keep product choice separate from equipment hygiene: serum doesn’t sterilize a cartridge or make a used cartridge reusable.
Once you’ve prepared a fresh cartridge and followed your device’s cleaning instructions, you can explore this Salmon DNA ampoule serum as part of your skincare routine. Choose products according to your needs and each item’s directions, keeping equipment preparation separate from skincare.
Visit bruunbeauty.com to explore the serum and other skincare supplies, or contact Bruun Beauty with questions.
Build a routine you can repeat with confidence
Understanding how to sterilize microneedling cartridges also means recognizing that a used, single-use cartridge isn’t reusable. Keep that distinction central as you refine your setup, whether you work professionally or use a device at home. A clear routine helps you prepare each session without confusing skincare products with equipment-cleaning steps.
Use your next session to review how your supplies fit together. Keep cartridge handling, device maintenance, and skincare choices separate. For post-session skincare, Bruun Beauty offers Advanced Microneedling Serum SD - Control Salmon DNA Ampoule Serum and Jelly Mask Kits. Choose products that suit your routine and follow their directions.
A thoughtful setup supports consistency without complicating your routine. Keep the manufacturer’s instructions accessible, and build your process around the equipment you use.
With a clear workflow and fresh supplies, you can approach each session with greater confidence.
Frequently Asked Questions
Can microneedling cartridges be sterilized and reused, or are they single-use?
Follow the cartridge labeling: a single-use cartridge isn’t intended for another session. Before opening the package, check that the cartridge type matches your device model. If your setup includes different designs, keep their packaging together until you’re ready to select the right one.
What are the infection risks of reusing or improperly sterilizing microneedling cartridges?
Reusing a cartridge can carry contaminants from one session into another. Small spaces in the needle assembly can make reliable reprocessing difficult, and a visual check can’t establish its condition. In a professional setting, keep client records separate from equipment records so you can trace which device components were prepared for each session.
Are at-home microneedling cartridges safe to reuse or sterilize?
Use at-home cartridges according to their labeling and the device manufacturer’s instructions. Don’t assume a method for a reusable tool applies to a disposable cartridge. Before a session, confirm the cartridge type fits your device and keep both items’ instructions accessible.
Can a UV sterilizer replace chemical disinfection?
No. UV treatment is an optional supplement after chemical disinfection, not a standalone method for complex metal surfaces. For a cleaned and dried derma stamp, the guidance gives a typical UV cycle of 5-10 minutes. Follow the equipment instructions, and don’t apply a stamp’s process to a cartridge.
What skincare preparation should I consider before microneedling?
Preparation guidance recommends hyaluronic acid serum and avoiding sun exposure, hair-removal treatments, and certain skincare products beforehand. Which products to avoid depends on your routine, so review their use instructions in advance. If you take blood-thinning medication, seek appropriate guidance before planning a session.
How long should you wait between microneedling sessions?
Preparation guidance recommends waiting 4-6 weeks between microneedling sessions to allow the skin and dermis time to recover. Use that interval when planning your calendar, rather than scheduling sessions close together for convenience. Keep your skincare routine gentle and follow the directions for each product you use between sessions.
PDRN vs. Hyaluronic Acid: Which Skin Booster is Right for Your Routine?
PDRN vs. Hyaluronic Acid: Which Skin Booster is Right for Your Routine?
Related Posts

Consistent Microneedling and the Long-Term Changes to Expect

Aftercare choices to lower infection risk at home after microneedling

How to Create a Relaxing At-Home Spa Day With Simple Rituals

Sunscreen Recommendations After Microneedling: How to Protect Healing Skin

Investing in my skin for the future: what deserves my budget

Post-microneedling skincare routine for masks, makeup, and recovery

Skin Peeling After Microneedling: What to Avoid and When to Resume Makeup
