

How to Prepare Skin and Check Safety Before At-Home Microneedling
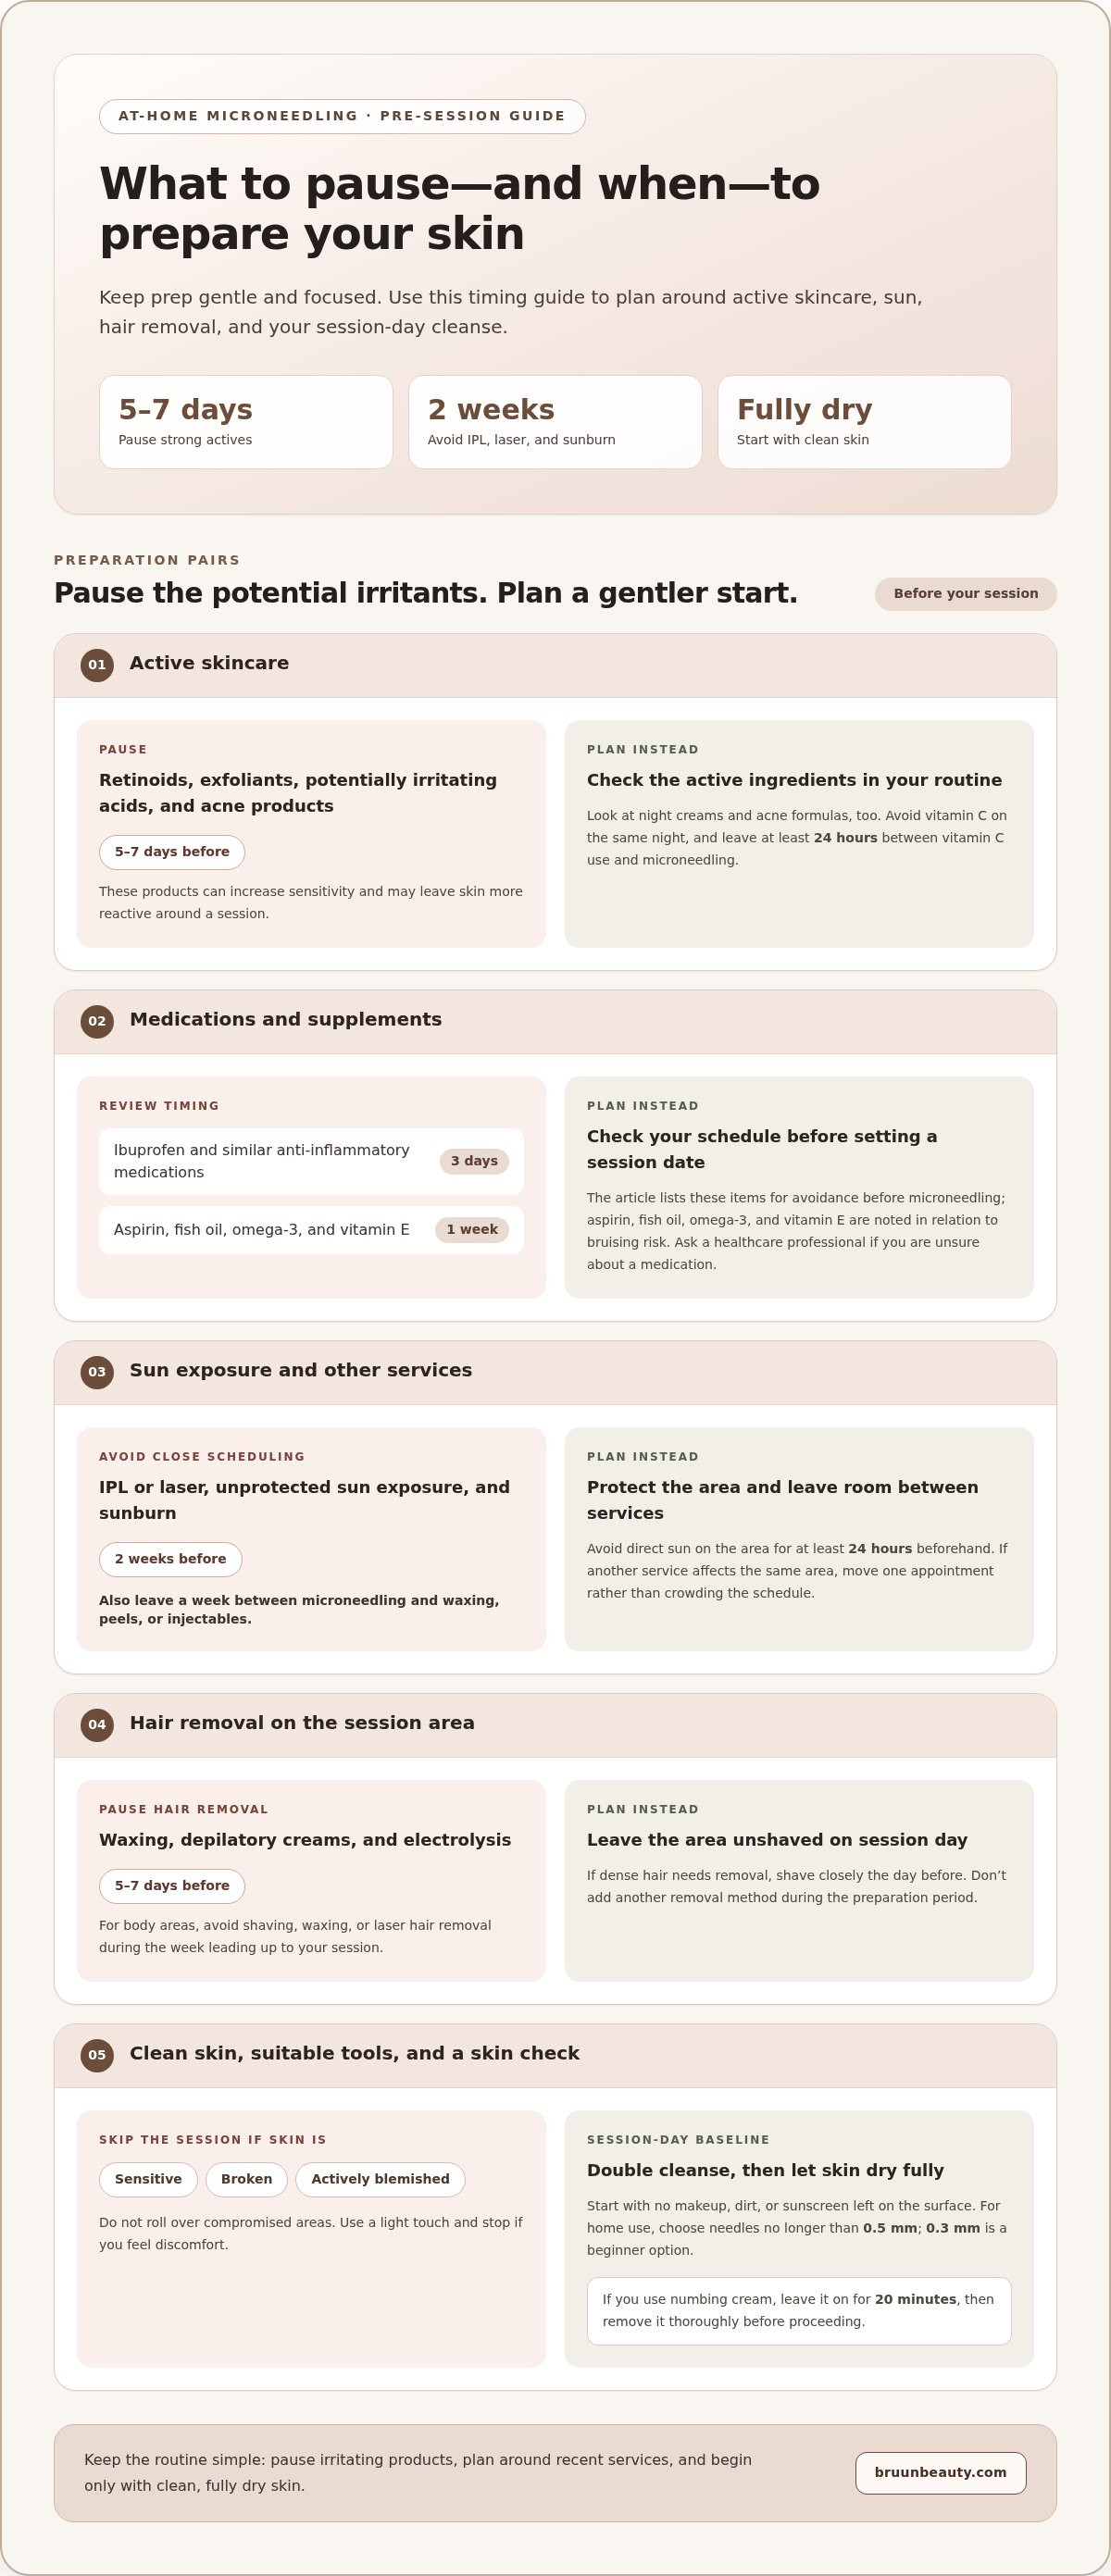
Clean, calm skin matters more than a complicated pre-treatment routine. Microneedling uses fine needles to create tiny punctures in the skin’s surface. Preparing skin for at-home microneedling means avoiding retinoids, exfoliants, potentially irritating acids, and acne products for 5-7 days before treatment, then starting with thoroughly cleansed, completely dry skin.
Active ingredients can make skin feel more sensitive, so it’s natural to wonder what belongs in your routine before a session. This guide explains what microneedling does, which products to pause, and how to cleanse and dry your skin without leaving sunscreen, makeup, or residue behind.
You’ll also learn when hyaluronic acid may fit into the process, why a serum for ordinary topical use isn’t automatically suitable during microneedling, and when to skip treatment on sensitive, broken, or blemished skin. These steps can help you make an informed choice and keep preparation gentle and focused.
Key Takeaways
- Pause retinoids, exfoliants, potentially irritating acids, and acne products for 5-7 days before microneedling.
- Start with thoroughly cleansed, fully dry skin, with no lingering sunscreen, makeup, or dirt.
- Use hyaluronic acid only in a formula suited to application during microneedling; ordinary topical skincare isn’t automatically appropriate.
- Skip at-home microneedling on sensitive, broken, or actively blemished skin.
- Review the preparation steps and safety considerations before choosing a serum or planning a session.
Avoiding retinoids, exfoliants, and vitamin C before treatment
For home use, choose needles no longer than 0.5 mm; a 0.3 mm length is a beginner option, while professional microneedling may use different depths for different concerns. Don’t assume numbing cream is needed at home: if you use it, leave it on for 20 minutes, then remove it thoroughly before proceeding.
- Pause strong actives before your session. Avoid topical retinoids, exfoliants, potentially irritating acids, and acne products for 5-7 days beforehand. These products can increase sensitivity, so combining them with a needle session may leave skin more reactive. Avoid vitamin C on the same night, and leave at least 24 hours between its use and microneedling.
- Remove makeup, sunscreen, and residue. Double cleanse before beginning, then make sure your skin is fully dry. Start only when there’s no makeup, dirt, or sunscreen left on the surface. Clean skin helps you avoid dragging leftover products across the area with a roller or pen.
- Review medications and recent procedures. Avoid ibuprofen and similar anti-inflammatory medications for 3 days beforehand. Aspirin, fish oil, omega-3, and vitamin E are listed for avoidance for 1 week beforehand because of bruising risk. Avoid IPL or laser procedures, unprotected sun exposure, and sunburn for 2 weeks before microneedling. If you’re prone to cold sores, antiviral medication is advised for 2 days before and on the session day.
- Keep post-session skincare simple. Avoid retinoids, alpha-hydroxy acids, vitamin C, alcohol-based products, and other irritating actives right after microneedling. Gentle skincare is recommended for the first 24-48 hours; the exact timing for restarting stronger products depends on whether irritation remains. Sun exposure can also add sensitivity, so plan your routine around recovery rather than immediate rejuvenation.
- Allow recovery between sessions. At-home schedules vary with needle length and how your skin responds. One guide recommends repeating sessions once every 2 weeks or up to once a week, depending on needle length; another recommends 4-6 weeks between sessions. Don’t increase frequency simply because your skin looks calm at first. The microneedling preparation and supplies context starts with clean skin, a suitable needle, and time for recovery.
Avoiding certain skincare products before microneedling
Plan your skincare and hair-removal schedule before microneedling. Sun exposure, irritating products, and recent procedures can all affect whether your skin is ready.
-
Avoid Sun Exposure and Other Procedures
Protect the treatment area from direct sun for at least 24 hours beforehand. Avoid IPL or laser procedures, unprotected sun exposure, and sunburn for 2 weeks before microneedling. Recent facial treatments matter too: leave a week between microneedling and waxing, peels, or injectables. These steps help you avoid starting a session with skin already affected by sun or another procedure.
-
Avoid Retinoids Before Microneedling
Pause topical retinoids for 5-7 days before your session, along with exfoliants, potentially irritating acids, and acne products. These ingredients may increase sensitivity, so using them close to needling can make your skin more reactive. Check the active ingredients in your skincare, including night creams and acne formulas. Don’t restart strong products immediately afterward; follow the gentle aftercare period described for your session.
- Schedule shaving and hair removal carefully. Avoid waxing, depilatory creams, and electrolysis on the treatment area for 5-7 days before microneedling. For body areas, avoid shaving, waxing, or laser hair removal during the week leading up to your session. Don’t shave the area on treatment day. If dense hair needs removal, shave closely the day before instead.
-
Use a light touch and avoid compromised areas. If you use a roller, follow its instructions and move gently without pressing hard or repeatedly working one spot. Don’t roll over sensitive or broken skin, or active blemishes. Focus on suitable skin rather than trying to cover every area of your face. Pay attention to discomfort and stop instead of pushing through it.
Before scheduling sessions, consider what your skin has experienced recently, including sun exposure, hair removal, and active products. For a closer look at microneedling tools and supplies, explore options that fit your preparation routine.
For body microneedling, avoid shaving, waxing, and laser hair removal on the treatment area during the week before your session. First identify the skin that will be needled, then keep that area clear of hair removal for the stated interval. If hair removal and microneedling are scheduled close together, move one appointment rather than fitting hair removal into the preparation period. If you’re unsure whether a planned service affects the treatment area, ask a healthcare professional before scheduling.
On treatment day, leave the area unshaved. If dense hair is present, the option is to shave it closely the day before, not to shave immediately before the session. Keep that timing in mind when setting up your routine, and avoid adding another removal method to the same area during the week before treatment. A simple calendar note can help you keep the treatment date, the clear interval, and any needed close shave in the right order. That way, preparation stays focused on the area being treated and follows the stated timing without last-minute hair removal.
Cleansing and drying skin before microneedling
A key step in preparing skin for at-home microneedling is cleansing gently and letting the skin dry fully. If you suspect an infection or another complication, seek medical care promptly instead of continuing to needle or apply skincare.
-
Double Cleanse the Skin
Start with a cleanser that removes makeup, sunscreen, and surface oil. Cleanse a second time gently to lift any remaining residue without scrubbing. Rinse thoroughly with tepid water, then check around your nose, hairline, and jaw for leftover product. A clean surface helps prevent topical residue from being carried across the skin during microneedling.
-
Prepare Skin with Antimicrobial Cleansing
Keep skin cleansing separate from device sanitation. Use a gentle cleanser on your face; don’t apply rubbing alcohol to facial skin as an antimicrobial step. For the microneedling tool, sanitize it with 70% rubbing alcohol and follow its cleaning instructions. Don’t use a tool with visible residue or a damaged needle head. A clean device and a clean skin surface are separate parts of preparation.
-
Dry Skin Before Treatment
Pat your face dry with a clean towel, then wait until no dampness remains. Don’t rub or apply a topical formula to make the skin slippery before treatment. Dry skin makes the area easier to see and prevents water or cleanser from mixing with products used during microneedling. Check the hairline and creases beside your nose, where moisture can linger.
- Clean and store the tool carefully. After every use, apply microneedle cleaning spray from approximately 10 cm away until the entire head is covered. Let the tool dry as directed, then store it in a clean, protected place. Don’t share needle heads. Follow the device instructions for handling and replacement, and avoid touching the needle surface with your fingers.
- Keep early cleansing gentle and watch your skin. For the first 48 hours after microneedling, use a gentle cleanser with tepid water and pat dry. Redness and pinpoint bleeding after at-home needling should subside within a day. When preparing skin for at-home microneedling, also plan for gentle cleansing afterward. If irritation worsens, persists, or raises concern about infection, seek medical care rather than adding active skincare.
Using hyaluronic acid serum
Use hyaluronic acid only if the formula is intended for microneedling. Avoid unverified serums, retinoids, exfoliating acids, and alcohol-based products during the procedure.
Choose a device and serum according to their directions, not ingredient trends alone. A product made for ordinary topical use isn’t automatically suitable for microneedling.
-
Apply Hyaluronic Acid Serum
Choose a simple hyaluronic acid serum formulated for microneedling. Although hyaluronic acid is commonly recommended for this step, the ingredient name alone doesn’t establish that a formula is suitable for use with needles. Check the product’s directions and intended application before using it. Don’t substitute a regular daily serum just because it feels gentle on intact skin.
-
Choose Serums for Glide and Hydration
Use only a formula intended for microneedling as your glide product. It should support smooth movement without encouraging you to press harder or make repeated passes. A serum designed for deeper application differs from a traditional topical product, so don’t assume familiar skincare is suitable during needling.
- Check growth factor and peptide formulas carefully. Growth factors and peptides may appear in skincare serums, but those ingredient names don’t confirm suitability during microneedling. Products used during needling should be formulated for application to deeper skin layers than traditional topical products. While suppliers such as Ascend Labs provide high-purity peptides for laboratory and metabolic research, cosmetic applications require purpose-made topical formulas. Follow the directions for the specific formula, and don’t combine several serums to create a custom blend.
- Keep ordinary skincare out of the procedure. Don’t use retinoids, exfoliating acids, vitamin C, or alcohol-based products as glide serums. These active ingredients are not interchangeable with a purpose-made microneedling formula. If you can’t tell whether a product is intended for needling, leave it out rather than testing it on freshly needled skin.
- Separate glide from your later hydration routine. A product used during microneedling serves a different purpose from a serum in your normal skincare routine. Use the formula as directed, and don’t layer additional products over it without instructions. After the session, keep your routine gentle and avoid strong actives while your skin is sensitive. Choose products according to their intended use, not just their texture.
Microneedling contraindications
Before using a device, consider active skin concerns, recent procedures, and medications that may affect your readiness. Microneedling creates tiny punctures, so postpone the session if the treatment area is already irritated or broken.
- Skip active or damaged skin. Don’t use an at-home device over active acne, open skin, or sensitive areas. Needling over active acne can spread bacteria across the treatment area. Makeup won’t make an unsuitable area ready for a session. Wait until the skin is intact and calm before reconsidering microneedling.
- Review isotretinoin use before planning a session. The guidance advises avoiding microneedling for 6 months after Accutane. This medication history matters even if your skin currently looks clear, because appearance alone doesn’t establish whether the timing is appropriate. Include Accutane when reviewing your medication history before a microneedling treatment, rather than relying only on how the surface looks.
- Account for recent injections. Allow two weeks after Botox or filler before microneedling, according to the cited medical guidance. This creates a pause after an injectable procedure instead of layering another procedure over the same area too soon. Note the date and location of injections when deciding whether to use a home device.
- Don’t use needling to address every skin concern. Active blemishes, broken skin, and sensitivity are reasons to skip treatment, not to adjust pressure or make fewer passes. A shorter session doesn’t resolve the concern that makes the area unsuitable. Microneedling should start with skin that can handle the procedure and its normal repair process.
- Choose postponement over masking a concern. If redness, irritation, or a new blemish appears before your planned session, don’t cover it with makeup and proceed. Reschedule until the treatment area is no longer visibly compromised. Keep a simple note of the concern and its location, especially if it affects the area you planned to needle.
Medication details matter alongside the condition of the treatment area. The person asking the question reports having taken doxycycline for a couple of months. Discuss that history with a healthcare professional before deciding whether to microneedle. This information doesn’t establish a specific waiting period or whether doxycycline changes suitability, so don’t guess based on the medication name alone. Ask for advice that takes your medication history and planned treatment area into account.
The guide advises against microneedling over active acne because it can spread bacteria. Treat an active concern as a reason to pause, not something to work around by changing the device’s pressure or route. If you’re unsure whether a concern is active or your medication history matters, ask a healthcare professional before using a device. Share the medication name and reported duration, and wait for guidance instead of assuming an interval. A clear-looking surface doesn’t answer every question about readiness; consider your full history as well as the treatment area’s appearance.
Bruun Beauty: Advanced Microneedling Serum SD - Control Salmon DNA Ampoule Serum
Advanced Microneedling Serum SD - Control Salmon DNA Ampoule Serum is one Salmon DNA ampoule to consider as you plan your microneedling routine. Choose a serum according to its intended use and directions, rather than assuming every skincare formula belongs on freshly needled skin. Keep preparation separate from product selection, and use the serum only as directed.
If you’re planning a simple post-session routine, Jelly Mask Kits are another skincare option to consider for a later step. Focus first on clean skin, suitable device handling, and recovery. Bruun Beauty’s microneedling selection lets you explore products for your routine.
Visit Bruun Beauty online to explore the serum and related skincare products.
Make Your Next Session a Considered Choice
Thoughtful preparation for at-home microneedling starts with a routine you can follow consistently, not with adding more steps. Before your next session, consider whether your skin is ready, whether your device and serum are intended for your planned use, and whether you can give your skin time to recover.
Choose products purposefully. Bruun Beauty’s Advanced Microneedling Serum SD - Control Salmon DNA Ampoule Serum, professional microneedling devices, and Jelly Mask Kits offer options to consider for your skincare routine. Follow each product’s directions, and don’t assume a product intended for one step belongs in another.
If your skin doesn’t feel ready, waiting is a practical choice. A careful routine gives you a clearer basis for deciding when to proceed and what to use.
Take your next step at a thoughtful pace, with your skin’s needs in mind.
Frequently Asked Questions
What is microneedling?
Microneedling uses fine needles to create thousands of tiny punctures in the skin’s surface. At-home devices are intended for more limited use than professional procedures, so don’t assume the same needle length or technique suits both settings. The device, treatment area, and your skin’s condition all affect how to approach a session.
Is at-home microneedling safe, and what are the risks?
At-home microneedling carries risks because needles puncture the skin, and poor hygiene or unsuitable technique can add to them. Redness and pinpoint bleeding after at-home needling should subside within a day. Don’t share needle heads or use the device on compromised skin. Stop if your skin’s reaction concerns you, and seek medical care for a suspected infection or another complication.
Who should avoid microneedling at home, including people with skin conditions or certain medications?
Skip home needling over active acne, sensitive or broken skin, and any area that is visibly irritated. Avoid microneedling for 6 months after Accutane, and wait two weeks after Botox or filler. Medication history matters; don’t assume a medication is safe to combine with microneedling based only on how your skin looks. Cold sore history also warrants planning before a session.
How many days before microneedling should I stop retinoids, exfoliating acids, and other active ingredients?
Stop topical retinoids, exfoliants, potentially irritating acids, and acne products 5-7 days before microneedling. Vitamin C should be kept off the same night, with at least 24 hours between use and needling. Check product labels for active ingredients, including in acne treatments and night creams, so you don’t overlook an active hidden in a familiar formula.
How should I cleanse and disinfect skin before at-home microneedling?
Remove makeup and sunscreen with a double cleanse, rinse with tepid water, and pat dry with a clean towel. Sanitize the device with 70% rubbing alcohol according to its instructions; skin cleansing and tool sanitation are separate steps. Don’t apply rubbing alcohol to your face as a substitute for cleansing. After treatment, use gentle cleansing and avoid rubbing the area.
Can I microneedle over acne, cold sores, eczema, sunburn, or irritated skin?
No. Don’t needle active acne, cold sores, sunburn, visibly irritated eczema, or broken skin. Needling over active acne can spread bacteria across the area, while sunburn or irritation means the skin is already compromised. Wait until the area is clear and intact. If cold sores are a recurring concern, plan with a healthcare professional before scheduling microneedling.
Skin Peeling After Microneedling: What to Avoid and When to Resume Makeup
Skin Peeling After Microneedling: What to Avoid and When to Resume Makeup
Related Posts

Aftercare choices to lower infection risk at home after microneedling

How to Create a Relaxing At-Home Spa Day With Simple Rituals

Sunscreen Recommendations After Microneedling: How to Protect Healing Skin

Investing in my skin for the future: what deserves my budget

Post-microneedling skincare routine for masks, makeup, and recovery
