

How to Choose a Device and Do Microdermabrasion at Home
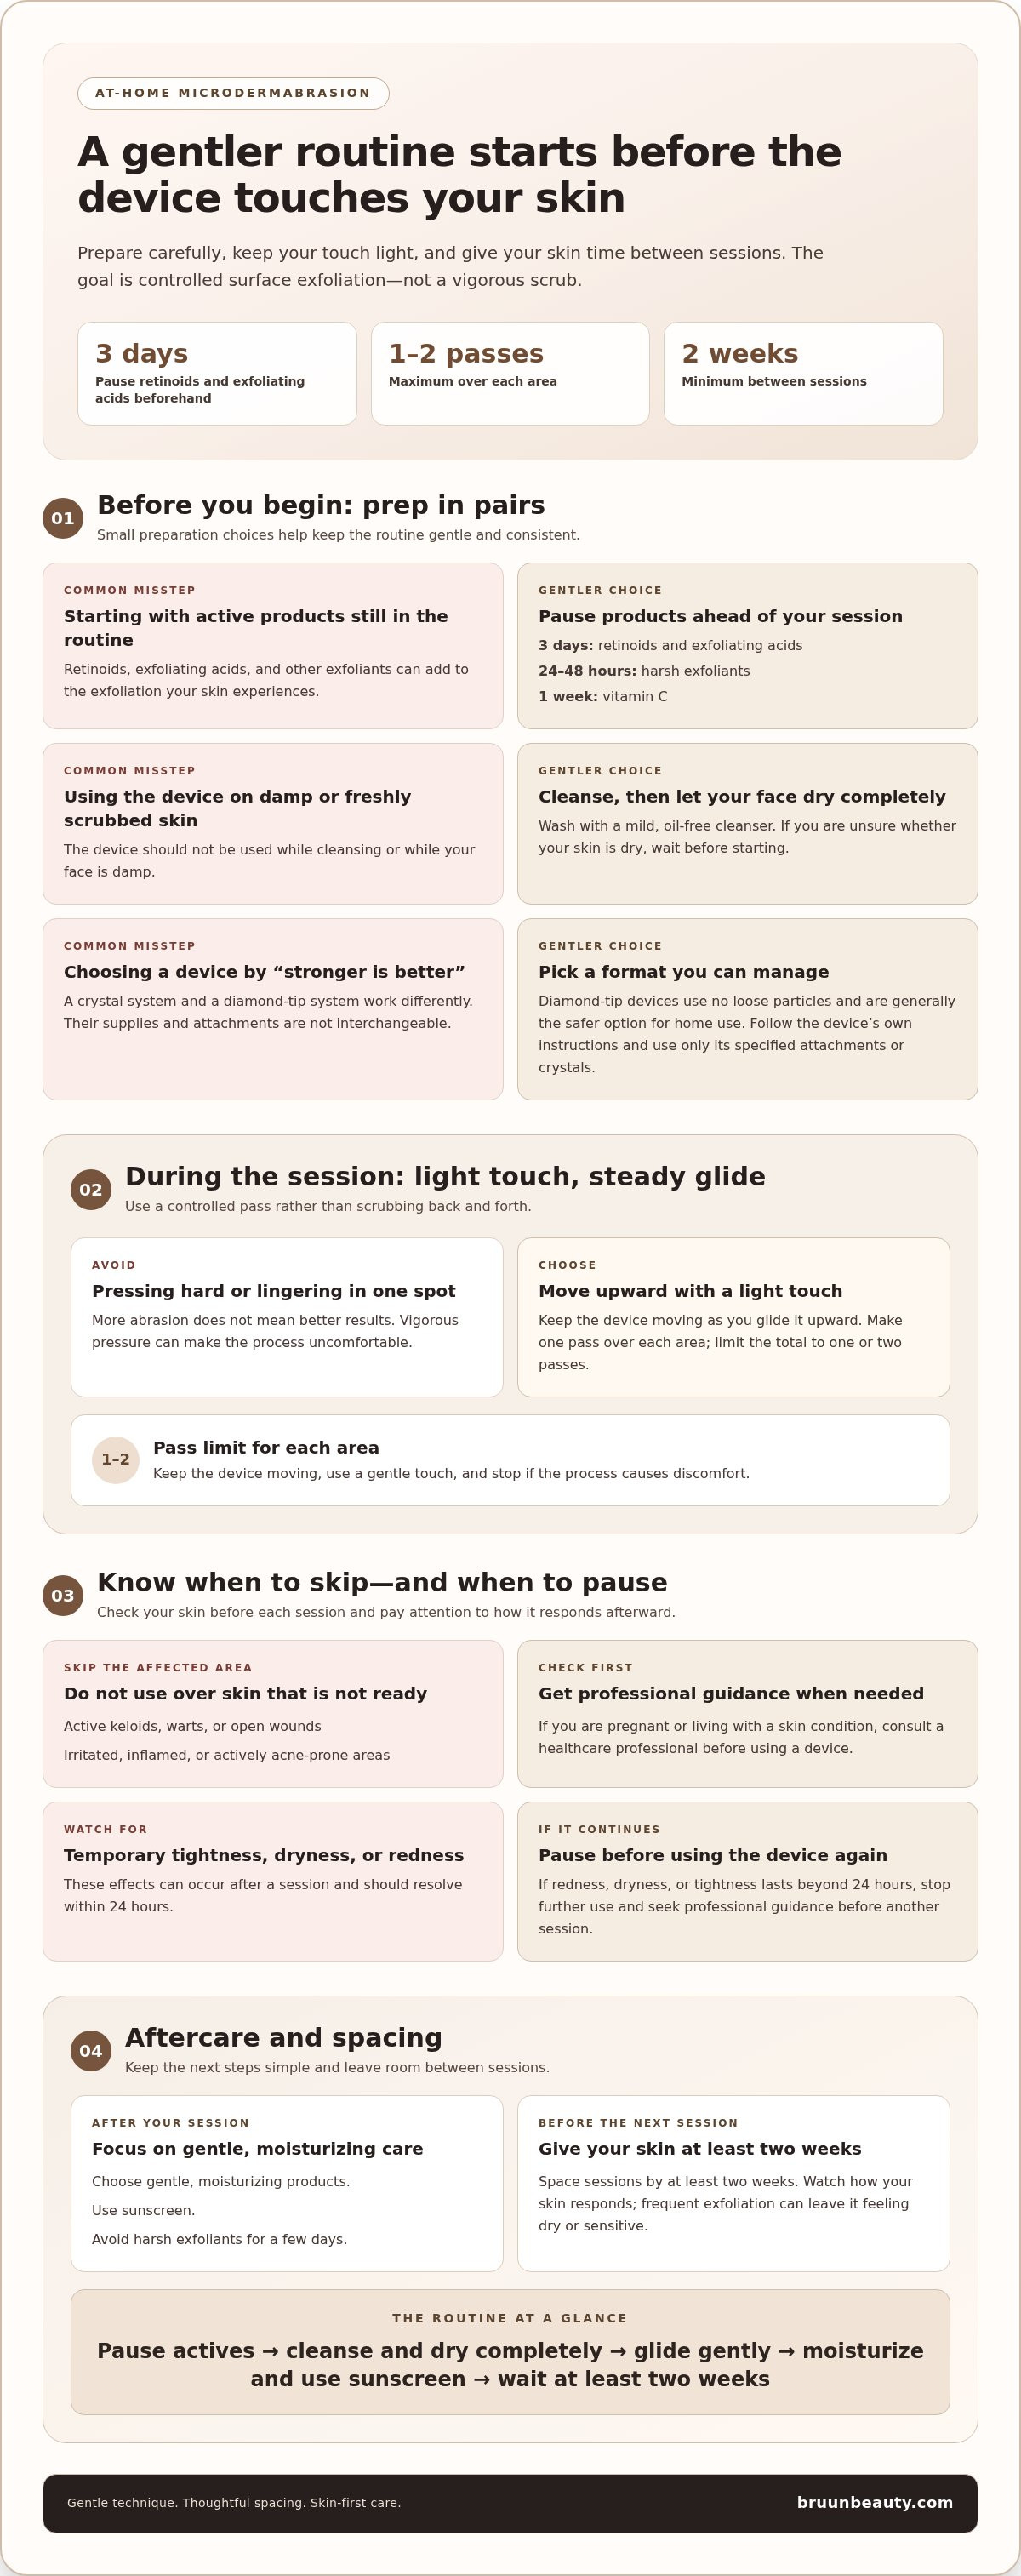
A careful, low-pressure technique matters more than a vigorous scrub when you learn how to do a microdermabrasion facial at home. Cleanse with a mild, oil-free cleanser, let your skin dry completely, then make one pass over each area while gliding the device upward without pressing. Leave at least two weeks between treatments, and stop retinoids and exfoliating acids 3 days beforehand.
It’s understandable to want smoother-looking skin without overdoing exfoliation. The right device, a light touch, and a gentle post-treatment routine can help you approach an at-home microdermabrasion facial with care.
Here’s how to prepare your skin, choose a device, move it across your face, plan sessions, and select gentle aftercare. You’ll also learn when to skip the device, so your routine stays focused on comfort and a healthy-looking glow.
Key Takeaways
- Choose a device that suits your comfort and technique; diamond-tip models use no loose particles and are generally the safer option for home use.
- Prepare with a mild, oil-free cleanser and completely dry skin. Pause retinoids and exfoliating acids 3 days before your session.
- Keep the device moving with a light touch, and limit treatment to one or two passes over each area.
- Space sessions carefully and watch how your skin responds; frequent exfoliation can leave skin feeling dry or sensitive.
- Afterward, focus on gentle, moisturizing products and sunscreen, and avoid harsh exfoliants for a few days.
How to Do Microdermabrasion at Home?
Before an at-home microdermabrasion treatment, understand how the device exfoliates and assess your skin. These steps can help you choose an appropriate tool and keep the process focused on cosmetic goals.
-
Understand How Microdermabrasion Exfoliates
Identify the device’s exfoliation method before using it, then follow its directions. According to the U.S. Environmental Protection Agency, microdermabrasion can use aluminum oxide crystals or other abrasive substances blown onto the face and vacuumed away with a handpiece. This mechanical exfoliation removes surface buildup. Check whether your device uses crystals or a diamond tip, and don’t assume stronger abrasion means better results.
-
Assess Skin Suitability and Risks
Inspect your skin before each session, and skip areas with active keloids, warts, open wounds, or irritated or inflamed skin. Avoid active acne lesions, since abrasion can worsen inflammation and potentially spread bacteria. If you’re pregnant or living with a skin condition, consult a healthcare professional before using a device. Temporary tightness, dryness, or redness can occur and should resolve within 24 hours.
- Choose a tool that feels manageable. Compare crystal-based devices with diamond-tip models rather than choosing by skin type alone. Diamond-tip devices use no loose particles and are generally the safer option for home use. If you have sensitive skin, proceed cautiously: follow the device instructions, avoid pressure, and stop if the process causes discomfort. Oily, dry, or combination skin doesn’t make irritated areas suitable for exfoliation.
- Prepare your face before the treatment. Stop retinoids and exfoliating acids at least 3 days beforehand. Avoid harsh exfoliants for 24 to 48 hours before your session, and stop vitamin C a week before treatment. Cleanse with a mild, oil-free cleanser, then use the device only when your face is completely dry. These steps help limit competing sources of exfoliation.
- Set a realistic cosmetic goal. Microdermabrasion is a surface-exfoliating step, so focus on the appearance of dullness or rough texture rather than expecting it to address every skin concern. After a session, note any redness, dryness, or tightness and how long it lasts. If these effects continue beyond 24 hours, pause further use and seek professional guidance before another session.
Prepare your skin in two deliberate steps: cleanse with a mild, oil-free cleanser, then let your skin dry completely before starting. Don’t use the device while cleansing or while your face is damp. Before treatment, confirm that you used the recommended type of cleanser and that no moisture remains on your skin.
Treat cleansing and dryness as separate parts of getting ready. A mild, oil-free cleanser is the recommended choice for washing beforehand, while the device should be used only on completely dry skin. If you are unsure whether your face has dried, wait before starting rather than using the device on damp skin. Keep both conditions in mind as you move from cleansing to treatment, so the cleanser choice and dry-skin requirement are each part of your routine.
At-home microdermabrasion device recommendations
For an at-home setup, gather a microdermabrasion device, its matching tip or crystal supplies, and the manufacturer’s instructions. Keep basic aftercare products nearby, but don’t put skincare formulas into the machine unless its directions specify them.
- Choose the device format before comparing features. Home machines may use a diamond tip or crystals, but those systems aren’t interchangeable. Decide which format you’re comfortable handling, then compare models within that category. Check the instructions and parts list to understand what the device requires for operation and upkeep.
- Match every attachment to its model. Tip shapes and labels vary between devices. Use the attachment that the machine’s manual identifies for the area you plan to treat. Don’t assume a tip from another brand will fit, even if it looks similar. Keep the model name and manual together so you can identify the right replacement part later.
- Read settings by their labels, not by comparison. Controls vary between machines, so a setting number on one model doesn’t tell you how another will perform. Use the device’s own descriptions to understand its options. If the manual doesn’t clearly explain a control or attachment, leave it unused rather than guessing.
- Check the crystal supply requirements. If you choose a crystal-based device, use only the abrasive material specified for that system. Particle type and delivery method are part of the machine’s design, not interchangeable add-ons. Store supplies as directed, and don’t pour skincare powders, scrubs, or homemade mixtures into the device.
- Keep the tool category clear. Microdermabrasion and microneedling use different equipment and procedures. A microneedling pen isn’t a substitute for a microdermabrasion machine, even if both appear in an advanced skincare routine. If you’re comparing options for a separate microneedling routine, explore microneedling devices and supplies as a distinct tool category.
- Build a complete kit around the device. Keep the manual, compatible attachments or crystals, and basic aftercare products together. Before each use, confirm you’ve selected the intended tip and supplies for that model. This quick check helps prevent mix-ups and keeps your routine consistent from one session to the next.
Treatment frequency and avoiding over-exfoliation
Treat exfoliation as one part of your routine, not a step to add whenever your skin looks dull. Track your skin’s response and avoid combining multiple exfoliating methods.
- Choose one exfoliation method for each routine. Don’t combine a device session, exfoliating paste, scrub, and acid product in the same routine. Each method exfoliates in a different way, making it harder to tell how your skin responds. Choose the approach that fits your goals and keep the others aside rather than layering them.
- Record each session and its context. Use a calendar or skincare journal to note the date, device or method, and products used afterward. Record any tightness, dryness, redness, or comfortable feel. These notes help you spot patterns instead of relying on memory or increasing frequency because your complexion looks temporarily dull.
- Pause if your skin shows signs of irritation. Before planning another session, check whether your skin has returned to its usual comfort and appearance. If dryness or redness remains, postpone exfoliation. Stinging or tightness isn’t proof that the session worked; treat it as a reason to reassess your routine.
- Keep device and paste schedules separate. A device routine and a DIY paste course use different methods. Don’t alternate between them to fill gaps in either schedule. Choose one approach and track it consistently. If you switch methods, don’t count the new option as an extra session in the first method’s plan.
- Restart other exfoliating products gradually. After a session, keep your routine simple before bringing back products such as exfoliating acids or retinoids. Reintroduce one product at a time, following its directions, so you can identify how your skin responds. Don’t add a scrub on the same day you restart an active ingredient.
- Adjust the plan when your routine changes. Travel, a new skincare product, or a change in how your skin feels can affect whether exfoliation makes sense that day. Review your notes before scheduling another session, and skip it when your skin feels unsettled. A measured calendar supports consistency without making exfoliation a task you must complete on schedule.
Space at-home microdermabrasion sessions carefully, and wait until your skin has recovered before scheduling another treatment. The recommended schedule is once every two weeks for oily skin and once a month for normal skin. Treat these intervals as guidance, not a prompt to exfoliate while your skin still feels unsettled. If redness, dryness, or tightness persists as the next date approaches, postpone the session and let your skin recover. These suggestions apply to at-home microdermabrasion, so don’t automatically transfer them to a paste, scrub, or exfoliating product. Keep noting the method and your skin’s response, and take a longer pause if your comfort hasn’t returned. A calendar can guide spacing, but it shouldn’t override what your skin is telling you.
Facial treatment technique and pass direction
Plan the facial in clear zones and prepare your aftercare before starting. A simple sequence helps you stay organized without rushing.
- Map your treatment area. Divide your face into zones such as the forehead, cheeks, nose, and chin. Decide where each zone begins and ends before starting. This makes it easier to spot missed patches and keep your movements even, instead of repeatedly treating the same area while trying to remember where you’ve been.
- Keep your movement deliberate. Use a mirror and work through one facial zone at a time. Avoid abrupt changes in direction or repeatedly returning to a patch that already feels sensitive. If the handpiece catches or feels uncomfortable, stop and review your technique and the device instructions rather than pressing harder.
- Protect your skin from sun exposure. Avoid sun exposure and use sunscreen for a week before and a week after microdermabrasion. Afterward, apply broad-spectrum SPF 50+ sunscreen to protect freshly exfoliated skin. Staying completely out of the sun for a few days after the procedure also supports a more careful aftercare routine.
- Choose soothing post-session care. Keep the rest of your routine simple after exfoliation. A moisturizing sheet mask can stay on for 5-15 minutes, followed by gentle hydration. The suggested post-treatment routine includes 12-15 drops of face oil. Avoid harsh exfoliants or acids for a few days, so your aftercare doesn’t add another exfoliating step.
- Notice changes without overreacting. Temporary tightness, dryness, or redness can occur after an at-home session and should resolve within 24 hours. Mild redness in a study lasted approximately 30-60 minutes, according to the U.S. Environmental Protection Agency. Give your skin time to settle, and don’t use another procedure to respond to short-term redness.
- Choose home or professional care based on your needs. At home, you manage the pace, device, and aftercare yourself. Professional microdermabrasion follows its own plan, with monthly maintenance sessions used to maintain cosmetic results. Keep the approaches distinct: a professional schedule doesn’t determine when to use a home device.
- Finish by cleaning the equipment. Follow the device manual to clean each component after your facial. Rinse the cap and foam filter with warm water when directed, then let the filter dry before storage. Store clean parts away from used care products, and note the treatment date so your next session isn’t an impulsive decision.
At-home microdermabrasion product ingredients
Keep the abrasive method separate from the skincare you apply around it. Ingredients in a paste, serum, or moisturizer don’t replace device instructions or determine how suction works.
- Know what the exfoliating step contains. A DIY paste combines aloe vera gel or juice with sodium bicarbonate. Aloe forms the base, and the bicarbonate is mixed in to make the exfoliating paste. Keep this method separate from a device session. Don’t apply the paste under a handpiece or add it to a machine’s crystal supply.
- Don’t treat every product as a device ingredient. Microdermabrasion devices use an abrasive substance and a handpiece that removes it; according to the U.S. Environmental Protection Agency, some systems use aluminum oxide crystals. A serum or moisturizer belongs in your skincare routine, not inside the suction or vacuum pathway. Use only materials specified in the device instructions.
- Keep the formula simple. For the paste method, follow the recipe rather than adding acids, retinoids, or extra exfoliating particles. Those additions change the formula. Avoid layering harsh exfoliants for a few days after exfoliation. A short ingredient list also makes it easier to identify what may be linked to dryness or redness.
- Choose post-session care for comfort. After exfoliating, favor gentle moisturizers rather than another abrasive product. A moisturizing sheet mask can be used after the procedure, and sunscreen protects freshly exfoliated skin from sun exposure. Keep the routine simple; introducing several formulas at once makes it harder to notice how your skin responds.
- Read ingredient claims in context. A label that says “collagen” doesn’t show whether a formula suits your device or post-session routine. Check product directions and use products only as intended. Don’t apply a cosmetic serum inside a microdermabrasion machine unless its instructions specifically say to.
- Keep methods and schedules distinct. A paste course and device sessions are separate exfoliation approaches, not steps to stack in one facial. The paste method is described for every 6-8 weeks over three sessions, followed by a 3-4 month rest. Don’t add device exfoliation to that course; allow your skin to settle between methods.
Bruun Beauty: Advanced Microneedling Serum SD - Control Salmon DNA Ampoule Serum
Advanced Microneedling Serum SD - Control Salmon DNA Ampoule Serum is a dedicated option for readers exploring microneedling skincare. Microneedling is separate from microdermabrasion, which exfoliates the skin’s surface. Don’t put the serum inside a microdermabrasion device or assume it’s intended for immediate post-procedure use. Follow the product directions and keep your routine gentle after exfoliation.
Choose this serum if you’re researching microneedling products as a separate part of your skincare routine, not as a substitute for a microdermabrasion tool or technique. Bruun Beauty also offers Jelly Mask Kits and BB Glow Treatment Supplies for other skincare interests.
Explore the serum and other skincare products at Bruun Beauty online.
Choose a Routine Your Skin Can Stay Comfortable With
Make your next step thoughtful, not more intense. As you learn how to do a microdermabrasion facial at home, consider how exfoliation fits with your other skincare habits. A simple routine makes it easier to notice what feels comfortable and when to pause.
Focus on the look and feel you want, and let your skin’s response guide future choices. You can explore other skincare approaches separately, without combining procedures or assuming every product belongs with every device. That distinction helps keep your routine deliberate rather than crowded.
Small, considered choices can make your at-home routine feel more manageable. Keep learning, stay gentle with your skin, and enjoy creating a skincare practice that feels right for you.
Frequently Asked Questions
Can Any Skin Type Do Microdermabrasion?
Skin type alone doesn’t determine whether a device is suitable; consider your skin’s current condition. Avoid areas with active acne, open wounds, warts, active keloids, or irritated or inflamed skin. Oily skin doesn’t automatically call for more frequent exfoliation, and sensitive skin benefits from a cautious approach. If you’re pregnant or have a skin condition, consult a healthcare professional before using a device.
What Are the Benefits of Microdermabrasion?
Microdermabrasion exfoliates the skin’s surface, which may help your complexion look less dull and feel smoother. Think of it as a cosmetic exfoliation step, not a way to address every skin concern. Set a modest goal, such as improving the look of rough texture, and don’t use the device over active acne. Your technique and aftercare matter as much as your device choice.
At-home microdermabrasion tips for different skin types
Choose a device based on comfort and technique, not skin type alone. Diamond-tip models use no loose particles and are generally safer for home use. If you have sensitive skin, use a light touch and stop if you feel discomfort. The suggested schedule is once every two weeks for oily skin and once a month for normal skin; avoid irritated areas regardless of skin type.
Improving Skin Texture Without Lasers: The Esthetician’s Guide to Smooth Skin
At-Home Collagen Induction: Guide to Radiant Skin
Related Posts

Consistent Microneedling and the Long-Term Changes to Expect

Aftercare choices to lower infection risk at home after microneedling

How to Create a Relaxing At-Home Spa Day With Simple Rituals

Sunscreen Recommendations After Microneedling: How to Protect Healing Skin

Investing in my skin for the future: what deserves my budget

Post-microneedling skincare routine for masks, makeup, and recovery

Skin Peeling After Microneedling: What to Avoid and When to Resume Makeup
