

Microneedling for Hyperpigmentation: Professional Home Guide
What if the secret to fading those stubborn dark spots isn't a stronger serum, but how deep that serum actually goes? Microneedling for hyperpigmentation at home is a powerful way to achieve an even, luminous skin tone by creating micro-channels that help brightening actives reach deeper layers. When performed with a safe needle depth of 0.5 mm or less, this professional-grade technique can visibly fade discoloration and boost your natural glow.
You have likely tried every Vitamin C and niacinamide product on the market, yet those sun spots and post-breakout marks still won't budge. It's frustrating to invest so much time and money into a routine that only seems to sit on the surface of your skin. You want that clear, glass skin look, but the high cost of in-clinic treatments often feels out of reach.
This guide will show you how to safely bridge the gap between expensive clinic visits and effective home care. You'll learn the exact esthetician-approved protocol to use microneedling for hyperpigmentation at home without risking irritation or damage. We'll cover everything from selecting the right Dr. Pen device and sterile cartridges to pairing your treatment with advanced K-beauty serums like Salmon DNA for a professional-grade finish.
Key Takeaways
- Understand how controlled micro-channels trigger your skin's natural renewal process to address melanin overproduction and uneven tone.
- Master the "less is more" rule for microneedling for hyperpigmentation at home by using conservative needle depths of 0.5 mm or less to avoid irritation.
- Discover why professional-grade Dr. Pen devices and sterile, single-use cartridges are non-negotiable for achieving safe, precise results.
- Learn the step-by-step mapping technique to ensure even coverage across your face while maintaining a clean, esthetician-level workspace.
- Follow the essential 24-hour aftercare protocol, including how to soothe your skin with professional jelly masks to protect your new glow.
Understanding Hyperpigmentation and the Microneedling Solution
Hyperpigmentation is simply your skin's way of reacting to stress. When your skin is exposed to excessive sun, hormonal shifts, or an injury like a breakout, it produces extra melanin as a protective shield. This overproduction results in the stubborn dark spots that often refuse to budge with standard creams alone. Choosing to start microneedling for hyperpigmentation at home allows you to target these specific issues by working with your skin's natural biology rather than against it.
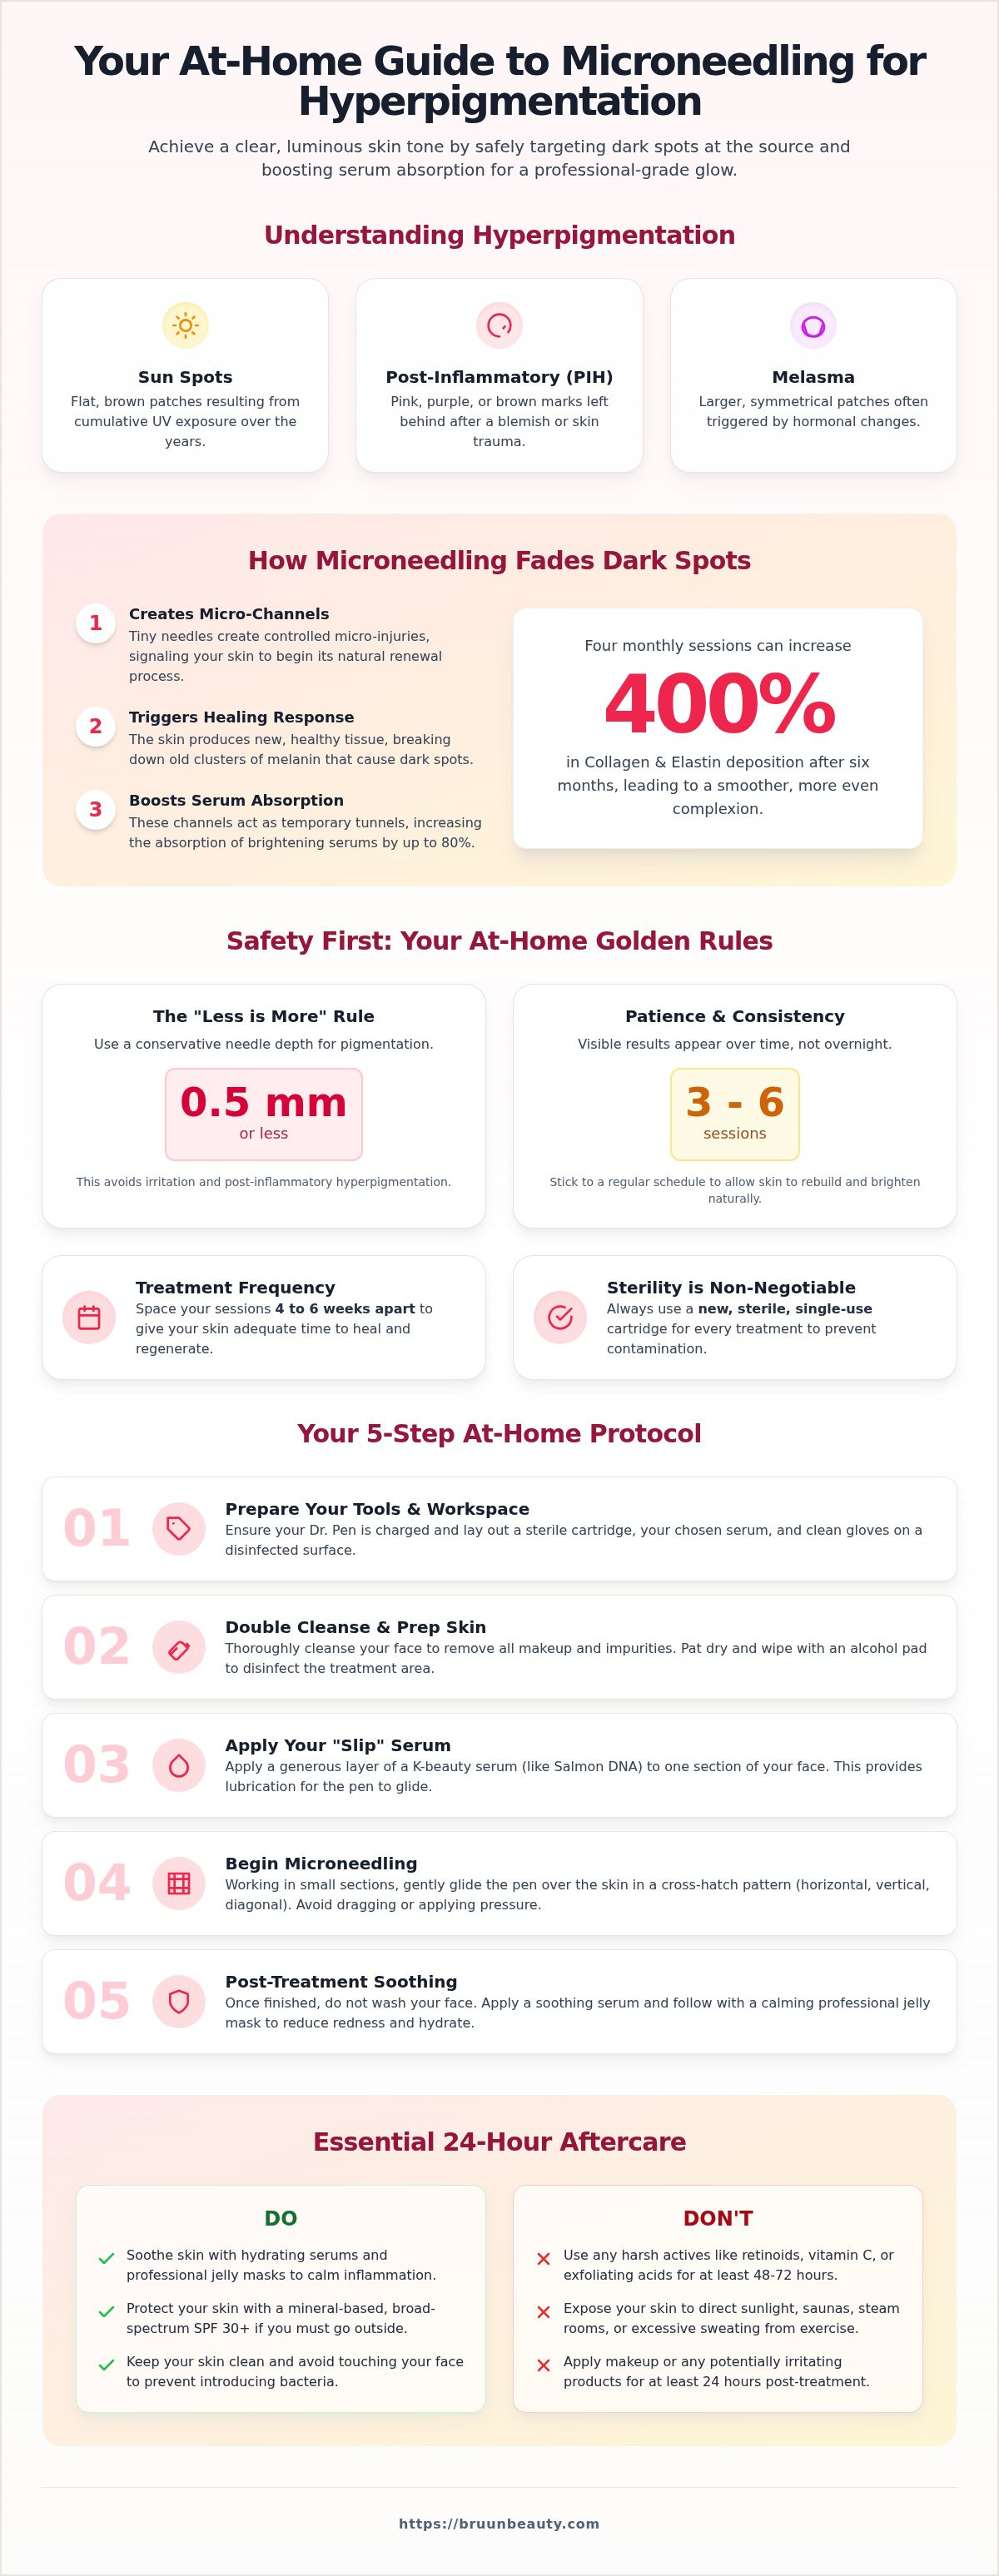
The process, technically known as collagen induction therapy (microneedling), involves using tiny needles to create thousands of controlled micro-injuries. These microscopic channels serve two purposes. First, they trigger a "wound healing" response that forces your skin to produce new, healthy tissue. Second, they act as temporary tunnels that increase the absorption of your brightening serums by up to 80%. This ensures your active ingredients reach the deeper layers where pigment actually lives.
Before you begin, it's helpful to identify which type of pigment you are facing. Common concerns include:
- Sun Spots: Flat, brown patches caused by years of UV exposure.
- Post-Inflammatory Hyperpigmentation (PIH): The pink, purple, or brown marks left behind after a blemish or skin trauma.
- Melasma: Larger, symmetrical patches often triggered by hormonal changes.
How Microneedling Fades Dark Spots
The physical action of the needles helps break down existing clusters of melanin that have settled deep in the dermis. As the skin heals, it sheds these darkened cells and replaces them with fresh, unpigmented tissue. This accelerated cell turnover is why microneedling for hyperpigmentation at home is often more effective than superficial chemical peels. While a peel only exfoliates the very top layer, microneedling encourages renewal from the inside out. In fact, research from May 2026 shows that four monthly sessions can increase collagen and elastin deposition by up to 400% after six months, leading to a much smoother and more even complexion.
Managing Expectations: Timeline for Results
Patience is your best friend when managing pigment. It's a marathon, not a sprint. You won't see a "glass skin" glow overnight, and rushing the process with needles that are too long can actually cause more inflammation. Most people start noticing a visible difference in their skin tone after 3 to 6 sessions, spaced about four to six weeks apart. Consistency is what separates professional-level results from a one-time trial. By sticking to a regular schedule, you give your skin the time it needs to rebuild and brighten naturally.
Essential Tools and Serums for Brightening Your Complexion
Achieving professional results starts with the right equipment. You wouldn't expect a masterpiece from a worn-out brush; your skin deserves the same standard of care. Using a high-quality Dr. Pen device is the first step in ensuring precision and safety. These devices allow you to control the depth and speed of the needles, which is vital when you are performing microneedling for hyperpigmentation at home.
Equally important are your needle cartridges. You must always use sterile, single-use cartridges to prevent cross-contamination and ensure the needles are sharp enough to create clean channels. Research into the dermatological applications of microneedling confirms that this method is highly effective for pigment disorders when done correctly with the right tools. Using a dull or reused needle can cause unnecessary trauma, leading to the very inflammation we want to avoid.
The "slip" serum you choose is perhaps the most critical part of the pigment-fading process. It provides the lubrication needed for the pen to glide smoothly while delivering concentrated actives directly into the skin. Without a proper serum, the device may drag, causing micro-tears. If you're looking to upgrade your routine, you can explore our full range of microneedling essentials to find the perfect match for your skin type.
Choosing Your Microneedling Pen
When browsing Dr. Pen models, you'll likely see the M8 and the A6S. Both are fantastic for home use, but they offer different benefits. The M8 features the thinnest needle gauge, which minimizes discomfort. The A6S is a professional favorite because of its dual-power design; you can use it corded for consistent power or cordless for better maneuverability around the curves of your face. Look for adjustable speed settings and precise depth control as non-negotiable features for your at-home sessions.
The Power of PDRN and Brightening Actives
K-beauty experts and estheticians are currently obsessed with PDRN, or Salmon DNA. This ingredient is a powerhouse for skin revitalization. BRÜUN’s Salmon DNA (PDRN) ampoules work by mimicking your skin's own DNA repair process, making it incredibly effective for evening out skin tone. You should also look for serums containing Niacinamide, Peptides, or Tranexamic Acid to help suppress melanin production and support your skin's barrier.
A quick word of caution: don't use harsh acids like high-percentage Vitamin C or Retinol during the actual needling process. These ingredients are great for daily care, but they can be too aggressive when applied through open micro-channels. Stick to soothing, hydrating, and reparative ampoules during your session to ensure your skin stays happy and nourished. You can always resume your active acids a few days after your skin has closed and recovered.
Safety First: Needle Depth and Frequency for Pigment
When you're performing microneedling for hyperpigmentation at home, your mantra should always be "less is more." It is a common misconception that deeper needles lead to faster results. In reality, excessive trauma is the fastest way to trigger post-inflammatory hyperpigmentation (PIH). This occurs when your skin perceives the treatment as a genuine injury rather than a gentle nudge, causing melanocytes to overreact and produce even more pigment. To keep your skin safe and glowing, it's best to stay within the cosmetic range of 0.25 mm to 0.5 mm.
Your skin also needs time to do the heavy lifting. While you might want to needle every week, you must give your skin 4 to 6 weeks to fully regenerate between sessions. This "wait time" allows the new collagen to mature and the fresh, unpigmented cells to reach the surface. Rushing this cycle can compromise your skin barrier and lead to chronic inflammation, which often darkens existing spots. Patience is a vital ingredient in any brightening routine.
Before you pick up your device, identify your "no-go" zones. You should never needle over:
- Active acne or breakouts, as this can spread bacteria across your face.
- Inflamed, irritated, or broken skin.
- Raised moles, warts, or any suspicious lesions.
- Areas with active cold sores or rashes.
Recommended Depths for Hyperpigmentation
For delicate areas like the under-eyes or around the lips, stick to 0.25 mm. This depth is perfect for general brightening and increasing serum absorption without causing distress. For stubborn sun spots on the cheeks or forehead, you can move up to 0.5 mm. A systematic review on microneedling for melasma shows that even conservative depths are highly effective when paired with the right brightening actives. Always start at the shallowest setting and only increase depth once your skin has shown it can handle the procedure without lingering irritation.
The Danger of Over-Needling
Over-treating your skin is a major setback. If you notice prolonged redness that lasts more than 48 hours, significant swelling, or "track mark" bruising, you have likely gone too deep or used too much pressure. These are signs of distress, not progress. The goal of at-home microneedling is to stimulate, not to damage. Respecting the healing phase of the collagen induction cycle ensures your skin remains nourished and resilient, eventually revealing that clear, "glass skin" glow you are working toward.
Step-by-Step: Your At-Home Microneedling Protocol
Performing microneedling for hyperpigmentation at home requires a disciplined approach to hygiene and technique. Think of your bathroom as a mini-spa; it needs to be spotless. Before you even touch your device, clear your counters and wipe them down with a disinfectant. Having a dedicated, sterile workspace is the first step toward achieving professional results without the clinic price tag.
The Pre-Treatment Ritual
Start by double cleansing your face to remove every trace of makeup, SPF, and oil. Use a gentle, pH-balanced cleanser that doesn't strip your barrier. Once your skin is clean, wipe the area with 70% isopropyl alcohol on a cotton pad to ensure a truly sterile surface. If you choose to use a numbing cream, apply it now and let it sit for about 20 minutes; just remember to wipe it off completely with alcohol before you start needling.
Now, apply your "slip" serum. You should work in small sections so the serum doesn't dry out before you reach it. Your skin must stay wet throughout the process to prevent friction or dragging. This lubrication allows the pen to move effortlessly, ensuring the needles enter and exit the skin vertically without causing unnecessary trauma.
Executing the Treatment
Map your face into four main zones: the forehead, the cheeks, the nose, and the chin. In each section, use the "stamp and glide" technique. Hold the pen at a 90-degree angle and move it in a controlled, steady motion. You want to complete vertical, horizontal, and then diagonal passes to ensure even coverage across the entire area. This systematic approach guarantees that your brightening actives reach every cluster of pigment.
Be ready to adjust your needle depth on-the-fly. Your skin isn't the same thickness everywhere. For example, you should dial down to 0.25 mm when working around the delicate undereye area, then move back to 0.5 mm for the fleshier parts of your cheeks. Once you finish a section, apply another layer of your favorite brightening serum to take advantage of those freshly opened micro-channels.
Hygiene doesn't end when the device turns off. Immediately remove the needle cartridge and dispose of it in a sharps container or a puncture-proof bottle. Wipe down the body of your Dr. Pen with alcohol to keep it ready for your next session. Never, under any circumstances, try to clean and reuse a needle cartridge; the risk of infection is simply too high.
Post-Needling Care: Soothing and Protecting Your Glow
Your skin has just undergone a controlled transformation, and the next 24 to 72 hours are the most critical for ensuring your results are luminous rather than irritated. Think of this phase as the "set" time for your treatment. While the micro-channels are open, your skin is a sponge for everything in its environment, which is why your aftercare routine must be as clean and precise as the procedure itself.
You must follow the 24-hour rule: no makeup, no heavy sweating at the gym, and absolutely no direct sun exposure. These activities can introduce bacteria or heat to the skin, potentially leading to breakouts or prolonged inflammation. To instantly calm that "sunburn" sensation, many of our professional followers swear by a BRÜUN professional jelly mask. These masks create an occlusive seal that pushes hydration deep into the skin while providing an immediate cooling effect.
Protecting your progress with a broad-spectrum SPF 30+ is non-negotiable. Since you've just brought fresh, new skin to the surface, it's highly susceptible to UV damage. Skipping sunscreen can lead to the return of dark spots, undoing all the hard work of your microneedling for hyperpigmentation at home. Focus on building a supportive routine with ceramides and hyaluronic acid to lock in moisture and keep your barrier resilient.
The First 72 Hours: Recovery Phase
During the initial recovery window, your goal is to support the skin barrier without causing stress. You should avoid all active ingredients like AHAs, BHAs, and Retinoids for at least 3 to 5 days. These can be too aggressive for newly needled skin and may cause unnecessary peeling or stinging. Instead, keep your skin hydrated and nourished with simple, soothing ampoules.
A cool jelly mask is the perfect post-needling treatment during this time. It helps to reduce redness and provides a physical barrier that keeps moisture from evaporating. If you notice slight flaking on day three, don't pick at it. This is a natural part of the cell turnover process, and keeping the area hydrated will help the new skin surface smoothly.
Long-Term Maintenance for Even Skin
Once the initial redness fades, you can begin to integrate your results into a broader K-beauty regimen. Consistency is what creates that coveted "glass skin" look. While one session provides a nice glow, the real transformation happens when you stick to your 4 to 6-week schedule. This allows your skin to complete its natural healing cycle before you start the next round of stimulation.
Remember that daily sun protection is required even on cloudy days or when you are staying indoors. UV rays can penetrate windows and trigger the melanocytes you've worked so hard to calm. If you are dealing with very stubborn, deep-set melasma that doesn't show improvement after six consistent sessions, it's a good idea to seek professional advice from a licensed esthetician for a more intensive clinical plan. For those seeking advanced solutions, Be-Youth offers medical-grade laser treatments specifically designed to target deep-seated pigment that home care might miss.
Your Path to a Clearer, More Radiant Complexion
Mastering microneedling for hyperpigmentation at home is about more than just owning a device; it's about following a safe, professional protocol. By prioritizing a conservative needle depth and pairing your treatment with high-performance actives like Salmon DNA, you can effectively address stubborn discoloration. This approach ensures you get the results you want without the risk of causing further irritation or damage.
Consistency and patience are your greatest allies in this journey. Stick to the recommended 4 to 6-week healing cycle and always protect your new skin with broad-spectrum SPF to prevent new spots from forming. As an authorized Dr. Pen retailer trusted by over 5,000 licensed estheticians, BRÜUN provides the same professional-grade tools used in top clinics across the country to ensure your safety and success.
With our fast shipping from Miami and Los Angeles, your transformation is closer than you think. You now have the expert knowledge and the right steps to achieve a luminous, glass-skin glow from the comfort of your own home. We are excited to help you feel confident in your skin again.
Frequently Asked Questions
Can microneedling make hyperpigmentation worse?
Yes, microneedling can worsen hyperpigmentation if you are too aggressive or skip sun protection. The resulting inflammation can trigger post-inflammatory hyperpigmentation (PIH), especially on deeper skin tones. Always start with conservative needle depths between 0.25 mm and 0.5 mm. Ensure your skin isn't already irritated or inflamed before you begin your session to keep your complexion safe and nourished.
How often should I microneedle for dark spots at home?
You should perform microneedling for hyperpigmentation at home once every 4 to 6 weeks. While it's tempting to do it more often, your skin needs this time to complete its full renewal cycle and build new collagen. Rushing the process can cause chronic inflammation, which often makes dark spots look darker. Consistency over several months is what leads to a truly luminous, even tone.
Which Dr. Pen is best for fading hyperpigmentation?
The Dr. Pen M8 and A6S are the top choices for addressing discoloration. These models feature fine needle gauges and stable motor speeds that create clean, vertical micro-channels. This precision is vital because it allows your brightening serums to reach the deeper layers of the skin without causing unnecessary tearing or surface trauma. Better precision always leads to more predictable, professional results from the comfort of your home.
What is the best serum to use while microneedling for pigment?
Sterile ampoules specifically formulated for needling are the best choice for your sessions. BRÜUN's Salmon DNA (PDRN) is a favorite among estheticians because it revitalizes the skin barrier while evening out your tone. You should always avoid serums containing high alcohol content, synthetic fragrances, or harsh acids during the actual procedure. These ingredients can cause intense irritation when delivered through open micro-channels.
Can I use microneedling for melasma at home?
You can use microneedling for melasma, but you must be extremely gentle since this condition is sensitive to heat and trauma. Because melasma is often hormonal, aggressive needling can backfire and darken the patches. Stick to very shallow depths and use a "less is more" approach. If your melasma is currently active or changing, it's best to consult a professional before trying any at-home treatments.
How long does it take to see dark spots fade after microneedling?
Visible fading of deep hyperpigmentation usually takes between 3 and 6 consistent treatments. You might notice a healthy "glow" within the first week as the surface layer exfoliates, but deeper pigment takes longer to lift. Your skin needs time to replace those darkened cells with fresh, healthy tissue. Be patient and stay committed to your routine to see the best long-term results for your skin.
Microneedling Frequency for Anti-Aging: Sessions and Healing Time
How to Track Microneedling Progress and See Results Over Time
Related Posts

Consistent Microneedling and the Long-Term Changes to Expect

Aftercare choices to lower infection risk at home after microneedling

How to Create a Relaxing At-Home Spa Day With Simple Rituals

Sunscreen Recommendations After Microneedling: How to Protect Healing Skin

Investing in my skin for the future: what deserves my budget

Post-microneedling skincare routine for masks, makeup, and recovery

Skin Peeling After Microneedling: What to Avoid and When to Resume Makeup
