

How to Track Microneedling Progress and See Results Over Time
Microneedling results unfold over weeks, not overnight. Final results from a single session are typically visible four to six weeks after treatment, while the Cleveland Clinic says results can take 3 to 6 months to appear. Knowing how to track microneedling progress helps you distinguish short-term recovery from gradual changes in your skin.
It’s natural to look for an immediate glow, but early redness or flaking can make changes difficult to judge. To track microneedling progress, keep a simple record of consistent photos, skin texture, hydration, and recovery. Note what you see in the first week, what may become noticeable around week two, and that collagen-related changes can take months to show. This gives you a clearer view of your skin’s timeline than a single mirror check.
Key Takeaways
- Compare photos taken in consistent lighting and angles to spot gradual skin changes more clearly.
- Separate temporary redness, swelling, or flaking from longer-term shifts in texture and hydration.
- Track recovery and visible changes on a timeline, since collagen remodeling continues beyond the first week.
- Use weeks 2-6 to document how your skin’s texture, glow, and hydration evolve between check-ins.
- Choose post-session skincare that fits your routine and follow the guidance provided for your treatment.
How Long Does It Take to See Results From Microneedling?
Early changes and longer-term effects follow different timelines. A useful way to track microneedling progress is to separate recovery notes from photos of gradual skin changes.
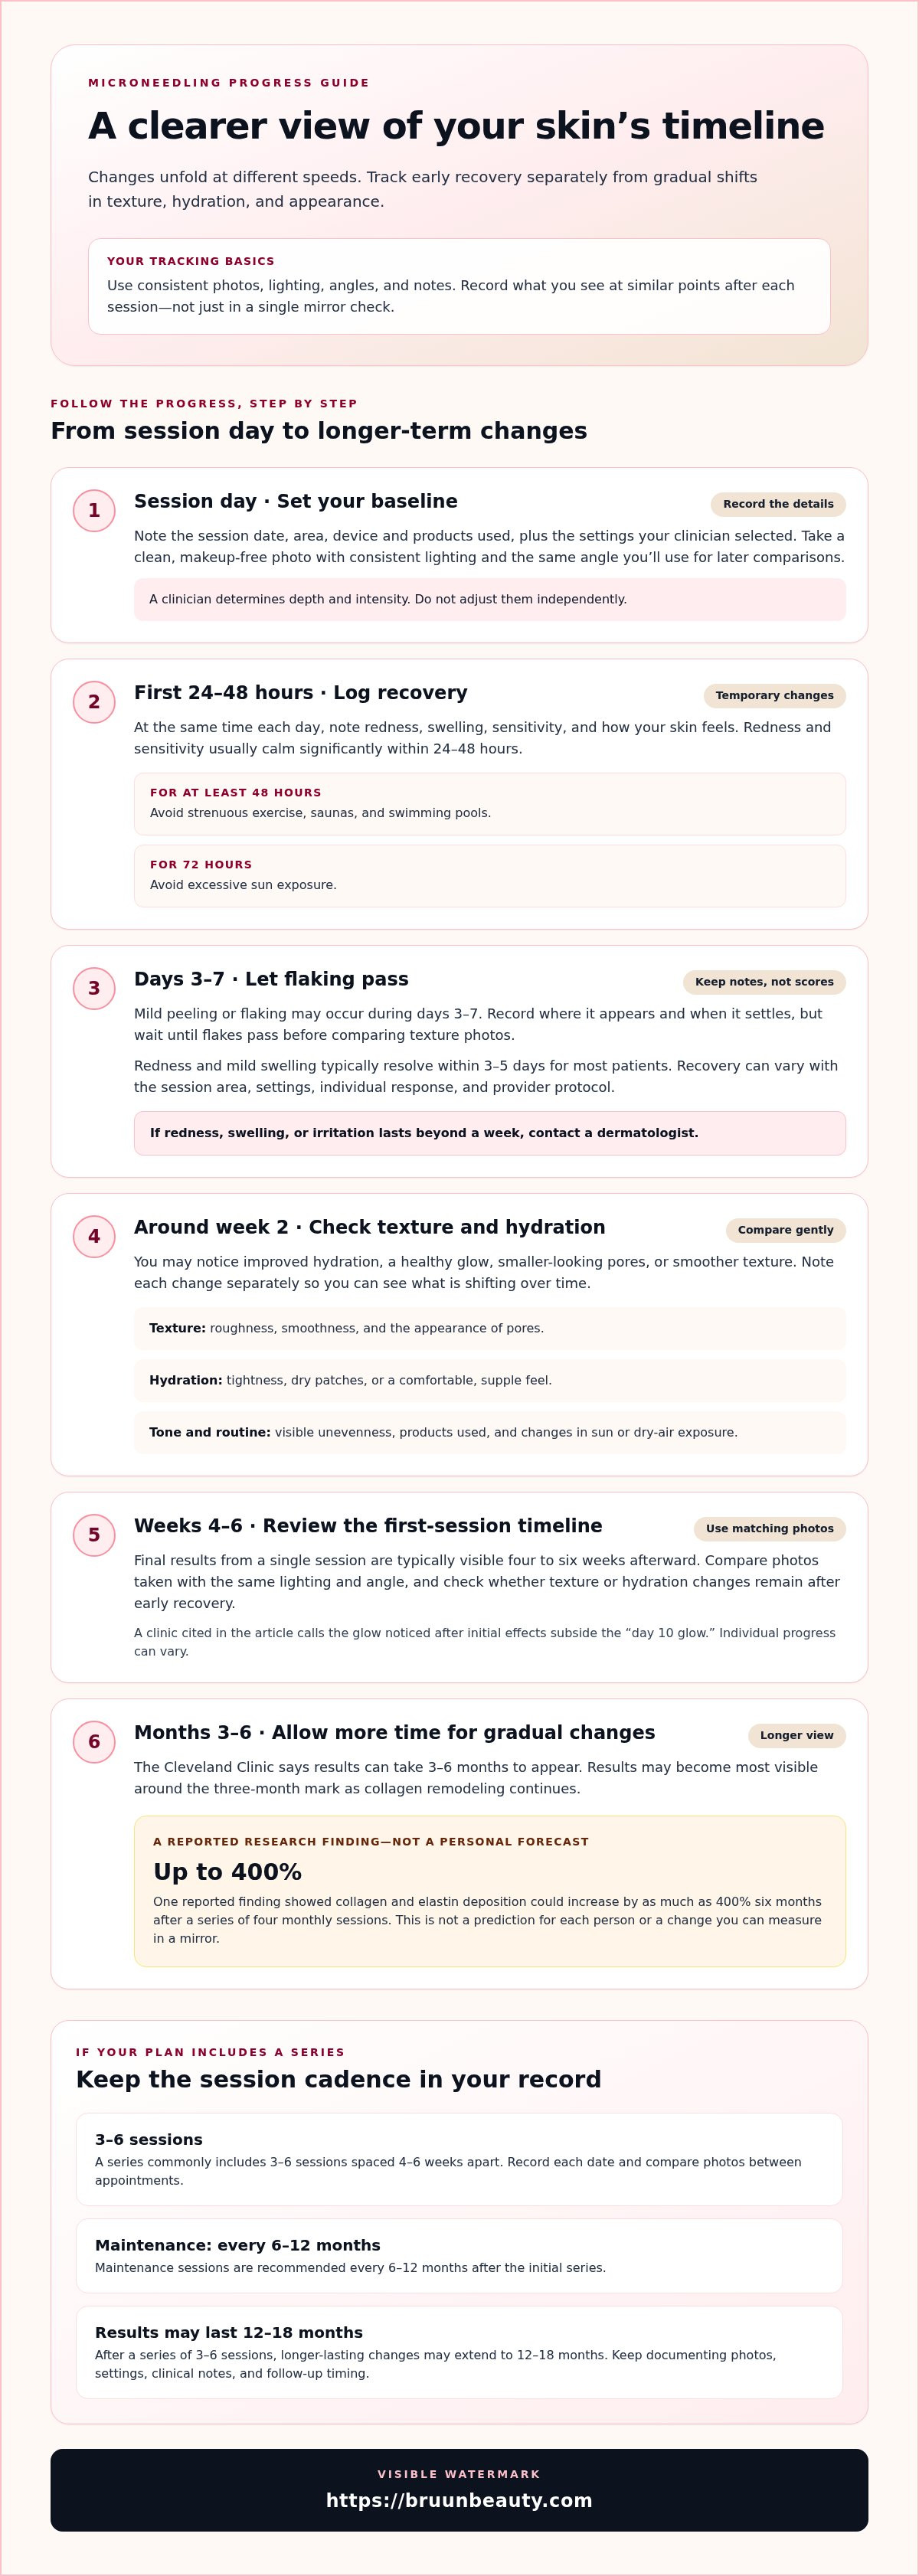
Some people notice texture changes in the first week or two. Final results from one session are typically visible four to six weeks after treatment, while the Cleveland Clinic says results can take 3 to 6 months to appear. Results may become most visible around the three-month mark as collagen remodeling continues.
Collagen and elastin findings can help explain why progress takes time. One reported finding showed collagen and elastin deposition could increase by as much as 400% six months after a series of four monthly treatments. That figure describes a finding after a series, not a prediction for each person or a measure you can see in a mirror.
Keep a record of the treatment date, device settings, treatment area, and follow-up timing. A clinician determines the depth and intensity; patients shouldn’t adjust them independently. Record the exact device and products used, too. The microneedling collection can help you identify product names for your notes.
Aftercare affects the early recovery period, so note when you resume normal activities. Avoid strenuous exercise, saunas, and swimming pools for at least 48 hours after treatment. Avoid excessive sun exposure for 72 hours, then use SPF 30+ sunscreen each morning. More intensive activities can typically resume around two weeks after microneedling.
Treatment Spacing and Maintenance
Treatment spacing is the time between microneedling sessions and any later maintenance. A series commonly includes 3-6 sessions spaced 4-6 weeks apart, allowing time to follow skin changes between appointments. Maintenance treatments are recommended every 6-12 months after the initial series. Record each session date and compare photos before deciding whether a new appointment fits your plan.
Progress Factors and Safe Tracking
Progress depends on the treatment area, settings, individual skin response, and provider protocol. At home, record photos, texture, and recovery without changing needle depth or intensity. If you see a dermatologist, clinical notes can capture settings and follow-up observations. Contact a dermatologist if redness, swelling, or irritation lasts beyond a week after microneedling.
One patient report cited on the page found that 73.3% of individuals saw visible improvement in their skin’s appearance by day 30 after a microneedling session. The clinic calls the glowing complexion noticed after the initial effects subside the “day 10 glow.”
For longer-lasting changes, completing a series of 3 to 6 microneedling treatments can extend results to 12 to 18 months. Keep documenting treatment settings, photographs, clinical notes, and follow-up timing, and use daily sun protection to help preserve results.
Monitoring skin texture and hydration changes
After each session, record specific changes rather than simply deciding whether your skin looks “better.” Note dryness, tightness, rough patches, visible pores, uneven tone, and how makeup sits. Include the treatment date and recovery stage so you can compare similar points in your routine.
Repeat the same simple checks each time. Describe one area, such as your cheeks, and its texture in your own words. For example, note whether a rough patch feels smoother or moisturizer absorbs differently. Take photos with a clean, makeup-free face, using consistent lighting and the same angle.
Track these details after every session:
- Texture: note roughness, smoothness, and the appearance of pores.
- Hydration: record tightness, dry patches, or a comfortable, supple feel.
- Tone: describe visible unevenness or areas that look more even.
- Routine: list products used and any changes in exposure to sun or dry air.
Skin can flake as the surface renews. Mild peeling or flaking may occur during days 3 through 7 after microneedling, so record where it appears and when it settles. Don’t score texture while flakes are present; compare the area again after they pass, using the same lighting and photo distance.
By week 2 after a session, you may notice improved hydration, a healthy glow, smaller-looking pores, and smoother skin texture. Record each change separately rather than combining them into one overall rating. A more comfortable feel, for example, is useful to track even if a photo doesn’t show a clear difference.
Collagen activity develops beneath the surface, so visible texture changes can unfold gradually. A study of 20 women who received six microneedling treatments every two weeks found reduced transepidermal water loss. This finding concerns a measured skin-barrier change; your notes should still focus on your own visible texture and hydration.
Distinguish temporary recovery signs from changes that remain after flaking ends. Swelling or dryness can affect how your skin looks in a photo, while comparisons across sessions can reveal longer-term patterns. Keep your routine steady during comparisons, and note product or sun-exposure changes that might affect how your skin feels.
To keep product names consistent in your notes, browse the microneedling product range and record the exact items you use alongside each session.
Tracking redness, swelling, and peeling during the first week
Use a daily log to distinguish recovery changes from symptoms that persist. Record redness, swelling, sensitivity, and peeling at the same time each day, then compare how they change over the first week.
Redness and sensitivity usually calm down significantly within 24 to 48 hours. Redness and mild swelling typically resolve within three to five days for most patients, though recovery also depends on the treatment area, device settings, personal factors, and provider protocol. Note whether the redness fades, stays steady, or becomes more noticeable.
Peeling can follow a different timeline. Microneedling-related flaking may appear during days 3 through 7, while peeling typically lasts from days 3 to 5. Write down when dryness or flaking begins and ends, and note its location, such as the cheeks or forehead. This helps you compare recovery patterns without mistaking temporary surface changes for lasting texture shifts.
- Day 1: Record redness, sensitivity, and swelling, with notes about where they appear.
- Days 2-3: Compare with the first entry and note whether redness is diminishing.
- Days 3-5: Log any bronzing, dryness, or peeling, including when it starts.
- Days 6-7: Note whether flaking has eased and whether redness or swelling remains.
Expected redness can look like a flushed complexion, and mild swelling may accompany it. Areas of bronzing, darkening, dryness, and sloughing may occur for 1-2 days after microneedling. Record these effects separately from redness, because different changes may start and fade at different points on your timeline.
The trend and duration can help distinguish typical redness from a possible complication. Expected redness generally diminishes, while redness, swelling, or irritation lasting beyond a week warrants contacting a dermatologist. Don’t judge by one photo. Compare your daily notes and images to see whether symptoms are settling.
Device choice and treatment settings can affect recovery, so note them alongside the treatment date. Clinicians determine microneedling depth and intensity; patients shouldn’t adjust them independently. If you receive treatment from a dermatologist, ask them to include the settings and follow-up timing in your clinical notes.
For a clear comparison, take a photo each day in the same lighting and position, then pair it with a brief symptom note. A simple entry such as “day 4, cheek flaking, redness lighter than yesterday” captures more useful detail than a general rating. Keep aftercare notes beside the timeline so you can interpret changes in context.
Week-by-week collagen remodeling and visible changes
At each weekly check-in, record one specific observation about a particular area instead of judging your whole face at once. For example, describe whether a line beside your mouth looks softer or your cheek texture appears more even. Linking each observation to a location makes gradual changes easier to compare.
Separate what you see from what you feel. “Lower cheek looks smoother in side lighting” describes appearance, while “skin feels less rough when cleansing” records texture by touch. These details add context to your progress log and help you discuss a specific concern at follow-up.
Use the same categories for every entry so your notes stay useful throughout your treatment plan:
- Area: name the facial zone, such as the forehead or lower face.
- Concern: describe the feature you’re monitoring, such as fine lines or uneven texture.
- Observation: record what looks or feels different, without assigning a cause.
- Context: note any change in routine that could affect how the area appears.
Look for patterns across entries, not a single dramatic difference. If a concern seems less noticeable in one observation but returns in the next, record both. This helps you avoid mistaking a temporary visual variation for a lasting change.
A study reported a 30% reduction in fine lines and wrinkles in the lower face and neck four months after microneedling treatment. Use that result as research context, not as a personal forecast. Your log should focus on the exact area and feature you’re tracking, rather than comparing your skin directly with a study result.
At each review, read your descriptions in order and identify recurring observations. Repeated notes about a softer-looking line, for example, show a clearer pattern than one isolated comment. If your records show different changes in separate areas, keep those findings distinct rather than combining them into one overall judgment.
Discuss collagen-related progress in relation to the concern that led you to consider microneedling. Bring specific notes to a clinician if you want help interpreting the pattern or discussing next steps. Recording the area, concern, and repeated observations can make the conversation more focused.
Documenting progress around weeks 2-6
Use your weeks 2-6 notes to make each concern easier to describe and compare. Give every concern its own entry instead of combining texture, tone, and visible lines into one overall rating. For example, track cheek roughness separately from uneven tone around the jaw.
Use consistent words for each observation. Describe texture as rough, even, or smooth, and tone as patchy or more uniform. Keep the wording descriptive rather than judgmental. Consistent terms make it easier to notice changes without relying on a vague impression.
Organize each entry with a few practical details:
- Area: identify the exact zone, such as the right cheek or forehead.
- Concern: name the feature you’re following, such as roughness or visible pores.
- Observation: describe what you notice in plain terms.
- Context: record makeup use, skincare changes, or unusual sun exposure.
Makeup can change how tone and texture appear, so note whether you’re documenting bare skin or a made-up look. Don’t compare those entries as though the conditions were identical. If something looks different, record the context instead of immediately attributing the change to microneedling.
Keep the same labels for concerns throughout your treatment plan. If you rename “rough cheek texture” as “large pores” in a later note, the record becomes harder to interpret. Add a separate concern when needed, and keep the original label for the feature you’re tracking.
At review time, group entries by concern and read them in date order. Notice whether a description recurs, changes gradually, or appears only once. For instance, repeated notes about uneven tone mean something different from one observation made after a skincare routine change.
Bring organized notes to a clinician if you want to discuss your observations. A short list of concerns and relevant context can help you explain what you’ve noticed without relying on memory. Keep questions about your treatment plan beside the related entry to connect the discussion to your own observations.
Use your record as a personal reference, not a scorecard. Specific descriptions help you pay attention to your skin without expecting every concern to change in the same way. Record meaningful context and use your observations to support informed conversations about your routine.
Bruun Beauty: Advanced Microneedling Serum SD - Control Salmon DNA Ampoule Serum
For clearer routine notes, record the exact product you use alongside each session and follow its label directions. The serum product details can help you keep its name consistent in your skincare log. Keep product use aligned with your clinician’s aftercare guidance, and note any routine changes when you compare skin observations.
Bruun Beauty’s online selection also includes Jelly Mask Kits and professional skincare tools. Visit Bruun Beauty to explore its skincare offerings or contact the team with questions.
Make Your Next Skin Check-In More Intentional
Knowing how to track microneedling progress gives each skin check-in a clearer purpose. Keep your notes consistent and use them to guide conversations about your skincare routine and next steps. Your record can help you focus on the changes that matter to you, rather than expecting every session to look the same.
As you organize your routine, Bruun Beauty offers Advanced Microneedling Serum SD - Control Salmon DNA Ampoule Serum, Jelly Mask Kits, and DR. PEN Microneedling Devices. Record the products and device you use alongside your skin observations to keep your notes connected to your routine.
Keep the process simple and consistent. A thoughtful record can help you feel prepared for each check-in and more confident as you care for your skin.
Small, consistent observations are a practical next step in caring for your skin.
Frequently Asked Questions
Does skin concern or starting skin condition change the timeline?
Yes. Your starting concern and treatment factors shape how progress appears. The treatment area, settings, individual skin factors, and provider protocol all affect the timeline. Before your session, describe your main concern specifically, such as rough cheek texture or visible lines around your mouth. Keep that description as your baseline, then compare the same area at follow-ups.
How Can You Document Before and After Results More Reliably?
Pair consistent photos with a short written record after each session. Include the treatment date, area, settings recorded by the clinician, products used, and your main observation. Keep original images, not edited versions, and label files with the date and facial area. A dated cheek photo alongside a note about dryness gives more context than an image alone.
How Many Sessions Do Patients Typically Need to See Visible Changes?
A typical recommended course is 3-6 sessions, with each session spaced 4-6 weeks apart. Your notes can help distinguish changes after one appointment from patterns across a course. For example, compare the same concern at each follow-up rather than judging the entire series from one photo. Keep the treatment plan and recorded session dates together for a clearer overview.
What changes should you expect after microneedling, and when?
Early texture changes can appear in the first week or two, while hydration, glow, and smoother-looking texture may be noticeable by week two. Results from a single session are typically visible four to six weeks afterward. Collagen-related changes take longer to assess, so distinguish short-term appearance and recovery notes from observations made at later follow-ups.
How often should you take photos to track microneedling results?
Take baseline photos, then repeat them at consistent follow-up points throughout your plan. Use the same interval between comparisons whenever possible, and take photos before appointments if that fits your clinician’s schedule. Avoid comparing images taken under different conditions, since changes in lighting or camera distance can make ordinary variation look like a skin change.
How to take consistent before-and-after microneedling photos?
Use the same room, light source, camera, and position each time. Face the camera straight on, then capture the same side angles and areas. Keep your face clean and makeup-free so coverage doesn’t alter the appearance of tone or texture. Save the original images and compare them side by side instead of relying on memory.
How long does it take to see results from microneedling for acne scars, wrinkles, or enlarged pores?
Timing depends on the treatment area, settings, individual factors, and provider protocol, so track each concern separately. Early texture changes can appear within the first week or two; results from a single session are typically visible four to six weeks afterward. Use the same close-up area for each comparison, and discuss persistent concerns at follow-up.
How many microneedling sessions are typically needed, and how far apart?
A commonly recommended series includes 3-6 sessions spaced 4-6 weeks apart. Record each appointment date and the interval before the next session so your progress notes match your treatment plan. The clinician’s chosen settings and treatment area also belong in that record. Avoid changing device depth or intensity yourself, since those decisions require professional assessment.
Microneedling for Hyperpigmentation: Professional Home Guide
Microneedling Forehead Lines: Esthetician's Guide
Related Posts

Consistent Microneedling and the Long-Term Changes to Expect

Aftercare choices to lower infection risk at home after microneedling

How to Create a Relaxing At-Home Spa Day With Simple Rituals

Sunscreen Recommendations After Microneedling: How to Protect Healing Skin

Investing in my skin for the future: what deserves my budget

Post-microneedling skincare routine for masks, makeup, and recovery

Skin Peeling After Microneedling: What to Avoid and When to Resume Makeup
