

Your Ultimate Dr. Pen Needle Depth Chart: A Safe Guide to Professional Results
What if the difference between a professional glow-up and a painful skin setback is just a fraction of a millimeter? A reliable dr pen needle depth chart is essential for safety, as the skin on your forehead is much thinner than on your cheeks. Using depths like 0.25mm for delicate areas and slightly deeper settings for texture ensures you stay within safe, cosmetic limits while achieving a nourished glow.
It's completely normal to feel a bit nervous when you're adjusting your device for the first time. You want that clear, rejuvenated look, but the confusion over needle counts and speed settings can feel like a major roadblock. We're here to act as your knowledgeable esthetician friend, taking the guesswork out of the process so you can focus on your skin's transformation with total confidence.
We'll break down the specific depths for every area of your face, from the thin skin around your eyes to the more resilient areas of your chin. You'll learn how to choose between 16-pin and 36-pin cartridges and why pairing your session with Salmon DNA serums is a game-changer for hydration. We'll also cover the latest 2026 safety standards to ensure your at-home routine remains professional and effective.
Key Takeaways
- Understand the relationship between skin thickness and needle depth to ensure a safe, comfortable procedure for every facial zone.
- Access a detailed dr pen needle depth chart that provides specific settings for targeting concerns like fine lines, large pores, and uneven texture.
- Learn which needle cartridges, such as 16-pin or nano-needles, are best suited for your specific skin rejuvenation goals and skin type.
- Discover why using professional-grade Salmon DNA (PDRN) serums during your session is the secret to achieving a hydrated, glowing complexion.
- Explore the best post-care protocols, including the use of cooling jelly masks, to soothe your skin and enhance your visible results.
Understanding Microneedling Depth: Why Accuracy Matters
Microneedling depth refers to the exact distance your device's needles travel into the various layers of your skin. Getting this setting right is the difference between a successful session and potential irritation. When you consult a dr pen needle depth chart, you'll notice that different areas of the face require different precision. Accuracy ensures you're targeting the right tissue to meet your specific skincare goals without causing unnecessary stress to your complexion.
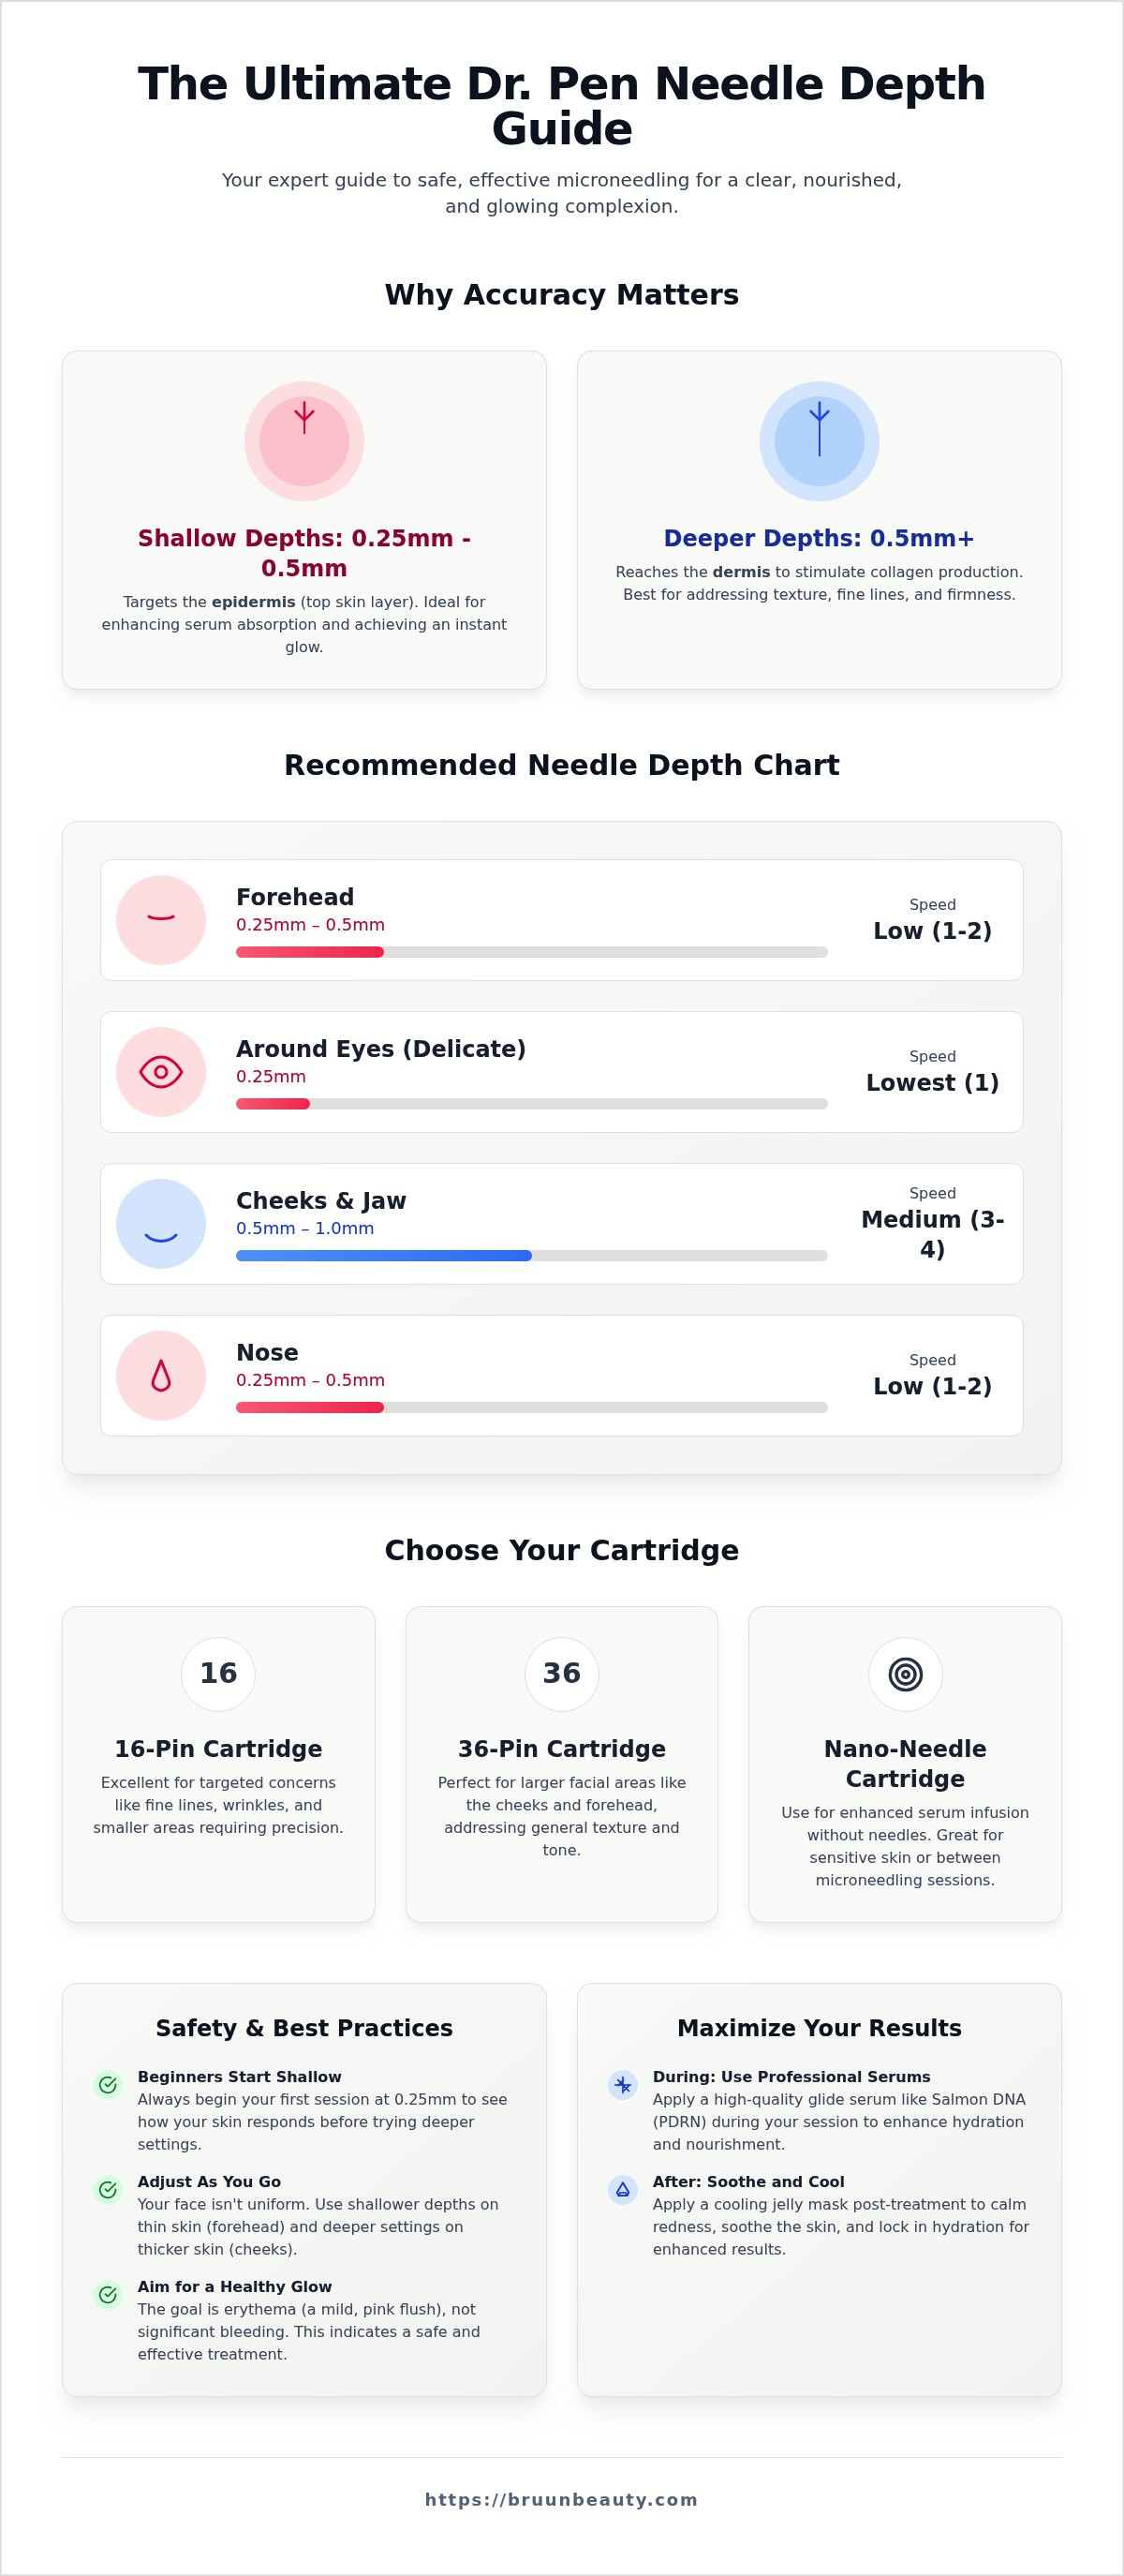
Shallower depths, typically between 0.25mm and 0.5mm, focus on the epidermis. This is the top layer of your skin where most of your visible texture and "glow" happen. By staying shallow, you're primarily enhancing the absorption of your favorite serums. If you're looking for deeper structural changes, settings of 0.75mm or more reach the dermis. This deeper penetration is what triggers Collagen Induction Therapy, helping to firm the skin from the inside out. Remember that more depth doesn't equal faster results; it's about finding the "sweet spot" for your unique needs.
The Role of Skin Thickness in Setting Your Pen
Your face isn't a flat canvas; it's a landscape of varying thicknesses. Areas like your forehead and the bridge of your nose have very thin skin, often sitting directly over bone. In contrast, your cheeks and jawline usually have a thicker dermal layer. You must adjust your microneedling device as you move across these zones to avoid discomfort. Factors like age and past sun damage can also thin your skin over time, making it more delicate than it used to be.
- Thin Skin Areas: Forehead, nose, and around the eyes.
- Thick Skin Areas: Cheeks, chin, and neck.
- Pro Tip: Always test a new depth setting on a small, less visible area like the side of your jaw before proceeding with your full face.
Safety First: When to Stay Shallow
Safety is the foundation of any professional-grade result. Beginners should always start their first session at 0.25mm. This allows you to see how your skin reacts and helps you get comfortable with the device's movement. You should avoid going deep in "danger zones" where the skin is tight against the bone, as this can lead to bruising or scratching. Your goal is a healthy pink glow, known as erythema, rather than significant bleeding.
If you notice pinpoint bleeding, it's often a sign that you've reached the dermal layer. While this is normal for some advanced protocols, at-home enthusiasts should aim for that "sunburned" look without overdoing it. Using the right cartridges and following a dr pen needle depth chart ensures you stay within safe, cosmetic limits for a nourished and refreshed appearance.
The Comprehensive Dr. Pen Needle Depth Chart
Navigating your device settings doesn't have to be a guessing game. While every skin type reacts differently, having a baseline dr pen needle depth chart helps you maintain safety while pursuing professional-grade results. These numbers serve as a guide for your first few sessions. Always listen to your skin and adjust for comfort. It's also vital to follow FDA safety guidelines for microneedling to ensure you're using your device within recommended parameters for cosmetic improvement.
| Facial Area | Needle Depth | Recommended Speed |
|---|---|---|
| Forehead | 0.25mm – 0.5mm | Low (1-2) |
| Around Eyes | 0.25mm | Lowest (1) |
| Cheeks & Jaw | 0.5mm – 1.0mm | Medium (3-4) |
| Nose | 0.25mm – 0.5mm | Low (1-2) |
Facial Area Settings for Dr. Pen Devices
Facial skin varies significantly in thickness, meaning you'll need to adjust your pen as you glide across different zones. For the forehead and nose, stick to 0.25mm to 0.5mm. The skin here is thin and sits close to the bone, so deeper settings can feel uncomfortable. On your cheeks and jawline, you can safely move to 0.5mm or 1.0mm. These areas have more "cushion," allowing for deeper penetration to address texture or pores. Always keep the area around the eyes at 0.25mm on the lowest speed to protect this delicate tissue.
Body and Neck Depth Guidelines
When moving beyond the face, the rules change because skin density increases. For the neck and décolleté, stay between 0.25mm and 0.5mm. The neck is quite sensitive, especially near the thyroid area, so keep your speed at a level 2 or 3. For body concerns like stretch marks or older scars on the stomach or thighs, you can use depths of 1.0mm to 2.0mm at a high speed (5-6).
| Body Area | Needle Depth | Recommended Speed |
|---|---|---|
| Neck & Décolleté | 0.25mm – 0.5mm | Low-Medium (2-3) |
| Body Scars/Stretch Marks | 1.0mm – 2.0mm | High (5-6) |
Body skin is much denser than facial skin. High speeds are necessary to ensure the needles penetrate effectively without dragging across the surface. If you're ready to start your journey toward smoother skin, choosing a high-quality microneedling kit ensures you have the right tools for both face and body concerns.
Adjusting Depth Based on Your Skincare Goals
Your dr pen needle depth chart isn't just a safety manual; it's a roadmap to your specific beauty goals. Because your skin's needs change based on your environment and age, your settings should be just as flexible. By matching your needle depth to your desired outcome, you ensure that every session delivers the most value for your time. Most users find success by focusing on one of these three primary targets:
- The Glass Skin Glow: Use 0.25mm or nano-needling to refresh the surface and maximize radiance.
- Smoothing Fine Lines: Dial your device to 0.5mm or 0.75mm to encourage a firmer, more youthful appearance.
- Improving the Look of Acne Scars: Settings of 1.0mm and above, paired with 12-pin cartridges, help target deeper texture concerns.
You don't have to choose just one goal per session. Many enthusiasts transition depths as they move across the face. For example, you might use 0.25mm on your forehead for a glow, then increase to 1.0mm on your cheeks to address older blemish marks. Simply pause, adjust the dial on your Dr. Pen, and continue with your session. This customized approach mimics the precision of a professional clinic right in your own home.
Microneedling for Product Absorption
At the 0.25mm setting, you are performing what many call "micro-channeling." This depth doesn't reach the blood vessels or nerves; instead, it creates thousands of tiny pathways through the stratum corneum. These channels act like a fast-track for your skincare, allowing active ingredients to penetrate much deeper than they would with a manual application.
We love pairing this shallow setting with authentic K-beauty products to achieve a nourished, dewy finish. Since the goal here is simple hydration and a brightened complexion, going deeper isn't necessary. In fact, staying shallow reduces recovery time to almost zero, making it a perfect "weekend refresh" for your skin.
Targeting Texture and Pores
The 0.5mm setting is widely considered the "sweet spot" for anyone looking to refine their skin's texture. At this depth, you're effectively stimulating the upper layers of the dermis. This process encourages the skin to support itself more effectively, which helps firm the walls of your pores. When the skin is firm, pores appear smaller and the overall surface looks significantly smoother.
Patience is key when you're working on texture. While a glow can appear in days, structural changes take longer. We recommend spacing these sessions 4 to 6 weeks apart. This timeline gives your skin enough space to complete its natural renewal cycle without causing over-exfoliation or stress. Stick to your dr pen needle depth chart and let the process work at its own pace for the best results.
Choosing the Right Cartridge and Speed for Your Depth
Don't ignore your pin count; it's just as critical as selecting the right number on your dr pen needle depth chart. Think of it like choosing the right brush for a detailed painting. A 12-pin cartridge features fewer needles, which reduces surface resistance and allows for easier penetration into the skin. This makes it the perfect choice for addressing deeper texture concerns where you're working at 1.0mm or deeper.
For overall facial rejuvenation and that dewy K-beauty look, 36-pin or 42-pin cartridges are your best friends. These create more micro-channels in a single pass, making them ideal for the shallower settings of 0.25mm to 0.5mm. If you're looking for a zero-recovery option, nano-needling cartridges use microscopic tips to infuse serums without actually piercing the skin. It's a fantastic choice for the delicate area around your eyes or for a mid-week hydration boost.
Matching Cartridges to Your Chart Settings
Using high-quality, authentic needles and cartridges is a non-negotiable for skin safety. Low-quality needles can have microscopic burrs that cause irritation or "track mark" scratches. A good rule of thumb is to match your pin count to your depth goals to ensure the needles glide smoothly without resistance.
- 12-Pin: Best for deep acne scars and targeted body work (1.0mm to 2.5mm).
- 36/42-Pin: Best for large pores, fine lines, and hyperpigmentation (0.25mm to 0.75mm).
- Nano-Needles: Best for serum absorption and sensitive areas (0mm to 0.25mm).
Why Speed Matters as Much as Depth
Motor speed determines how long the needle stays in your skin, which we call "dwell time." If you use a deep setting at a low speed while moving the pen across your face, the needles might still be inside the tissue as you pull the device along. This causes a dragging effect that leads to micro-tears. To keep your session comfortable and safe, follow the golden rule: always increase your speed as you increase your depth.
For the Dr. Pen M8, which reaches 15,000 RPM, levels 4 through 6 are best for depths over 0.5mm. The newer Dr. Pen A11 is even more powerful, reaching 18,000 RPM, providing a very high-precision experience even at its maximum settings. Here is a quick speed vs. depth cheat sheet for your next session:
- Low Speed (1-2): Best for 0.25mm and nano-needling on thin skin areas like the forehead.
- Medium Speed (3-4): Best for 0.5mm to 0.75mm on resilient areas like the cheeks.
- High Speed (5-6): Best for 1.0mm and above on thicker skin or body concerns.
Maximizing Results: Serums and Post-Care Protocols
Once you've dialed in the correct settings from your dr pen needle depth chart, the next step is ensuring your device glides effortlessly. We call this "slip." Without a high-quality serum to act as a lubricant, the needles can cause unnecessary friction or dragging, which compromises your results. A professional-grade serum doesn't just protect the skin; it serves as the vehicle for the active ingredients you're pushing into those fresh micro-channels.
Salmon DNA, or PDRN, has become the gold standard in the K-beauty world for a reason. It's incredibly compatible with human skin and provides the essential building blocks for a nourished, vitalized complexion. Using a sterile serum is non-negotiable since you're working with open channels. We always recommend choosing serums from a trusted US-based leader like Bruun Beauty, shipping directly from our hubs in Miami and Los Angeles to ensure freshness and quality.
The Power of Salmon DNA and Peptides
For the best results, we suggest using the SD Control Salmon DNA Ampoule during and after your session. This serum is specifically formulated to support skin rejuvenation without the heavy fillers found in over-the-counter products. The PDRN works alongside peptides to encourage a firm, glowing appearance that lasts long after your session ends.
Using a professional-grade serum ensures that you aren't introducing irritants into the skin. When you follow your dr pen needle depth chart to reach the dermal layer, your skin's absorption rate increases significantly. This is why the "why" behind your ingredients matters just as much as the depth of your needles. Stick to sterile ampoules to maintain a high safety standard for your at-home or clinic routine.
Calming the Skin with Jelly Masks
Immediately after your session, your skin will likely feel warm and look pink, similar to a mild sunburn. This is the perfect time to apply a Bruun Beauty Jelly Mask. These masks create a vacuum-like seal over the skin, known as occlusion. This seal forces the remaining serums deeper into the tissue while providing an instant cooling sensation that reduces the appearance of inflammation.
- Esthetician Tip: Pop your jelly mask powder or the mixed solution in the fridge for 10 minutes before application for an extra-chilled, soothing experience.
- Occlusion Benefit: The seal prevents moisture from evaporating, which is crucial since the skin's barrier is temporarily open.
- Hydration Boost: Ingredients like hyaluronic acid or rose in the mask help lock in a dewy, "glass skin" finish.
The 24-Hour "No-No" List
The first 24 hours after using your Dr. Pen are critical for a safe recovery. Your micro-channels remain open for several hours, making the skin vulnerable to bacteria and UV damage. Follow these simple rules to protect your investment:
- No Direct Sunlight: Wear a wide-brimmed hat if you must go outside, and apply a physical (mineral) sunscreen after the first 4 to 6 hours.
- No Sweating: Skip the gym, sauna, or hot yoga. Sweat can carry bacteria into the micro-channels and cause irritation.
- No Makeup: Avoid foundation or powders for at least 24 hours. Let your skin breathe and recover naturally.
- No Active Acids: Put away your Retinol, Vitamin C, and AHAs for 3 to 5 days to avoid stinging or over-sensitizing the area.
Start Your Professional Skincare Journey Today
Professional-grade results are now within your reach because you have the roadmap to success. With your dr pen needle depth chart as a trusted guide, you can navigate every session with the precision and confidence of an expert. You understand how to adjust for different facial zones and how to pair your device with the right cartridges for your unique skin goals.
Bruun Beauty provides everything you need to maintain a high standard of care, from authorized devices to specialized Salmon DNA serums. We ship all orders directly from our hubs in Miami and Los Angeles, ensuring you receive the quality tools trusted by licensed estheticians across the US. By focusing on safety and using the right professional pairings, you are ensuring your skin remains nourished and vibrant.
Your journey toward a clear, glowing complexion is a rewarding process that gets better with every session. Take your time, follow the safety protocols we've discussed, and enjoy the transformation as your skin becomes more resilient and refreshed. You have the tools and the knowledge; now it's time to let your inner radiance shine through.
Frequently Asked Questions
How do I know if the needle depth is too deep for my skin?
You'll know the depth is too deep if you experience significant pain or see heavy, dripping blood rather than light pinpoint spotting. Your skin should have a healthy pink glow after a session; if it looks raw or bruised, you've likely pushed too far. Always start at the lowest setting on your dr pen needle depth chart to gauge your skin's unique tolerance level before increasing the intensity.
Can I change the needle depth while the Dr. Pen is running?
You can adjust the dial while the motor is active, but we recommend pausing for a second to ensure precision. Pausing allows you to verify the exact setting on your device before moving to a new facial zone. This habit prevents accidental depth increases that could cause discomfort on thinner areas like the forehead or around the eyes, ensuring your session remains safe and professional.
Does a deeper needle setting mean I will see results faster?
Deeper settings don't correlate with faster results; they actually increase your recovery time and the risk of irritation. Skin rejuvenation is a marathon, not a sprint. Consistency with shallow or medium depths is often more effective for achieving a nourished, glowing complexion than aggressive, deep sessions. Overdoing it can stress the skin, so it's best to follow the recommended guidelines for a steady transformation.
What is the best needle depth for treating acne scars at home?
For home users, 1.0mm is generally the maximum depth recommended for targeting the appearance of acne scars on the cheeks. This depth reaches the dermis to encourage collagen induction without the high risks associated with deeper medical-grade settings. Always pair this depth with a high-quality 12-pin cartridge and a professional Salmon DNA serum to support the skin's natural rejuvenation process while maintaining a high safety standard.
How often should I microneedle based on the depth used?
Your frequency depends entirely on the settings from your dr pen needle depth chart. For deeper sessions between 0.5mm and 1.0mm, wait 4 to 6 weeks to allow the skin to complete its full renewal cycle. If you're using shallow settings or nano-needling at 0.25mm for product absorption, you can safely perform sessions every 1 to 2 weeks for a consistent and healthy glow.
Should I see blood when microneedling at 0.5mm or 1.0mm?
Pinpoint bleeding is a common sign that you've reached the dermal layer, especially at 1.0mm, but it isn't required for success. Some skin types are more resilient and may only show redness. Your goal should be a uniform pinkness, often described as a mild sunburn, which indicates that the micro-channels have been successfully created. This allows your professional-grade serums to penetrate effectively for a rejuvenated look.
What depth should I use for nano-needling with my Dr. Pen?
Nano-needling is most effective at a 0.25mm setting or by using the specific "nano" cartridge designed for your device. Since nano-needles don't actually pierce the skin's deeper layers, you're focusing on the very top of the epidermis. This is the perfect depth for weekly maintenance to infuse hydrating peptides or Salmon DNA serums, helping you achieve that sought-after K-beauty glass skin finish without any downtime.
Is the needle depth different for men’s skin vs women’s skin?
Men's skin is typically about 25% thicker than women's skin due to higher testosterone levels, which might allow for slightly deeper settings in some areas. However, we still suggest that everyone starts with the baseline recommendations on the depth chart. Regardless of gender, factors like age, sun damage, and the specific area being treated are much more important than gender when choosing your final device settings.
Best Microneedling Serums 2026: Esthetician's Guide
Best Serums for Dr. Pen: Professional Guide to Glow
Related Posts

Consistent Microneedling and the Long-Term Changes to Expect

Aftercare choices to lower infection risk at home after microneedling

How to Create a Relaxing At-Home Spa Day With Simple Rituals

Sunscreen Recommendations After Microneedling: How to Protect Healing Skin

Investing in my skin for the future: what deserves my budget

Post-microneedling skincare routine for masks, makeup, and recovery

Skin Peeling After Microneedling: What to Avoid and When to Resume Makeup
