

Dr. Pen Settings for Stretch Marks: Microneedling Guide
What if the reason your stretch mark creams are failing isn't the ingredients, but the fact that they never actually reach the skin layers that need them most? Finding the right dr pen settings for stretch marks is the secret to reaching the deep dermal layers where topical products cannot go. For most body areas, you will achieve the best results using needle depths between 1.5 mm and 2.5 mm paired with higher device speeds to safely remodel textured scar tissue at home.
You've likely spent a fortune on "miracle" oils that only sit on the surface, leaving you frustrated with silver or red marks that just won't budge. It's completely normal to feel a bit anxious about using deeper needle settings on your stomach or thighs, especially when you're confused about which cartridge pin count provides the smoothest experience. We understand that you want professional results without the high med-spa price tag or the guesswork.
This guide helps you master the professional techniques used by estheticians, from selecting a 16-pin cartridge for deep penetration to choosing the right speed for different skin thicknesses. You'll learn how to pair your device with advanced Salmon DNA Ampoule Serums to support your skin's natural rejuvenation process and finally achieve the smoother, glowing texture you deserve.
Key Takeaways
- Understand that stretch marks are deep dermal tears that require mechanical induction to reach the layers where topical creams fail.
- Master the exact dr pen settings for stretch marks, focusing on needle depths between 1.5 mm and 2.5 mm for thicker skin on the stomach and hips.
- Learn why professional-grade 12-pin or 16-pin cartridges are more effective for remodeling mature scar tissue than high-count pins.
- Discover how to boost your results by pairing treatments with Salmon DNA (PDRN) serums and soothing K-beauty jelly masks.
- Implement a safe aftercare routine that minimizes sensitivity and protects your skin during the critical 48-hour recovery window.
Why Body Skin Requires Specific Dr. Pen Settings
Stretch marks, or striae, are more than just surface-level concerns. They're actually deep tears within your dermis, which is the middle layer of your skin. Because these fibers have snapped deep below the surface, even the most expensive topical lotions simply can't reach the depth required to remodel them. Creams sit on the epidermis, but the real work happens much further down.
This is where choosing the correct dr pen settings for stretch marks becomes essential. By creating controlled micro-injuries, you trigger the body's natural collagen induction therapy response. This process, known as dermal remodeling, encourages the skin to produce new collagen and elastin fibers. Over time, these new fibers help fill in the gaps caused by the original tears, leading to a smoother and more even appearance.
The Difference Between Facial and Body Microneedling
Body skin is significantly thicker and more resilient than the skin on your face. While a shallow 0.5mm setting might work wonders for a facial glow, it often yields no results on the thighs or stomach. To reach the dermal layer on the body, you need deeper penetration and higher power. Shallow settings simply won't trigger the remodeling process needed for stubborn stretch marks.
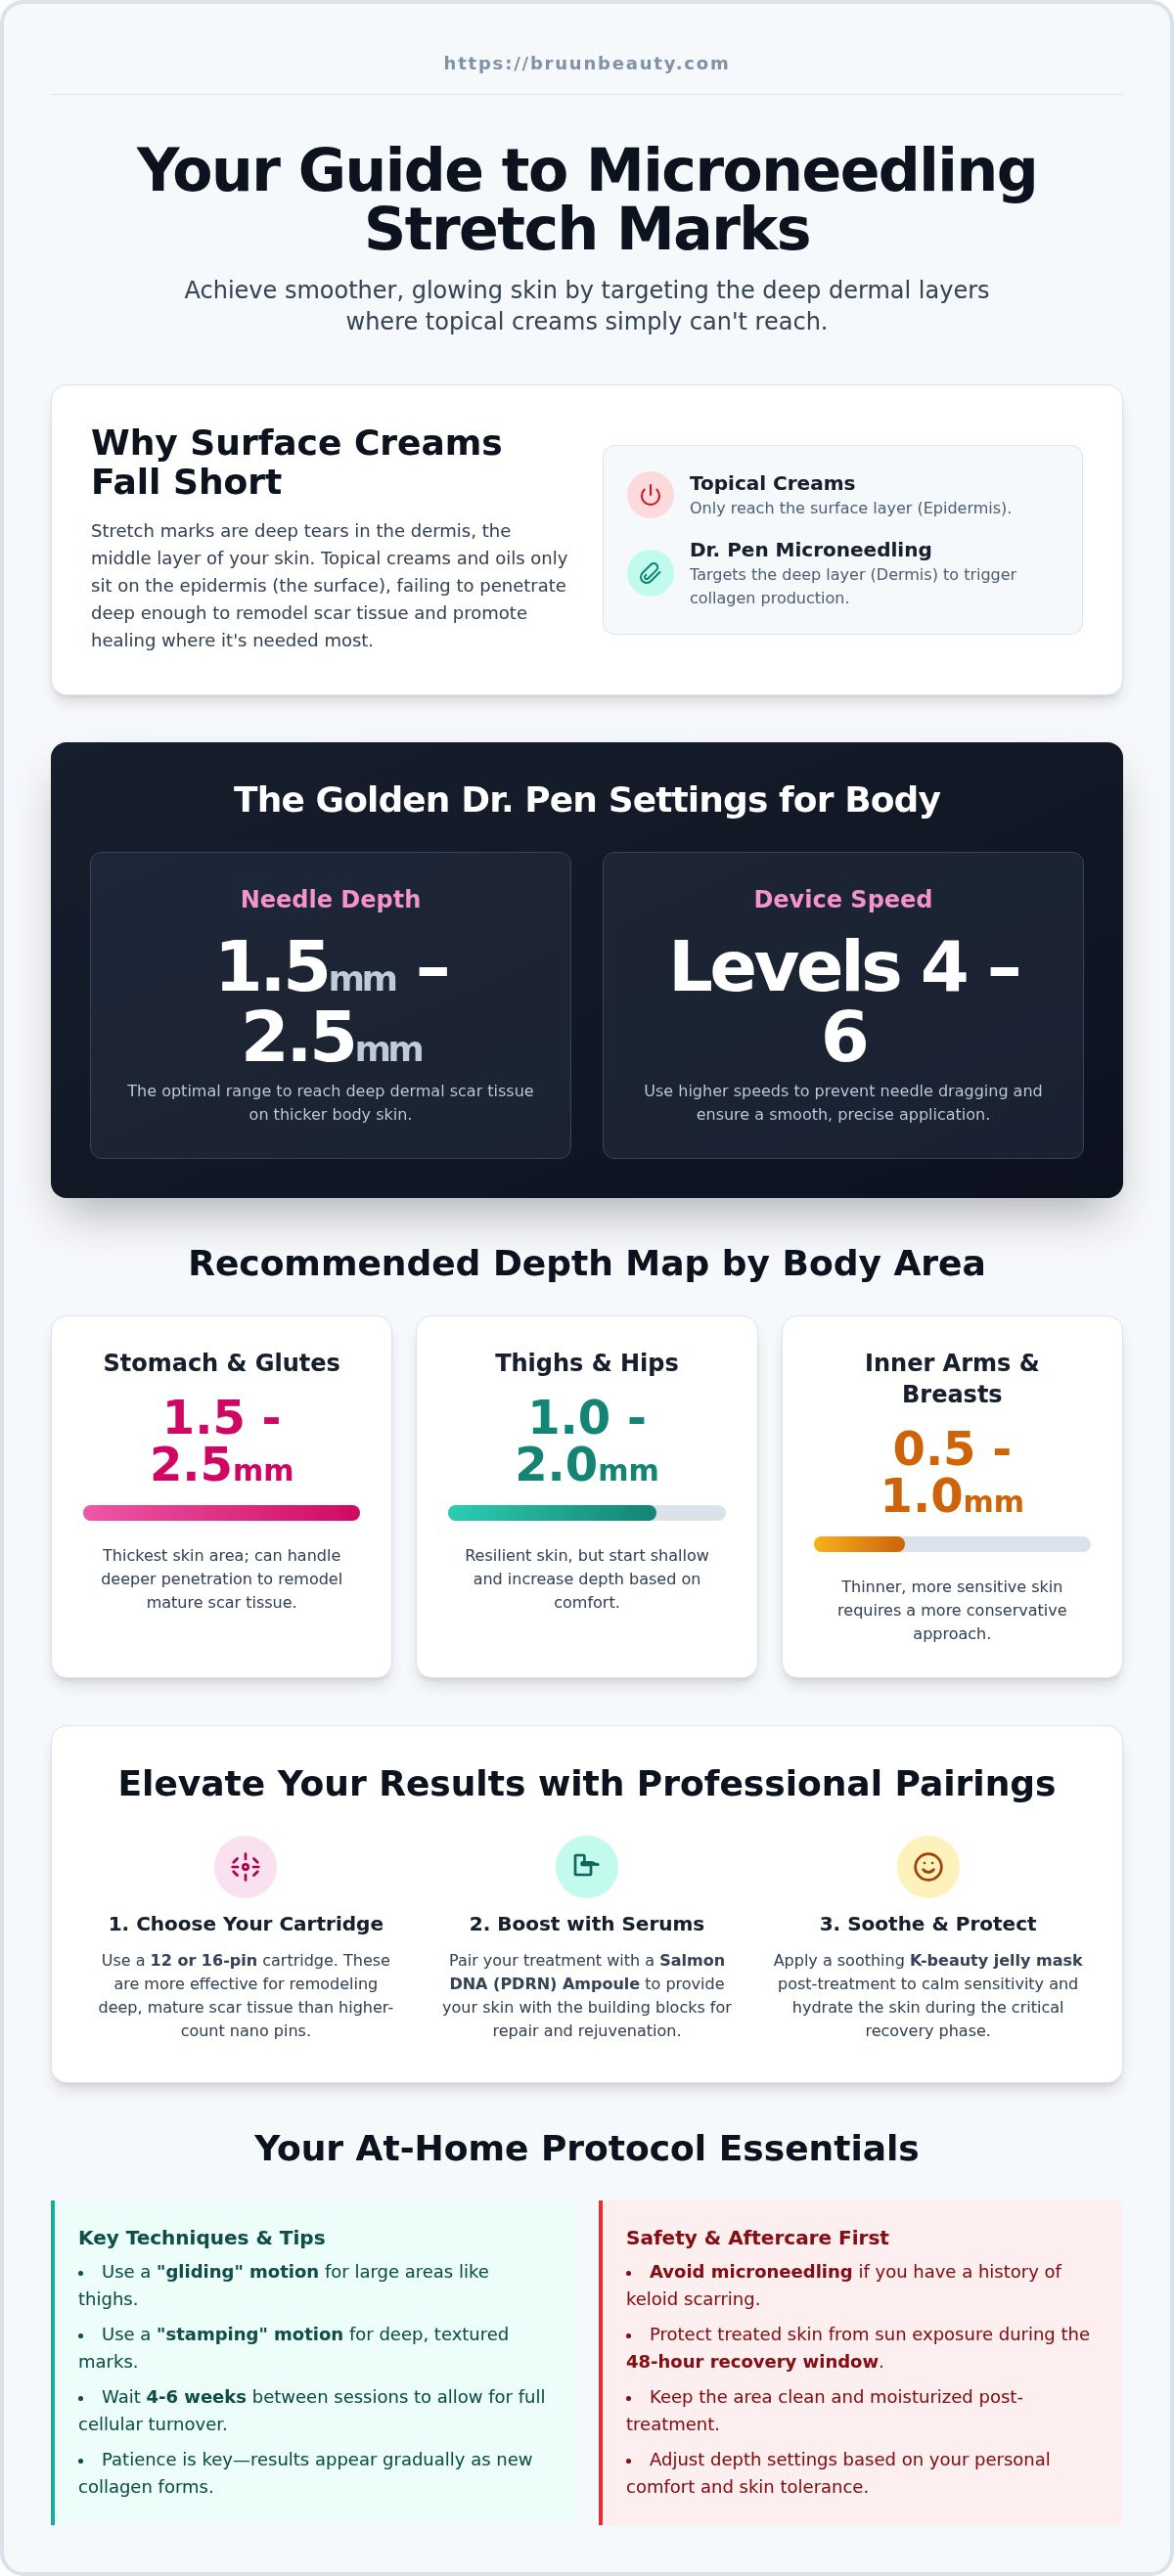
To navigate these larger surface areas successfully, you must use high-speed settings on your Dr. Pen device. Higher speeds, typically levels 4 through 6, allow the needles to move in and out of the skin with extreme precision. This prevents the needles from dragging or catching as you glide across the skin, which is a common risk when working on the thicker tissue of the hips or buttocks.
Who Should Microneedle Stretch Marks?
You'll see different results depending on the age and color of your marks. Striae Rubra are newer, red or purple marks that are still in an active phase of change. Striae Alba are older, silver or white marks that have matured into permanent scar tissue. Both types can show improvement, but older marks often require more sessions and specific dr pen settings for stretch marks to see a visible change.
Patience is your best friend during this process. Your skin follows a 4-6 week cellular turnover cycle, so you won't see the full impact of a single session immediately. Safety is also a priority. If you have a history of keloid scarring, you should avoid microneedling these areas, as the process could lead to raised scars. For everyone else, staying consistent with your sessions while allowing for full recovery time is the secret to success.
The Golden Dr. Pen Settings for Stretch Marks
Setting up your device correctly is the difference between a wasted session and real skin transformation. While facial settings are often conservative, your dr pen settings for stretch marks must be more robust to reach the deep layers of the dermis. The "Golden Rule" for most body areas is to start between 1.0mm and 1.5mm, which allows you to gauge your skin's resilience before moving to deeper, professional-level settings.
Microneedling is a versatile procedure used to address various skin concerns, including deep-seated textural issues. For stretch marks, you also need to choose between a "stamping" or "gliding" technique. Gliding is perfect for covering large areas like the outer thighs. However, for deep, textured marks, a stamping motion ensures the needles enter vertically without any lateral tension on the skin, providing a cleaner puncture and better remodeling results.
Your comfort matters just as much as the depth. Always adjust your settings based on your individual tolerance and the specific density of the skin you're working on. If an area feels too sensitive, it's perfectly fine to dial back the depth by 0.25mm until you feel more confident. Investing in a high-quality microneedling kit ensures you have a device with a motor powerful enough to maintain consistent speed at these deeper depths.
Recommended Depth Map by Body Area
Not all body skin is created equal. To get the best results without unnecessary irritation, follow this depth guide based on skin density:
- Stomach and Glutes: 1.5mm to 2.5mm. This skin is typically thicker and can handle deeper penetration to reach mature scar tissue.
- Thighs and Hips: 1.0mm to 2.0mm. These areas are resilient but can be more sensitive near the inner thigh, so start shallow and work your way up.
- Inner Arms and Breasts: 0.5mm to 1.0mm. Because the skin here is much thinner and closer to the bone or glandular tissue, a cautious approach is essential.
Matching Speed to Depth for Safety
When you're working at depths of 1.5mm or greater, speed is your best friend for safety. Higher speeds, specifically levels 5 or 6 on a Dr. Pen M9, ensure the needles move in and out of the skin so quickly that they don't have time to "catch" or "drag." This rapid oscillation creates clean micro-channels rather than scratches.
You can identify "needle dragging" if the device feels like it's pulling or scratching the skin surface rather than making a smooth, vibrating contact. If this happens, you should instantly increase the device speed or slow down your hand movement. Save the lower speed settings for very shallow work on sensitive, thin-skinned areas where you want maximum control over every single puncture.
Step-by-Step Stretch Mark Microneedling Protocol
Approaching your session with the mindset of a professional esthetician ensures you get the best results while keeping your skin safe. While Microneedling for stretch marks is highly effective, the success of the treatment depends on a disciplined protocol. You aren't just running a device over your skin; you're performing a precise dermal procedure that requires clean tools and a steady hand.
Preparation and Numbing
Start by double-cleansing the treatment area. Body skin often carries more oils, sweat, and residue from heavy body lotions than facial skin. Use a gentle cleanser followed by an alcohol wipe to ensure the surface is completely sterile. This prevents any bacteria from being pushed into the micro-channels you're about to create.
Since your dr pen settings for stretch marks will likely be at 1.5mm or deeper, comfort is a priority. Apply a 5% Lidocaine numbing cream to the area and cover it with plastic wrap for 20 to 30 minutes. Before you begin, thoroughly remove the cream with a fresh alcohol wipe. Finally, submerge your new needle cartridge in 70% isopropyl alcohol for five minutes to ensure total sanitization before clicking it into your Dr. Pen device.
The Microneedling Technique
Never use your device on dry skin. Apply a high-quality "slip" serum, such as a hyaluronic acid or a specialized PDRN ampoule, to help the device glide. This lubrication prevents the needles from pulling or creating unnecessary surface trauma. Work in small, manageable sections, such as a 4x4 inch square, to ensure the serum doesn't dry out before you reach it.
Using the correct dr pen settings for stretch marks won't matter if your technique is uneven. Use the "Cross-Hatch" movement pattern for even coverage. Glide the device vertically across the section, then horizontally, and finish with a diagonal pass. This ensures every millimeter of the stretch mark receives the same level of attention. For most body areas, two to three passes per section are appropriate.
Your goal is to reach the "End Point," which is characterized by mild erythema, or uniform redness. You might see tiny pinpoints of blood, which is normal for deeper settings, but you should avoid excessive bleeding. Once the area looks like a mild sunburn, you've successfully triggered the remodeling process. Stop there and move to the next section to maintain the integrity of your skin.
Professional Pairings: Cartridges and Serums
While mastering your dr pen settings for stretch marks is vital, the physical cartridge you choose determines how effectively those settings are translated into your skin. Your device provides the power, but the needle configuration dictates the precision of the dermal remodeling process. Using the wrong pin count can result in surface-level trauma without ever reaching the deep fibers that require attention.
By combining the right mechanical settings with high-performance actives, you create a synergistic effect that topical creams simply cannot match. This dual approach ensures that you aren't just creating micro-channels, but you're also delivering the exact nutrients your skin needs to improve its texture and resilience from the inside out.
Choosing Your Needle Cartridge
Selecting the right needle count is just as important as the depth itself. 12-Pin cartridges are the preferred choice for deep body work. Because there are fewer needles, they encounter less "skin resistance," allowing them to penetrate thick tissue more efficiently. This makes them ideal for reaching depths of 1.5mm to 2.5mm on the stomach, glutes, and thighs where stretch marks are most prominent.
42-Pin cartridges are better suited for addressing surface texture and overall skin tone. The higher needle density creates more micro-channels but with slightly less depth penetration due to the "fakir effect." They are excellent for the final stages of your routine when you want to polish the skin's appearance. However, we don't recommend nano-needling for stretch mark work. While nano-pins are wonderful for a facial glow, they cannot reach the dermis where stretch marks originate.
The Power of PDRN and Peptides
Your skin needs more than just mechanical stimulation; it needs the right biological building blocks to build new tissue. Salmon DNA (PDRN) is an advanced K-beauty ingredient that has revolutionized at-home treatments. PDRN works at a cellular level, mimicking human DNA fragments to support the skin's natural ability to remodel and strengthen itself without the need for aggressive chemicals.
Hyaluronic Acid is another essential component, serving as your primary "slip" agent. It provides a lubricated surface that prevents the device from pulling or scratching your skin during the procedure. When your skin is open, it's incredibly vulnerable. You must avoid any serums containing "toxic" additives like synthetic fragrances, harsh preservatives, or artificial dyes. These can lead to prolonged inflammation or adverse reactions when pushed deep into the skin. Choosing microneedling bundles ensures you always have a steady supply of fresh, professional-grade cartridges and potent serums ready for your next session.
Aftercare and Managing Long-Term Results
The work doesn't end once you turn off your device. The first 24 to 48 hours after your session are critical for ensuring your skin stays calm and protected. During this window, expect the treated area to feel like a moderate sunburn. You will likely see uniform redness and feel a tight, sensitive sensation, which are signs that your dr pen settings for stretch marks successfully reached the target tissue.
Managing the body after microneedling requires specific precautions that differ from facial care. Avoid wearing tight clothing like leggings or skinny jeans over the treated area for at least two days. Friction from restrictive fabrics can lead to unnecessary irritation or even post-inflammatory hyperpigmentation. You must also keep the area strictly out of the sun, as those fresh micro-channels are highly susceptible to UV damage.
To speed up the cooling process, many professionals recommend using K-beauty jelly masks immediately after your session. These masks provide an instant cooling effect and help push hydration deep into the skin while reducing the appearance of redness. Patience is your most important ingredient; you must wait a full 4 to 6 weeks between sessions to allow the skin's natural remodeling cycle to complete.
Immediate Post-Treatment Care
Keep the treatment area clean and well-hydrated. For the first 24 hours, only apply specialized microneedling serums that are free from fragrances and acids. This keeps the skin barrier supported while it begins to close the micro-channels. Do not apply heavy body butters or scented lotions until the redness has completely subsided.
Hold off on intense exercise and heavy sweating for at least 48 hours. Sweat can carry bacteria into the open channels, increasing the risk of breakouts or infection. Follow the "No-Touch" rule religiously. Because body surface areas are large, it's tempting to check the texture with your hands, but you must avoid touching the skin unless you have just washed your hands with antibacterial soap.
Tracking Your Progress
Dermal remodeling is a marathon, not a sprint. While you might notice a smoother feel within a few weeks, the most significant changes in the appearance of stretch marks typically take 3 to 6 months to fully manifest. This is the time required for new collagen fibers to mature and strengthen the skin's internal structure. Taking consistent "Before and After" photos in the same lighting every month will help you stay motivated.
As your skin builds resilience over several sessions, you can gradually adjust your dr pen settings for stretch marks. If you started at a depth of 1.0mm with good results and no adverse reactions, you might consider moving to 1.5mm for your third or fourth session. This progressive approach ensures you continue to challenge the skin to produce more collagen without causing excessive trauma or discomfort.
Achieving Your Smoother Skin Goals
You now have the professional roadmap to address deep dermal tears with confidence. By mastering the correct dr pen settings for stretch marks, you've moved beyond surface-level oils and into the realm of real skin remodeling. Remember that patience and the right 12-pin cartridge are your best tools for seeing a visible difference in texture over the coming months.
We take pride in providing the same professional-grade inventory used by licensed estheticians across the US. Our 5-star rated Salmon DNA (PDRN) serums are designed to nourish your skin exactly when it's most receptive. With fast shipping from our Miami and Los Angeles warehouses, your tools arrive quickly so you can begin your transformation without delay.
You deserve to feel confident and comfortable in your own skin every single day. We're excited to help you celebrate your journey toward clear, nourished, and glowing skin.
Frequently Asked Questions
What is the best Dr. Pen needle depth for deep stretch marks?
For deep marks on the stomach or glutes, the ideal depth is 1.5 mm to 2.5 mm. These dermal tears require deeper penetration than facial issues to reach the fibers needing remodeling. Start at 1.0 mm to test your skin's tolerance before increasing the depth in future sessions for better textural results.
How often can I microneedle stretch marks on my stomach or thighs?
Space your sessions 4 to 6 weeks apart to respect the skin's natural remodeling cycle. This gap allows new collagen to mature and prevents surface irritation. Consistency is vital, but rushing the process won't produce faster results. Patience ensures your skin remains nourished and resilient throughout the entire journey to smoother texture.
Which Dr. Pen cartridge is best for stretch marks: 12-pin or 42-pin?
A 12-pin cartridge is best for deep body work because it encounters less resistance in thick tissue. While 42-pin options help with surface tone, they often can't reach the dermis effectively. Using the correct dr pen settings for stretch marks with a lower pin count ensures clean, vertical penetration into the mature scar tissue.
Can I use microneedling on old, white stretch marks?
Yes, microneedling is highly effective for older, silver marks. These mature scars require slightly deeper settings, often between 2.0 mm and 2.5 mm, to trigger a new remodeling response. By creating controlled micro-channels, you encourage the skin to produce fresh elastin and collagen, which helps improve the overall appearance and smoothness of the area.
Do I need numbing cream for body microneedling?
We recommend using a 5% Lidocaine numbing cream for any session using depths of 1.5 mm or more. Body work at these levels can be quite intense, and being comfortable helps you maintain a steady technique. Apply it 20 minutes beforehand and wipe it away thoroughly with alcohol before starting your Dr. Pen procedure.
What serums should I use with my Dr. Pen for stretch marks?
Pair your device with a specialized Salmon DNA (PDRN) ampoule for advanced support. These K-beauty serums provide the necessary lubrication for your device to glide safely while delivering nutrients deep into the skin. Combining professional dr pen settings for stretch marks with PDRN helps strengthen the dermal structure and promotes a clear, healthy, glowing appearance.
How long does it take to see results from microneedling stretch marks?
Most people notice initial texture improvements within 4 to 8 weeks, but full results take 3 to 6 months. Collagen synthesis is a gradual process that continues long after your session. Consistent application every 6 weeks leads to the best outcome, as the skin needs time to build new fibers and remodel the existing tissue.
Is it safe to microneedle stretch marks at home?
It's safe when you follow professional sanitization steps and use an authorized device. Always use a fresh, sterile cartridge and double-cleanse the area before starting. By following a disciplined protocol and using the correct settings, you can achieve professional-grade results without the high spa price tag. Safety and hygiene should always be your top priorities.
Can You Use Vitamin C with Microneedling? A Guide to Radiant Results
Best Peptide Serum for Microneedling: Ultimate Guide
Related Posts

Consistent Microneedling and the Long-Term Changes to Expect

Aftercare choices to lower infection risk at home after microneedling

How to Create a Relaxing At-Home Spa Day With Simple Rituals

Sunscreen Recommendations After Microneedling: How to Protect Healing Skin

Investing in my skin for the future: what deserves my budget

Post-microneedling skincare routine for masks, makeup, and recovery

Skin Peeling After Microneedling: What to Avoid and When to Resume Makeup
