

How to Get Your Skin Ready for At-Home Microneedling
A simple, calm routine is the best starting point for how to prep skin before microneedling at home: pause potentially irritating products 5-7 days beforehand, keep hair removal away from the treatment area, and cleanse your skin well on the day. Don’t shave the area that day, and start with clean skin free of makeup, lotion, oil, and sunscreen. A hyaluronic acid serum can be part of your prep, too.
It’s understandable to want hydrated, smooth skin before using a microneedling device, but adding lots of products can work against that goal. A gentle, simple routine helps you prepare without unnecessary steps.
This guide covers cleansing, when to pause exfoliants and hair removal, and what to consider if you use medication or have a skin concern. You’ll also learn how to approach hyaluronic acid thoughtfully, so your prep stays clear and manageable from cleansing to treatment day.
Key Takeaways
- Plan hair removal ahead of your session, and avoid shaving the treatment area on microneedling day.
- Start with clean skin and keep makeup, oils, and other leave-on products off the treatment area before you begin.
- Review your medications and current skin condition before deciding whether to proceed.
- Learn how hyaluronic acid can fit into your prep routine and what to consider when choosing a serum.
- Know which exfoliants and active products to pause so your skin has time to settle before microneedling.
Hair removal and shaving before treatment
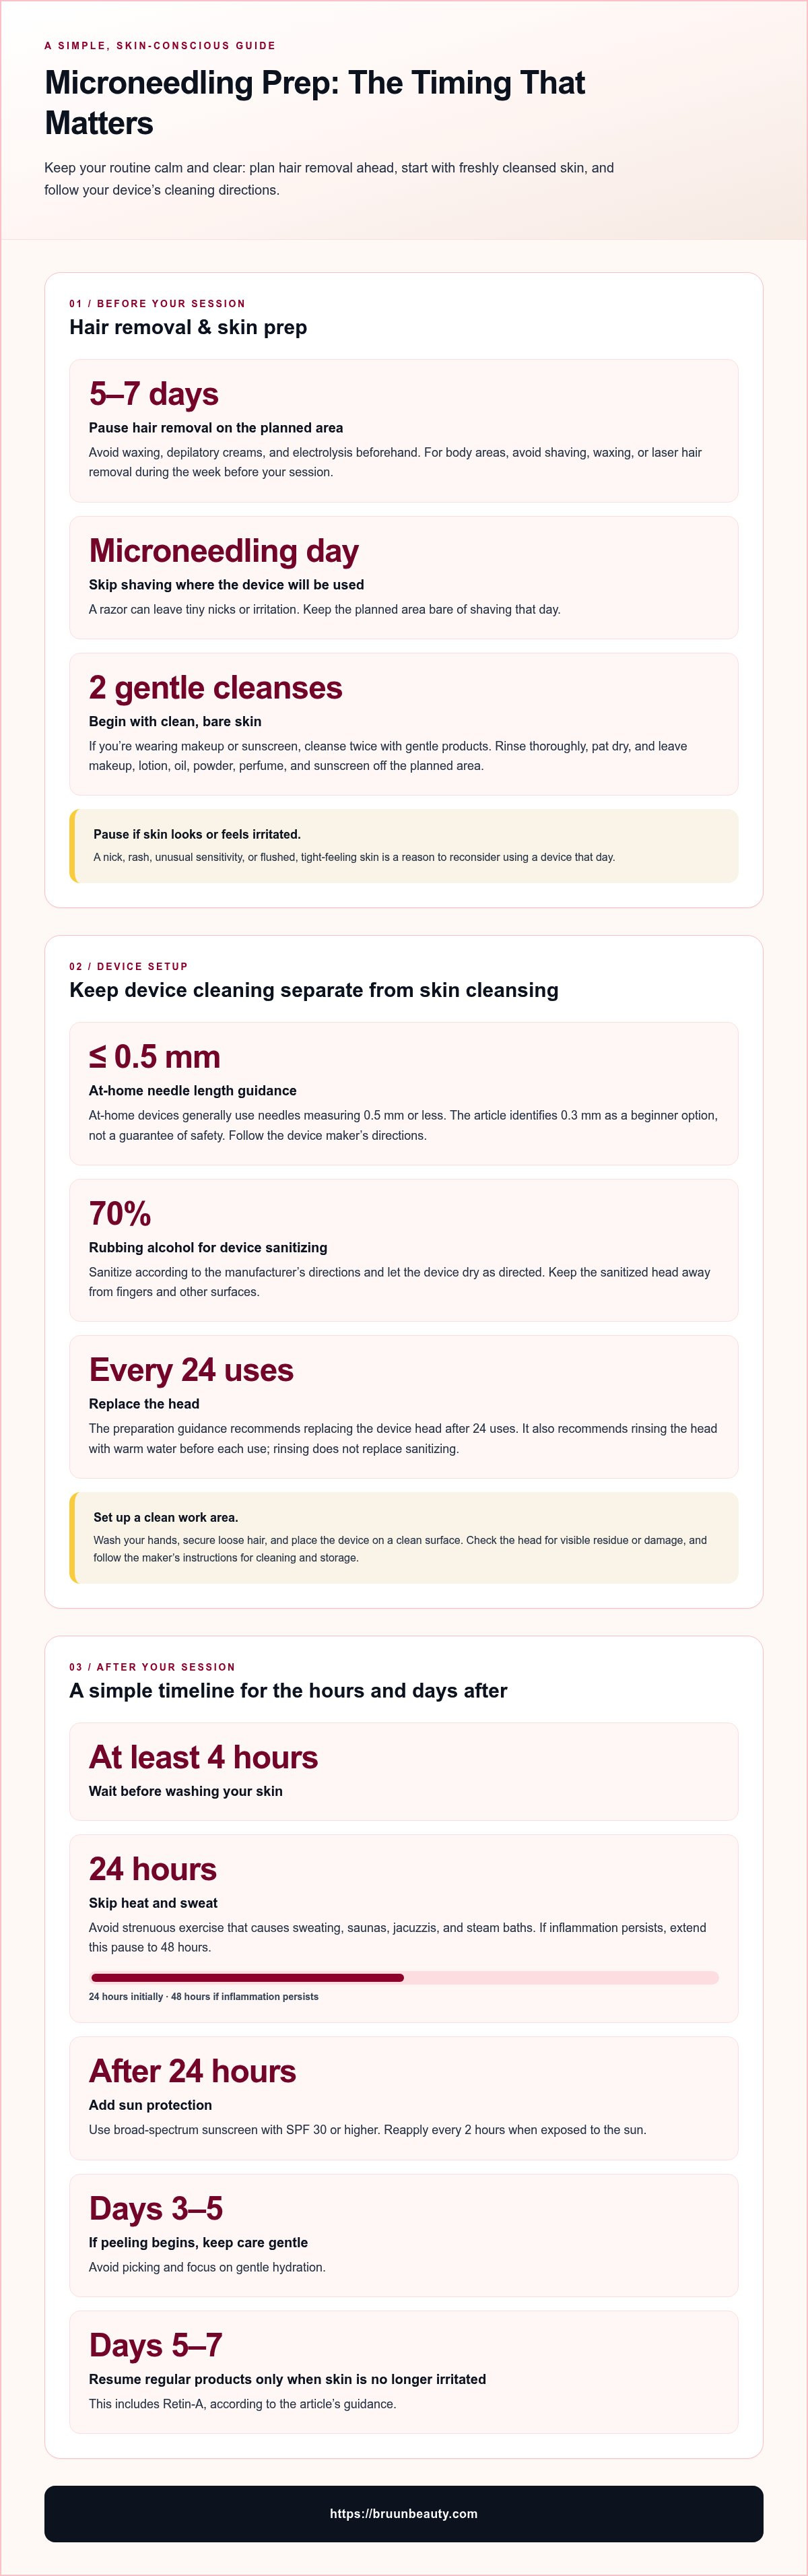
- Plan hair removal before setting your treatment day. Avoid waxing, depilatory creams, and electrolysis on the area for 5-7 days beforehand. These methods can leave skin more sensitive, while microneedling adds needle contact to the surface. For example, if you wax your upper lip, leave at least 5 days before microneedling.
- Skip shaving the treatment area on microneedling day. A razor can leave tiny nicks or irritation, making skin feel more sensitive. For body areas, avoid shaving, waxing, or laser hair removal during the week before your session. Keep hair removal away from the exact area you plan to needle.
- Cleanse gently before you begin. Double cleanse to lift makeup, sunscreen, and everyday residue: first use a gentle cleanser suited to your skin, then wash again with a mild cleanser. Rinse thoroughly and pat dry with a clean towel. The microneedling collection relates to this preparation step and the device used on freshly cleansed skin.
- Keep the treatment area bare on treatment day. After cleansing, avoid applying lotion, oil, makeup, powder, perfume, or sunscreen there. These products can leave residue where the needles contact your skin. If you notice a nick, rash, or unusual sensitivity while cleansing, pause rather than using a device on irritated skin.
- Plan the first hours after microneedling, too. Wait at least 4 hours before washing the skin. Avoid strenuous exercise that causes sweating, saunas, jacuzzis, and steam baths for 24 hours; extend that pause to 48 hours if inflammation persists. Heat and sweat can add irritation while your skin feels sensitive.
- Keep post-treatment skincare simple. After the first 24 hours, use broad-spectrum sunscreen with SPF 30 or higher, and reapply every 2 hours when exposed to sun. Resume regular skincare products and Retin-A on days 5-7 only when your skin is no longer irritated. If peeling begins around days 3-5, avoid picking and focus on gentle hydration.
Use the planned treatment site as your reference when arranging hair removal. For a body area, avoid shaving, waxing, or laser hair removal on that area during the week before treatment. Mark the area you expect to treat and keep those hair-removal methods away from it throughout that period. If you remove hair elsewhere, keep it separate from your treatment-area plan. This makes it easier to follow the preparation steps without confusing unrelated areas.
Treat the day of microneedling as a separate no-shave checkpoint. Do not shave the treatment area that day, since shaving can cause irritation. If you usually shave as part of getting ready, leave that step out for the area being treated rather than trying to fit it in before your appointment. The key is to keep the planned skin clear of shaving on treatment day and to follow the week-before pause for body-area hair removal. Keeping those timing rules distinct, one covering the week before for body hair removal, and one covering the treatment day for shaving, can help avoid accidentally relying on the wrong timing.
Cleansing skin before microneedling
Keep cleansing and device preparation as separate tasks: prepare the skin, then handle the microneedle with clean hands. For at-home use, devices generally use needles measuring 0.5 mm or less; 0.3 mm is a beginner option, not a guarantee of safety. Follow the device maker’s directions for your skin and device.
Cleanse on Appointment Day
- Set up a clean work area before handling your device. Wash your hands, secure loose hair, and place the device on a clean surface, away from used towels and open skincare containers. Check the needle head for visible residue or damage, and don’t use it if it appears compromised.
- Sanitize the at-home device with 70% rubbing alcohol, following its manufacturer’s directions. Let the device dry as directed before use. Keep the sanitized head from contacting counters, fingers, or other surfaces; otherwise, you’ll need to repeat the cleaning process before your session.
Double Cleanse the Skin
- If you’re wearing makeup or sunscreen, cleanse twice gently. Treat both passes as cleansing, not exfoliation: don’t add a scrub, cleansing brush, or rough cloth. If your skin feels tight or looks flushed afterward, avoid further friction and reconsider whether it’s ready for a session.
- Check for cleanser residue around your brows, nostrils, and hairline. Rinse these areas carefully, since leftover product can mix with serum or other products used in your routine. Pat your skin dry, then inspect it under good light for visible residue before preparing your device.
Prepare the microneedle head according to its instructions. Guidance for at-home devices recommends rinsing the head with warm water before every use and shaking off excess water. Don’t assume rinsing replaces sanitizing; follow the device maker’s full cleaning directions. Replace the head every 24 uses, as recommended in the preparation guidance.
Keep the cleaning steps specific to the equipment you own. The microneedling device and supply range can help you compare options as you plan your setup. Check the maker’s instructions for cleaning, storage, and head replacement before each session.
On the day of a microneedling appointment, gently cleanse the face to remove makeup and debris, then avoid applying skincare products. Keep this appointment-day preparation distinct from the device-cleaning steps: these instructions concern the skin, not the microneedle head. The aim is to remove makeup and debris with a gentle cleanse while leaving skincare products off the skin before the appointment.
If numbing cream is used, remove it and cleanse the skin again using 60% alcohol and purified water. This further cleanse follows numbing cream removal; it is separate from the initial gentle cleanse. Keep the sequence clear: first remove makeup and debris with a gentle cleanse, avoid applying skincare products, and, after removing numbing cream, cleanse again with 60% alcohol and purified water. The additional cleanse does not replace the earlier removal of makeup and debris.
General health and skin preparation
Before using a microneedling device, consider your skin, sun exposure, medications, and usual routine. These checks can help you decide whether your skin is ready for a session.
Review Retinoids, Acids, and Exfoliants
- Pause potentially irritating skincare products 5-7 days before your session. This includes retinoids, exfoliants, and products with salicylic acid; avoid alpha-hydroxy acids and vitamin C for at least 24 hours beforehand. Check labels for these ingredients, including in serums, so they don’t slip into your routine. Avoid adding new actives during this pause.
Avoid Sun Exposure and Tanning
- Avoid tanning, IPL or laser procedures, and unprotected sun exposure for 2 weeks before microneedling. Stay out of direct sun for at least 24 hours beforehand, and use sunscreen if exposure is unavoidable. Sunburned skin isn’t ready for a session. If you’re planning general skin rejuvenation, keep sun protection part of your routine.
Check for Acne or Irritated Skin
- Look closely at the full area before starting. Don’t microneedle over active acne, broken skin, or skin that feels sensitive or irritated; puncturing active blemishes can spread bacteria. Avoid areas with an active cold sore or eczema irritation, too. If you’re prone to cold sores, preparation instructions advise an antiviral agent for 2 days before and on the day.
Consider Numbing Cream
- Don’t add numbing cream automatically to your at-home routine. If you use it, apply it after double cleansing, leave it on for 20 minutes, then remove it thoroughly before proceeding. Residue should not remain on the skin. Follow the directions for the cream and device, and don’t microneedle skin that becomes irritated or unusually sensitive.
- Review medications before your session. Review your medications with a healthcare professional before microneedling, especially if you take medicines that may affect bleeding. They also advise avoiding aspirin, fish oil, Omega-3, and vitamin E for 1 week because of bruising risk. Don’t change prescribed medication without guidance from the prescribing professional.
- Make practical choices to support your routine. Drink plenty of water in the days before your appointment, and avoid exercise or hot showers for at least an hour before and after microneedling. Qure Skincare advises avoiding alcohol before a session because it can dehydrate skin. Keep your plan gentle and don’t add new products.
Using hyaluronic acid serum
Hyaluronic acid can be a helpful hydration step, but the complete formula and its directions matter. When deciding how to prep skin before microneedling at home, distinguish an everyday serum from a product specifically directed for use with a microneedling device.
- Check the serum label before adding it to your routine. Look for hyaluronic acid in the ingredient list, then review the full formula. A product may contain other ingredients too, so don’t judge its suitability by the headline ingredient alone.
- Use a familiar serum as part of your regular skincare routine instead of testing a new formula close to your session. This gives you a chance to notice how your skin responds on an ordinary day. Introduce any new product separately from other routine changes.
- Follow the serum’s directions for application and frequency. Hyaluronic acid is a humectant that helps bind water in the skin’s surface layers. Think of it as a hydration ingredient, not a substitute for device instructions or a promise about microneedling results.
- Keep regular skincare separate from application during microneedling. Don’t assume an ordinary face serum is meant to be used with a needle device. Use a formula during the procedure only when its directions and the device instructions specifically support that use.
- Compare the serum and device directions before using them together. Check how the product should be applied and whether the device instructions address serum use. If the directions don’t clearly align, keep the serum in your regular skincare routine rather than applying it during needling.
- Consider the full ingredient list when choosing a formula. A serum that combines hyaluronic acid with other active ingredients may require different timing from a simple hydration step. Review each ingredient and its directions instead of assuming every product with “hyaluronic” in its name serves the same purpose.
- Keep your plan consistent from session to session. Write down the serum name, when you apply it, and any changes you notice in your skin. This simple record can help distinguish your usual routine from products you’re considering for microneedling.
- Keep expectations practical as you decide how to prep skin before microneedling at home. Hyaluronic acid can support hydration as part of skincare, but the formula’s directions determine how to use it. Choose a product with a clear role in your routine, and don’t add steps without a reason.
How long before microneedling should I stop retinoids, acids, and exfoliants?
Pause potentially irritating products before your session rather than trying to balance several active ingredients. A simple routine makes it easier to notice sensitivity and keep your skin calm.
- Set a pause date 5-7 days before microneedling for potentially irritating topical agents. This includes retinoids, exfoliants, and products containing salicylic acid. If your session is Saturday, review your routine the previous weekend and put those products aside for the preparation window.
- Check ingredient labels, not just product names. Retinol creams, alpha-hydroxy acid toners, salicylic acid cleansers, and exfoliating pads can all add active ingredients to your routine. Pause retinoids, alpha-hydroxy acids, and vitamin C for at least 24 hours before microneedling, even if a product feels familiar.
- Use the longer pause when you’re planning carefully. Some preparation guidance says to avoid retinoids, exfoliants, and other potentially irritating products for at least 48 hours. A 5-7 day pause is also recommended for potentially irritating topical agents, giving your skin more time away from these actives before the needle contacts it.
- Keep your routine basic while pausing products. Choose familiar, gentle skincare and don’t introduce a new peel, scrub, or retinoid as a replacement. For example, set aside an exfoliating toner and use a mild cleanser instead. Avoiding multiple active formulas makes it easier to identify what may be causing sensitivity.
- Include products used less often in your review. A weekly peel or exfoliating mask still counts, even if you don’t apply it daily. Check the calendar for the last application, and skip any exfoliant that falls inside the 5-7 day preparation window. Don’t use a stronger product to compensate for the pause.
- Wait to restart active skincare until your skin is no longer irritated. Preparation instructions say regular skincare products and Retin-A may restart on days 5-7 after microneedling, once irritation has settled. Add products back gradually, rather than restarting retinoids, acids, and exfoliants together on the same day.
- Use skin response as a practical signal. If your usual moisturizer stings or your face feels unusually sensitive before the session, don’t cover that feeling with more skincare products. Keep the routine simple and reconsider proceeding while irritation remains. After microneedling, unusual sensitivity from usual products at 48-72 hours can signal overdoing it.
Bruun Beauty: Advanced Microneedling Serum SD - Control Salmon DNA Ampoule Serum
Advanced Microneedling Serum SD - Control Salmon DNA Ampoule Serum is one named serum to consider alongside your microneedling routine. Its name identifies Salmon DNA, but you should still check the product directions before applying it.
Keep the steps distinct: prepare your skin as described above, then follow the serum and device instructions for when and how to apply the formula. Don’t assume a serum belongs under a microneedling device just because it’s designed for microneedling skincare. This distinction helps you choose products thoughtfully without adding extra steps on treatment day.
If you’re building a skincare setup, Bruun Beauty also offers Jelly Mask Kits and BB Glow Treatment Supplies. Visit bruunbeauty.com to explore the available options or contact Bruun Beauty with questions about its offerings.
Make Your Next Session a Thoughtful One
Turn what you’ve learned about how to prep skin before microneedling at home into a simple plan you can follow without rushing. Choose your session day, review your product labels, and set aside the items you’ll pause. A written plan can help you avoid last-minute changes and make each step intentional.
Pay attention to how your skin feels as you prepare. If irritation or unusual sensitivity appears, don’t cover it with extra products or push through your routine. Give yourself time to make a considered decision, and focus your skincare on comfort rather than adding new steps.
A calm, consistent approach can make preparation more manageable and give your skincare routine room to work for you. Keep your plan simple, stay attentive to your skin, and take your next step with confidence.
FAQs
How far apart should repeat microneedling sessions be?
Preparation guidance recommends scheduling repeat microneedling treatments 4-6 weeks apart. Keep that interval in mind when planning a series, and avoid adding extra sessions simply because your skin looks settled. The time between appointments gives you room to observe how your skin responds and follow its recovery before another session.
When can I wear makeup after microneedling?
Wait at least 8-24 hours after microneedling before applying makeup. If you used a 1.0 mm microneedling head, wait 24 hours. When you do return to makeup, use clean applicators and avoid rubbing the skin. These steps help limit unnecessary contact while your skin is still sensitive.
How long can redness or pinpoint bleeding last?
Redness and pinpoint bleeding after microneedling should subside within a day. Keep your hands off the area and follow your device’s aftercare instructions. If the skin’s appearance or sensation concerns you, pause further sessions and seek appropriate medical guidance rather than trying to mask the change with makeup.
Should I avoid ibuprofen after microneedling?
Preparation guidance advises avoiding anti-inflammatory medications such as ibuprofen for 1 week after microneedling. If you take medication regularly or need pain relief, don’t change a prescribed routine based on general skincare guidance. Ask the professional responsible for your medication what is appropriate for your situation.
Can I go back to my usual skincare if my skin still feels irritated?
Wait until your skin is no longer irritated before restarting regular skincare products and Retin-A, which preparation guidance places on days 5-7 after microneedling. Resume your usual routine gradually instead of layering several active formulas at once. If a familiar product causes unusual sensitivity 48-72 hours afterward, take that as a sign to scale back.
At-Home Collagen Induction: Guide to Radiant Skin
Microneedling for Large Nose Pores: Professional Guide
Related Posts

Consistent Microneedling and the Long-Term Changes to Expect

Aftercare choices to lower infection risk at home after microneedling

How to Create a Relaxing At-Home Spa Day With Simple Rituals

Sunscreen Recommendations After Microneedling: How to Protect Healing Skin

Investing in my skin for the future: what deserves my budget

Post-microneedling skincare routine for masks, makeup, and recovery

Skin Peeling After Microneedling: What to Avoid and When to Resume Makeup
