
Dr. Pen Settings for Stretch Marks: A Step-by-Step Guide
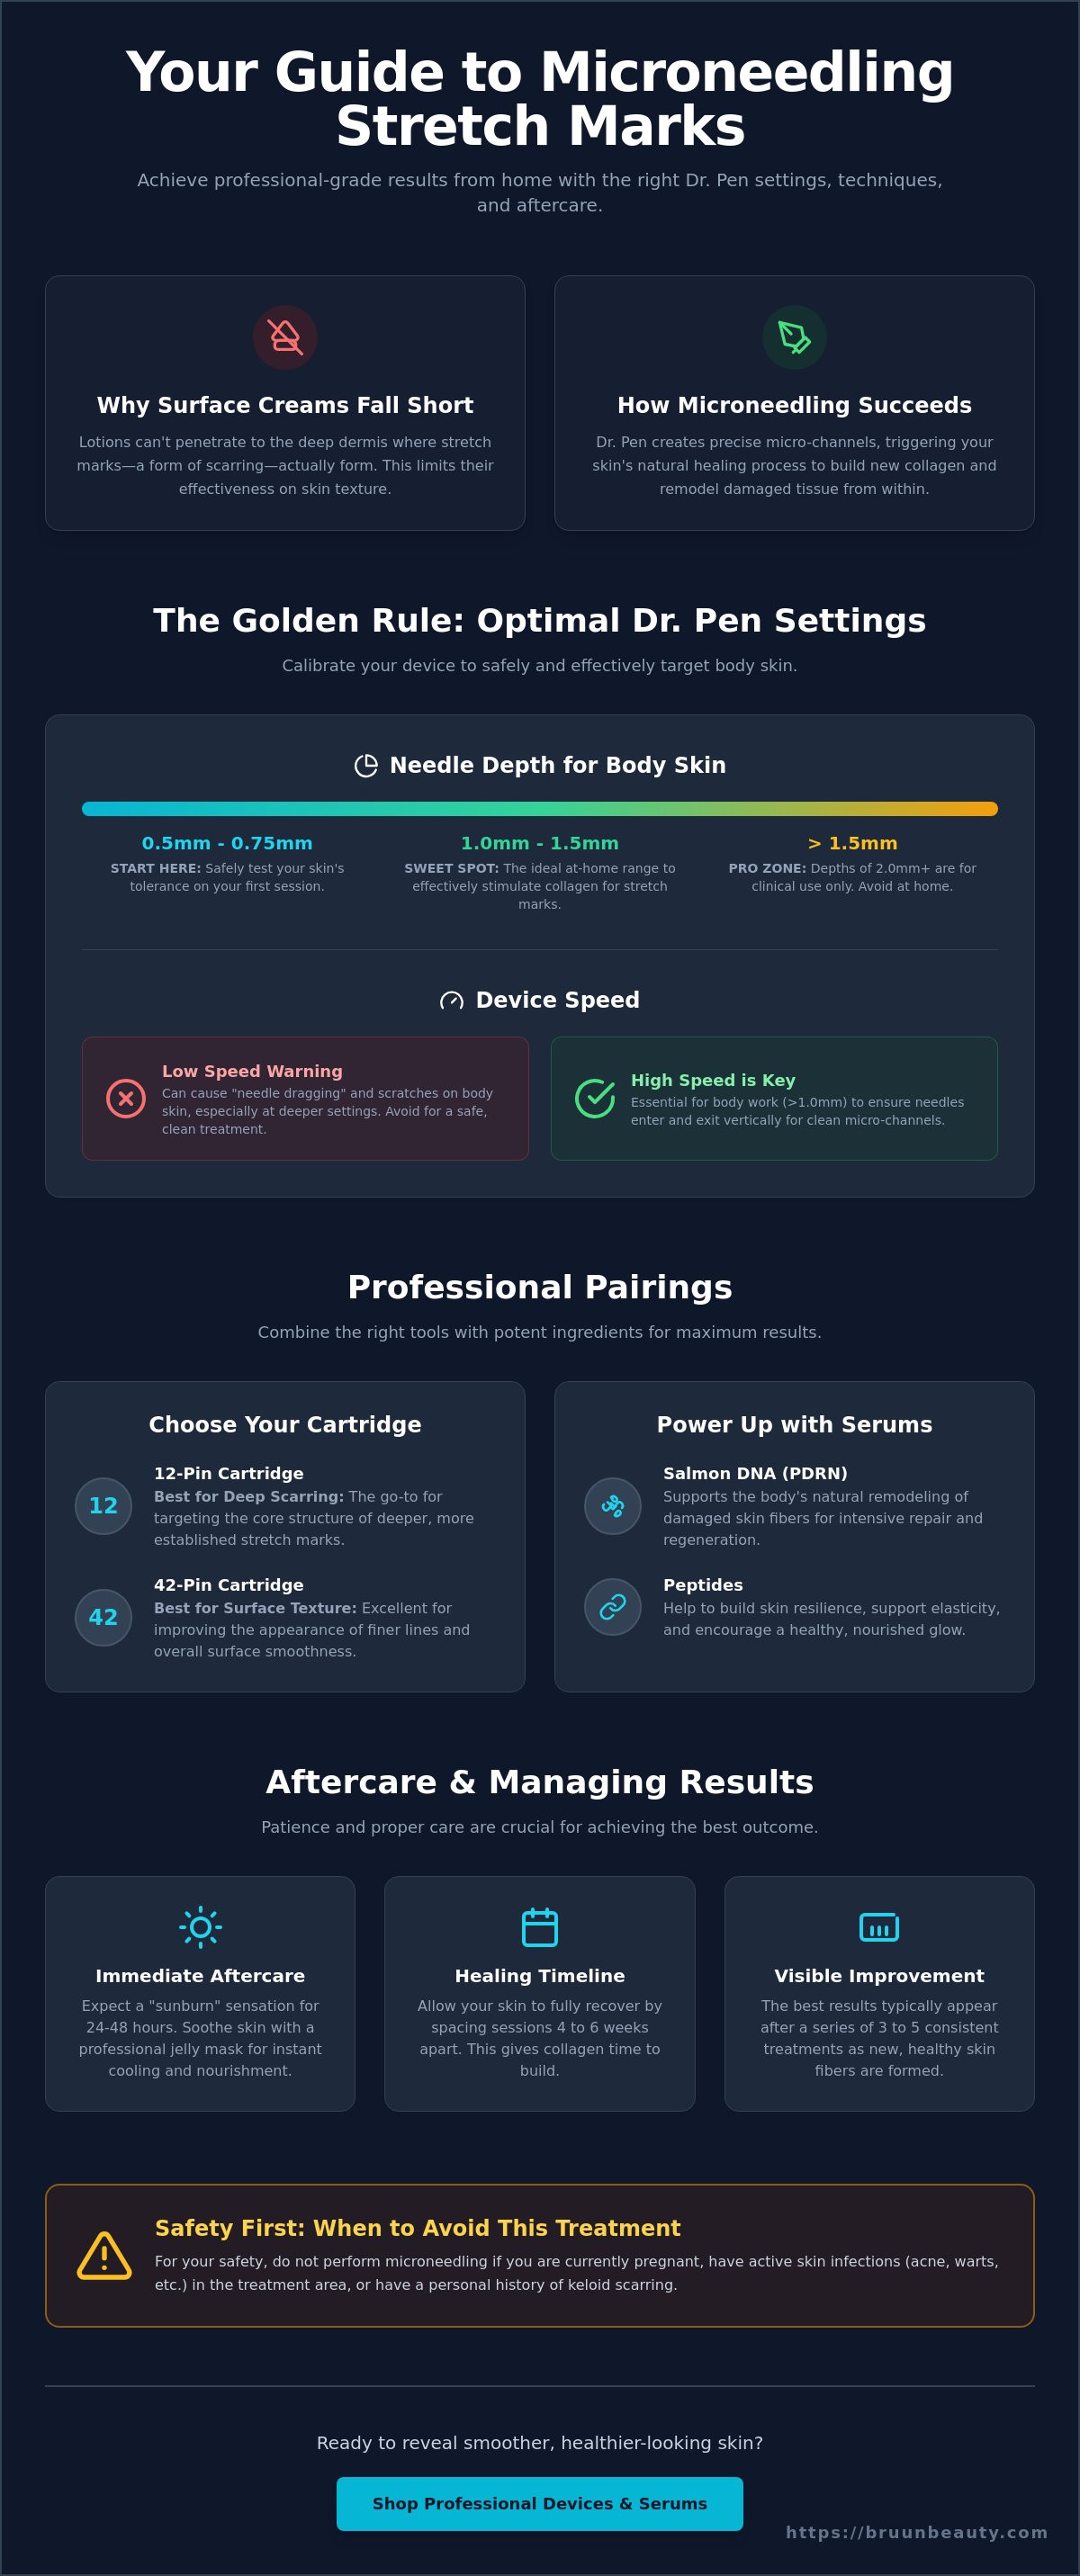
What if the reason your favorite stretch mark creams aren't working is simply because they can't reach the deep dermal layers where the texture issues actually live? To see real results, you need the right dr pen settings for stretch marks, typically involving needle depths between 1.0mm and 1.5mm to effectively stimulate collagen production. This professional calibration allows you to target skin texture issues that surface-level lotions simply can't touch.
You've likely spent a small fortune on products that promise miracles but leave you feeling frustrated. It's common to feel a bit nervous about using advanced microneedling technology at home, especially when you're worried about causing damage. We believe you deserve to feel confident in your skin, and that starts with having the right education and tools.
In this guide, you'll learn the exact depths, speeds, and serum pairings to transform your skincare routine. We'll cover everything from the latest Dr. Pen M9 smart features to the best regenerative ingredients like peptides and Salmon DNA. By the end, you'll have a clear, step-by-step plan to achieve professional-grade results from the comfort of your own home.
Key Takeaways
- Understand why higher device speeds are essential when working on body skin to prevent needle dragging and ensure a smooth, comfortable session.
- Discover the optimal dr pen settings for stretch marks, including the "golden rule" of starting with shallow depths to safely build your skin's tolerance.
- Learn how to choose between 12-pin and 42-pin cartridges to target either deep dermal scarring or fine surface texture effectively.
- Master the science of professional serum pairings, such as using Salmon DNA (PDRN) to support the body's natural remodeling of damaged fibers.
- Find out how to manage the post-treatment "sunburn" phase using professional jelly masks for instant cooling and nourishment.
Understanding Microneedling for Stretch Marks
Stretch marks, or striae, are a unique type of skin concern. They aren't just surface lines; they're actually a form of deep dermal scarring. When your skin stretches quickly due to growth or pregnancy, the collagen and elastin fibers in the middle layer of your skin can snap. This leaves behind the indented, textured marks that many of us find frustrating. Using a professional-grade device for Collagen induction therapy helps remodel this damaged tissue from the inside out.
While manual rollers are a common entry point, a Dr. Pen device offers much better precision. These pens create vertical micro-channels at high speeds, which is safer for your skin than the "raking" motion of a manual roller. Because stretch marks vary in depth and age, having control over your dr pen settings for stretch marks is the key to seeing a visible change in texture and color. You can expect to see the best results after a series of 3 to 5 sessions, as your skin needs time to build new, healthy fibers.
Why Body Skin Requires a Different Approach
Your stomach, thighs, and glutes have much thicker skin than your face. This means your dr pen settings for stretch marks must be calibrated to reach the deep dermis where the damage actually exists. Blood supply also varies across the body; the skin on your torso often heals faster than the skin on your lower legs. We use "controlled trauma" to wake up your skin's repair cells. This process encourages the body to produce fresh collagen, which gradually fills in the "valleys" of the stretch marks for a smoother appearance.
Who Should (and Should Not) Microneedle Stretch Marks
Ideal candidates for this protocol include those with striae rubra (newer red or purple marks) and striae alba (older silvery-white marks). Newer marks often respond faster, but older marks can still show significant texture improvement. However, safety comes first. You should avoid microneedling if you have active skin infections, a history of keloid scarring, or if you're currently pregnant. Since body skin takes longer to cycle through the healing process, you'll generally space your sessions 4 to 6 weeks apart. This patience allows your skin to fully recover and nourish itself between treatments.
For at-home enthusiasts, it's vital to stay within safe boundaries. Professional-grade results are achievable when you keep your needle depths between 1.0mm and 1.5mm. Anything deeper, such as 2.5mm, is best left to licensed practitioners in a clinical setting to avoid unnecessary irritation. Pairing your session with high-quality microneedling serums, like Salmon DNA or peptides, can further support your skin's natural resilience and glow.
Dr. Pen Settings: The Optimal Depth and Speed for Body Skin
Finding the right dr pen settings for stretch marks is a bit like finding the perfect temperature for a bath; it needs to be just right to be effective. Since stretch marks are deep-seated scars, your settings must be powerful enough to reach the dermis while remaining safe for home use. A helpful Microneedling overview from the Cleveland Clinic highlights how this process works by creating tiny injuries that prompt the skin to repair itself through natural collagen production.
When you're working on the body, speed is your best friend. When needles go deeper (above 1.0mm), the motor needs to move faster to ensure the needles enter and exit the skin vertically. If the speed is too low, the needles can "drag" as you move the pen across your skin. This dragging causes unnecessary scratches instead of the clean, vertical micro-channels we want. High-quality skincare devices allow you to toggle these speeds precisely to match your comfort level and the thickness of the area you're treating.
Always start your very first session at a shallower depth, perhaps 0.5mm or 0.75mm, even on the stomach. This allows you to see how your skin reacts and how quickly you heal. Even as you become more experienced, don't exceed 2.5mm at home. Using professional-grade microneedling tools is exciting, but respecting these safety limits ensures you get the glowing results you want without causing unnecessary trauma to the tissue.
Recommended Needle Depth by Body Area
- Stomach and Abdomen: This area often has the thickest dermal layer. You'll likely use 1.5mm to 2.5mm for older, silvery marks that feel indented.
- Thighs and Glutes: These areas are quite dense. A setting of 1.5mm to 2.0mm is usually the sweet spot for remodeling texture and improving skin elasticity.
- Inner Arms and Breasts: The skin here is delicate and much thinner than your thighs. Stick to 0.5mm or 1.0mm to avoid irritation and ensure a comfortable experience.
Matching Speed to Depth
Your dr pen settings for stretch marks should always pair higher speeds with deeper needle lengths. Speeds 1-3 are reserved for shallow prep or when you're working on the most sensitive, thin-skinned areas like the inner arms. Speeds 4-5 are the standard range for most body treatments between 1.0mm and 1.5mm. Finally, Speed 6 is the maximum power setting for depths of 2.0mm and above. This high frequency ensures the needles move fast enough to avoid any catching or pulling as you glide over the treatment area.
The Step-by-Step Stretch Mark Protocol
Think of your workspace as your own professional mini-clinic. Before you begin, wipe down your surface and lay out your tools on a clean towel. Clinical research has confirmed that microneedling is a safe and effective treatment of striae distensae across all skin tones, but maintaining strict hygiene is what ensures those results are beautiful and irritation-free. Start by double-cleansing the treatment area with a gentle, oil-free cleanser to remove every trace of body lotion, sweat, or oils.
If you're planning to use deeper dr pen settings for stretch marks, you'll likely want to apply a 5% Lidocaine numbing cream. Let it sit for 20 to 30 minutes to ensure a comfortable experience, especially on denser areas like the thighs. Once the skin feels numb, wipe the area thoroughly with alcohol to ensure a sterile surface. This step is vital because your skin will be open to absorbing everything you apply next.
The "slip" factor is your most important safety measure during the process. Never use your Dr. Pen device on dry skin. Always apply a generous layer of a hydrating serum to the specific section you're working on. This creates a smooth glide that prevents the needles from scratching or tearing the skin surface. Work in small, manageable zones so your serum stays wet and active throughout the session.
Professional Movement Patterns
To achieve professional-grade results, you should use the cross-hatch technique. Move the pen vertically over the stretch mark, then horizontally, and finally diagonally. This pattern ensures every millimeter of the damaged tissue is reached for even collagen production. While a gliding motion is standard, very deep or textured scars benefit from "stamping." This involves lifting the pen and placing it firmly down rather than sliding it across the skin. Stamping prevents the needles from catching on the uneven edges of deep texture. Always keep the pen at a 90-degree angle to ensure the needles enter the skin perfectly straight.
Sanitization and Cleanup
Your safety doesn't end when the device turns off. You must dispose of your needle cartridges immediately after a single use. These are designed for one session only. Reusing them, even on yourself, risks infection and uses dull needles that can damage your skin. Wipe down the body of your pen with 70% isopropyl alcohol to keep it pristine. Finally, avoid touching the treated area with unwashed hands for at least 24 hours. Your skin is full of open micro-channels, so keeping it clean is the best way to support a smooth, glowing recovery.
Professional Pairings: Cartridges and Serums
Setting the right dr pen settings for stretch marks is only half the battle. To see a visible shift in skin texture, you must pair your device with the right needle configuration and high-performance serums. Think of your cartridge as the delivery vehicle and your serum as the fuel that powers skin regeneration. When these two elements work together, you'll see much better results than using the device alone.
Choosing the Right Cartridge Pin Count
Choosing between a 12-pin and a 36-pin or 42-pin cartridge depends on the age and depth of your marks. 12-pin cartridges concentrate the motor's energy into fewer points. This allows for deeper penetration into tough, fibrous tissue. This makes them the best choice for deep, indented stretch marks that require significant remodeling of the dermal layer.
If you're focused on smoothing out surface-level texture or treating a large area like the full abdomen, 36-pin or 42-pin needle cartridges are ideal. These create more micro-channels per pass, which is perfect for refining the skin's overall feel and appearance. Avoid nano-needling for this specific concern. Nano-needles don't reach the dermis, so they won't be able to address the snapped fibers that cause stretch marks in the first place.
K-Beauty Serums for Advanced Results
While your dr pen settings for stretch marks create the pathways, your serums do the heavy lifting. Salmon DNA (PDRN) is currently the gold standard in professional K-beauty for scar remodeling. PDRN mimics human DNA to support the body's natural repair signals. This helps to rebuild the skin's structure more efficiently than standard lotions or creams.
Always use a pure Hyaluronic Acid base during your session to ensure the pen glides smoothly without snagging. You can also layer in peptides and growth factors to send a "message" to your skin to produce more collagen. However, keep your active irritants for later. Avoid using Vitamin C, Retinol, or exfoliating acids during the actual needling process. These can cause intense stinging and unnecessary inflammation when delivered directly into the open channels.
Layer your serums by applying the thinnest, most active ampoules first, followed by your Hyaluronic Acid lubricant. This ensures the most powerful ingredients are pushed deep into the micro-channels for maximum absorption. You can find our full range of professional microneedling serums to elevate your next home session and achieve that nourished, glowing skin you're looking for.
Aftercare and Managing Your Results
Once you've finished your session using the ideal dr pen settings for stretch marks, your skin will enter what we call the "sunburn" phase. For the first 24 to 48 hours, it's completely normal for the area to look red and feel warm to the touch. This is a sign that your body's natural repair process is in full swing. Keep the area clean and avoid tight, restrictive clothing that might cause friction against the sensitive tissue.
During this initial recovery, your main goal is to keep the skin hydrated and protected. Avoid hot showers, saunas, or intense workouts for the first two days to prevent excess inflammation. Instead, focus on gentle moisturization to keep the skin barrier supported while it closes those micro-channels. This occlusion helps the skin retain the moisture it needs to remodel the damaged dermal fibers.
The Role of Jelly Masks in Body Aftercare
Applying professional jelly masks is a secret weapon for body treatments that many people overlook. These masks create a vacuum-like seal over your skin, which helps push hydrating nutrients deeper into the tissue. This is especially helpful after using your dr pen settings for stretch marks because it provides instant cooling relief to large areas like the stomach or thighs.
Look for masks in our jelly index that feature calming ingredients like Centella Asiatica, Aloe Vera, or Hyaluronic Acid. When applying to the body, mix a slightly thicker consistency so the mask stays in place on curved areas. Let it sit for 15 to 20 minutes to fully soothe the area and lock in moisture before you continue with your daily routine.
Long-Term Maintenance and Success
Patience is your best friend when it comes to body remodeling. While you might feel tempted to repeat the process quickly, you must wait 4 to 6 weeks between sessions. Your skin needs this time to fully cycle through the collagen-building process. During these weeks, keep the area well-moisturized with daily body oils or rich creams to maintain elasticity and support the new fibers being formed.
Protect your progress by using a broad-spectrum sunscreen on the treated area if you're spending time outdoors. Freshly needled skin is more sensitive to UV rays, and sun protection helps prevent dark spots or uneven tone. We also recommend taking clear progress photos every month. Remodeling happens gradually, and looking back at where you started is the best way to stay motivated as you work toward clear, nourished, glowing skin.
Take the Next Step Toward Smoother Skin
Mastering the right dr pen settings for stretch marks is the most important step in your journey to smoother, more resilient skin. By combining precise needle depths with professional-grade K-beauty serums like PDRN, you're giving your body the tools it needs to remodel deep dermal texture effectively. Remember to stay patient during the 4 to 6 week healing cycle; real transformation happens beneath the surface during your skin's natural recovery phase.
At BRÜUN, we are dedicated to providing the same professional-grade inventory trusted by licensed estheticians across the country. Our advanced K-beauty serums have earned 5-star reviews for their ability to support nourished, glowing skin. Plus, with our US-based warehouses in Miami and Los Angeles, you can count on fast, reliable shipping for all your skincare needs. It's time to stop settling for topical creams that don't reach the dermis and start seeing the results you deserve.
Shop Professional Dr. Pen Devices and Serums at BRÜUN today and start your professional-grade skincare routine at home. You're just a few sessions away from feeling completely confident in your skin again.
Frequently Asked Questions
How many sessions of Dr. Pen do I need for stretch marks?
Most people see a visible improvement after 4 to 6 sessions, typically spaced 4 to 6 weeks apart. If you have deep or older silvery stretch marks, you might require up to 8 sessions to reach your desired texture. Consistency is vital because the biological process of collagen remodeling is gradual. Your skin needs this downtime between treatments to build the fresh, healthy fibers that improve the appearance of the treatment area.
Does microneedling for stretch marks hurt?
Microneedling is very tolerable when you use a topical numbing cream with 5% Lidocaine for 20 minutes before starting. This simple step makes using the deeper dr pen settings for stretch marks, such as 1.5mm to 2.5mm, a comfortable experience. While body skin is thicker than facial skin, the deeper needle depths are necessary to reach the dermis. Most users describe the sensation as a light vibration or a prickly feeling rather than pain.
Can I use Dr. Pen on red stretch marks?
Yes, you can use your device on striae rubra, which are the red or purple marks that have recently appeared. These marks are still in an active inflammatory phase and often show excellent results because they have a better blood supply than older white marks. Start with a shallower depth of 0.5mm to 1.0mm to be gentle with the tissue. This approach allows the skin to heal effectively while the marks are still fresh.
Which Dr. Pen cartridge is best for stretch marks?
The 12-pin cartridge is generally the best choice for deep, indented scarring because it penetrates tough tissue with more focused energy. If you are targeting a larger area for general texture improvement, the 36-pin or 42-pin cartridges are excellent alternatives. These higher pin counts provide great coverage and effectively stimulate collagen production across the stomach or thighs. Choosing the right cartridge ensures your dr pen settings for stretch marks deliver the best possible outcome.
What should I avoid after microneedling my body?
Avoid hot showers, saunas, swimming pools, and intense exercise for at least 48 hours after your treatment. These activities can introduce bacteria or cause excessive sweating and irritation while your micro-channels are still open. Additionally, stay away from direct sun exposure and harsh chemical exfoliants like AHAs or body scrubs for one full week. This allows your skin barrier to recover fully without the risk of irritation or post-inflammatory hyperpigmentation.
How soon can I see results on my stretch marks?
Real results on stretch marks typically appear between 4 and 8 weeks after your session. You may notice a slight tightening or a healthy glow within the first week, but this is just the beginning. The timeline aligns with the biological process of collagen maturation, where your body organizes new fibers to replace damaged tissue. Most users see the most significant changes in texture and color after their third or fourth consistent session.
How to Clean Dr. Pen: Essential Maintenance Guide
Salmon DNA vs. PDRN: Choosing the Best Bio-Stimulator
Related Posts

The Best Microneedling Aftercare Serum Guide: Post-Treatment Glow Secrets (2026)

Dr. Pen Needle Cartridges Explained: Your Complete Guide to Choosing the Right Pin Count

Dr. Pen A6 Ultima Review: Is This Microneedling Workhorse Still Worth It in 2026?

Best Professional Microneedling Pen 2026: An Esthetician’s Guide to Results

Advanced Dr. Pen Techniques: The Professional Esthetician's Guide to Results

Your Ultimate Dr. Pen Needle Depth Chart: A Safe Guide to Professional Results

The Ultimate Guide to Using a Jelly Mask After Microneedling for Glowing Skin
