

At-Home Facial for Glowing Skin: Step-by-Step Routine
More steps don’t necessarily mean more glow. An at-home facial for glowing skin can be simple: cleanse, exfoliate gently if it suits your routine, add hydration, and finish with moisturizer. A clear sequence helps you create a fresh, nourished look without piling on products that may leave your skin uncomfortable.
You don’t need a mask, a device, or several active ingredients to make your routine feel complete. Start with products you know, choose one optional step if it fits your skin, and follow each product’s directions. This guide explains how to build a manageable home facial, where a jelly mask can fit, and why microneedling belongs in a separate, device-guided routine.
Key Takeaways
- Build an at-home facial for glowing skin around a simple sequence: cleanse, consider gentle exfoliation, then add hydration and moisturizer.
- Choose products you already know and skip steps that don’t feel comfortable or suit your routine.
- A mask is an optional home-spa step, not a requirement. BRÜUN’s Pomegranate Jelly Mask is one option when you want to add a mask.
- When time is short, streamline your facial to cleansing, serum, and moisturizer.
- Keep microneedling products in a separate, device-guided routine rather than adding them to a basic facial.
What Makes an At-Home Facial for Glowing Skin Complete?
A home facial is a planned skincare routine that cleanses your skin, adds a considered care step, and finishes with moisture. For an at-home facial for glowing skin, the goal isn’t to use every product you own. It’s to follow a comfortable sequence that leaves your skin feeling clean and nourished.
A facial might include cleansing, exfoliation, a mask, serum, and moisturizer, but you don’t need every step each time. Cleansing provides a fresh start, while serum and moisturizer add hydration to your routine. For a broader overview of What is a Facial?, see the general components and purpose of a facial.
Think of the routine as a few useful choices, not a checklist. Exfoliation and masking are optional, and the best choice depends on what your skin already tolerates. If you use a mask, follow its directions and pair it with familiar products. A jelly mask can add a home-spa touch, but it isn’t required for a complete facial.
What does a simple home facial include?
A simple facial has three parts: cleansing, one considered care step, and moisture. That middle step could be a serum you already use, gentle exfoliation that fits your routine, or a mask for the session. You don’t need to layer a mask, exfoliant, and several new products together.
Easy sequence: cleanse, choose one optional step such as exfoliation or a mask, apply serum, then finish with moisturizer.
Can you give yourself a facial at home?
Yes. You can create a home skincare ritual with products you know and use comfortably. Special equipment isn’t necessary. A calm space may make the routine feel relaxing, but it doesn’t determine whether the facial is complete.
A home facial is personal skincare, not an in-person spa service. Keep your hands clean, use products according to their labels, and avoid combining steps just to make the routine more elaborate. A reasonable expectation is skin that looks refreshed and feels nourished; results can vary with your routine and your skin’s needs.
Let comfort guide your choices. If a step feels uncomfortable, leave it out rather than pushing through a longer routine. Familiar basics are a practical starting point, especially when you’re deciding whether to add a new product.
How to Do an At-Home Facial for Glowing Skin Correctly
A thoughtful at-home facial for glowing skin follows a clear order, with optional steps chosen to suit your routine. Use clean hands, work with products you already know, and follow each label for application and removal. You don’t need steam, double cleansing, or several treatments to make the routine feel complete.
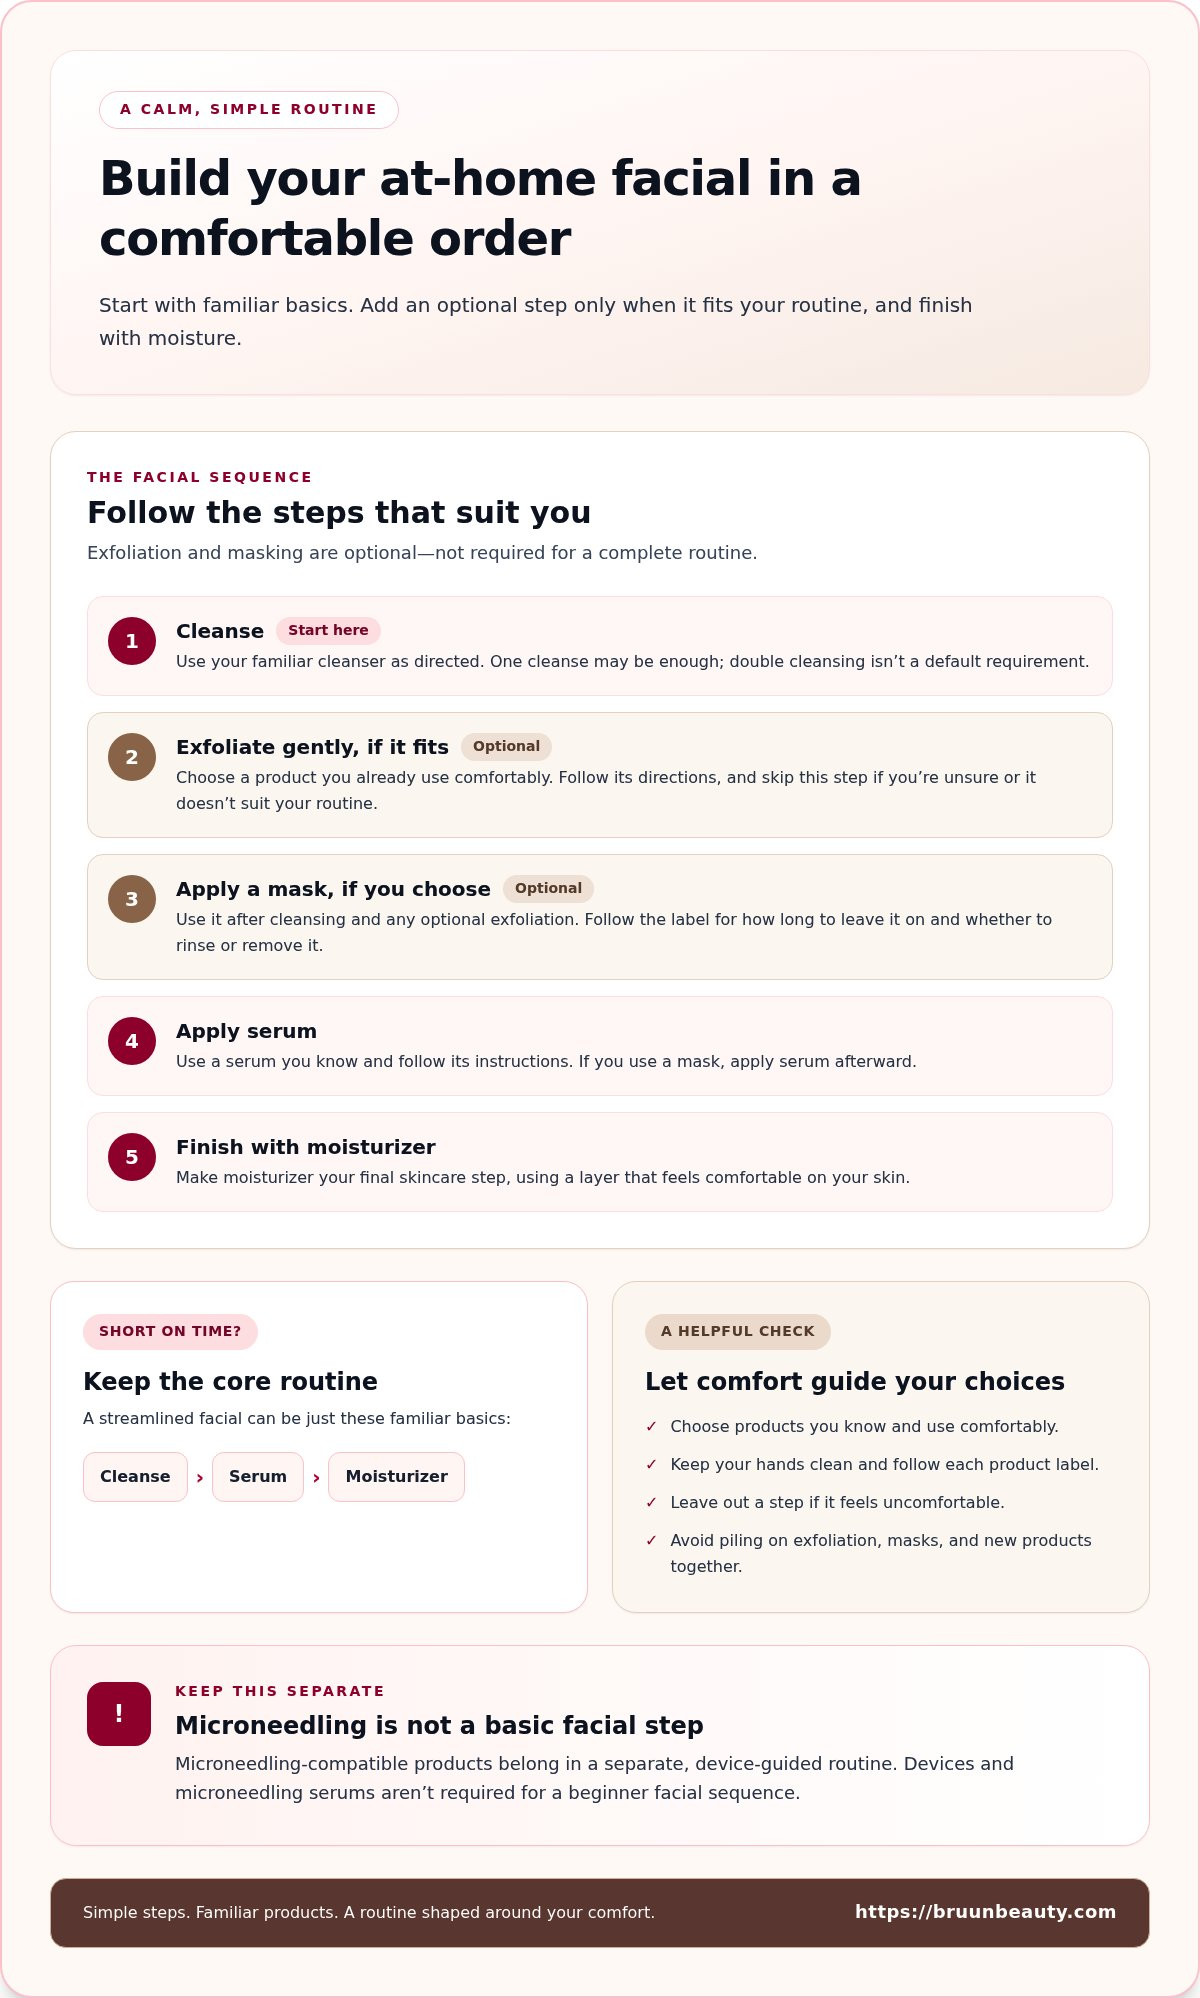
Recommended order: cleanse, exfoliate gently if appropriate, apply a mask if you choose, use serum, then finish with moisturizer.
Which steps come first in a DIY facial?
Start with cleansing to remove surface residue and give yourself a fresh base for the next step. Use your cleanser as directed, then rinse or remove it according to its instructions. One cleanse may be enough for your routine; double cleansing isn’t a default requirement.
Next, decide whether exfoliation makes sense for this session. It’s optional, not a required part of every facial. If you choose an exfoliating product, follow its directions and avoid adding multiple exfoliating steps just to make the routine feel more intensive.
If exfoliation isn’t a step you already understand or use comfortably, skip it and continue with hydration. The American Academy of Dermatology’s Building a Skincare Routine for Glowing Skin also offers general guidance on routine basics, including cleansing and moisturizing.
When should you apply a mask, serum, and moisturizer?
If you’re using a mask, apply it after cleansing and any optional exfoliation. Follow the label for how long to leave it on and whether to rinse or remove it. Afterward, apply serum according to its directions, then use moisturizer as your final skincare step.
Here’s the routine in order:
- Cleanse: Use your familiar cleanser as directed.
- Exfoliate, optionally: Choose a gentle product only if it fits your routine, and follow its label.
- Mask, optionally: Apply after cleansing and exfoliation, then remove as directed.
- Apply serum: Use it after the mask, following its instructions.
- Moisturize: Finish with a layer that feels comfortable on your skin.
Clean hands help keep application tidy, while product directions help you use each formula as intended. Microneedling-compatible products belong in a separate, device-guided routine. BRÜUN microneedling serums and devices aren’t required steps in a beginner facial sequence.
At-Home Facial Choices: Which Steps Help Your Glow Routine?
A simple facial can include cleansing, serum, and moisturizer. Other steps are choices, not requirements. For an at-home facial for glowing skin, focus on products that fit your routine and feel comfortable instead of adding more steps in pursuit of a fresher-looking finish.
Use this comparison to decide what belongs in your session and when it’s better to keep things basic:
| Routine choice | What it adds | When to keep it simple |
|---|---|---|
| Core: cleanse, serum, moisturizer | A clear sequence for cleansing and adding moisture. | Choose these familiar basics when you want a shorter routine. |
| Optional: exfoliation or a mask | A focused extra step, used according to its product directions. | Skip it if you’re unsure how it fits or your skin feels uncomfortable. |
| Optional: a skincare device | An additional tool with its own instructions and routine. | Leave it out if you want a straightforward facial or don’t know how to use it. |
More products and devices aren’t prerequisites for a fresh-looking finish. Each extra step adds another product or set of instructions to manage. Choose an add-on when you understand its role and it fits comfortably with the rest of your routine.
Is exfoliation necessary for an at-home facial?
No. Exfoliation is optional, and the directions for the specific product should guide how you use it. Avoid combining multiple exfoliating products in one session, such as an exfoliating cleanser followed by a separate exfoliant. That can make your routine unnecessarily intense. If the step feels uncomfortable or confusing, skip it and continue with products you know.
Do you need a device to get a fresh-looking finish?
No device is required. Cleansing, a suitable mask if you want one, serum, and moisturizer can make a complete routine. Devices are optional additions, not guaranteed shortcuts. If you’re exploring tools, browse skincare devices as a separate category and follow the instructions for the specific device you choose.
Microneedling belongs in an advanced, device-guided routine, not a standard facial checklist. Keep it separate from a simple home facial, and don’t add it just to make a routine seem more complete. A calm, uncomplicated sequence can be a practical choice for an ordinary skincare session.
How to Adapt Your Facial Routine to Your Skin and Schedule
Your routine should fit your skin and your day, not a fixed list of steps. Start with products you already understand, then consider one optional addition at a time. That makes it easier to notice how each product feels and keeps your facial manageable instead of turning it into a complicated project.
Consistency and comfortable product use matter more than elaborate rituals. A shorter routine you can repeat comfortably is a more practical foundation than a long sequence you feel pressured to complete.
How can you keep a home facial gentle and manageable?
Set out the products you plan to use, wash your hands, and use a clean towel. A comfortable space can make the ritual pleasant, but special lighting, music, or other ambiance isn’t essential. Give each product a clear purpose instead of adding steps simply because they’re common in facial routines.
If you want to try something new, introduce one optional product at a time. Follow its label for application and removal, and pause use if it causes discomfort. This approach helps you understand your routine without layering several unfamiliar formulas in the same session.
How often should you plan an at-home facial?
There isn’t one schedule that fits every product and routine. Check the directions for each product, especially optional exfoliants and masks, and let your skin’s comfort guide your choices. A full facial ritual is different from everyday cleansing and moisturizing, so you don’t need to turn basic daily care into a multi-step event.
Keep your plan sustainable. Choose a longer ritual when you have time, then return to familiar basics on busier days. Don’t add extra sessions to chase an immediate or guaranteed glow. Follow product directions and notice what feels comfortable over time.
Use these simple adjustments to make the routine fit the day:
- Short on time? Cleanse, apply a familiar serum, and moisturize.
- Trying a new mask or exfoliant? Add just that one step, follow its label, and keep the rest of the routine familiar.
- Not sure a step suits you? Leave it out for now rather than combining it with other new products.
If you’re exploring tools as a future addition, BRÜUN’s microneedling products include options for a separate, device-guided routine.
Personalize Your At-Home Facial with BRÜUN
A few thoughtful choices can make your at-home facial feel personal without adding unnecessary steps. Bruun Beauty offers Korean-inspired serums and masks for different parts of a skincare routine. A jelly mask can add a home-spa touch, while a serum can complement the products you already use.
Where can a jelly mask fit into your facial?
Use a mask after cleansing, and follow its directions for application and removal. It’s an optional addition, not a replacement for the rest of your routine. After removing it as directed, continue with the next suitable step you already use.
Bruun Beauty's Pomegranate Jelly Mask Jar Face Care Rubber Mask is an option when you want to add a mask to your home-spa ritual. Choose it for the extra step, not because you need a mask to make your facial complete. If you’re keeping your routine simple, cleansing and familiar leave-on products can be enough.
Think of a jelly mask as a moment to pause, not a reason to layer on more products. Keep the surrounding steps familiar, and let the mask’s directions guide how it fits into your session.
When does a microneedling serum belong in a routine?
Bruun Beauty's microneedling serums are designed for use with microneedling devices. Follow the instructions for your specific device and serum, and choose products based on the routine you’re planning rather than adding a serum simply to make your facial more elaborate.
The Advanced Microneedling Serum SD - Control Salmon DNA Ampoule Serum is made in South Korea and features a Salmon DNA-inspired PDRN complex. The ampoule comes in a 35 ml / 1.18 fl oz size. These details can help you identify the product and understand its intended context as you plan your skincare routine.
For a simple facial, keep your choices focused on products you’re comfortable using. If you’re exploring microneedling products, review the device and serum instructions so you can make an informed choice about how they fit your routine.
Browse Bruun Beauty microneedling products to explore options for a device-guided routine.
Make Your Next Facial Feel Like Your Own
Let your next at-home facial for glowing skin be a chance to make a thoughtful choice about your routine. Before you begin, decide what you want from the session, such as extra hydration or a relaxing mask step. Afterward, notice what felt comfortable and what you’d change next time. One intentional adjustment can help you shape a routine that feels more personal.
If you’re considering microneedling, review the product details and device instructions to make an informed choice about your next step.
Your skincare ritual can evolve at your own pace. Keep choosing what feels right for you, and enjoy making time for skin that feels nourished and cared for.
Frequently Asked Questions
How often should you do an at-home facial for glowing skin?
There’s no single schedule that fits every product or routine. Follow the directions for each mask or exfoliant, and notice how your skin feels afterward. Keep everyday cleansing and moisturizing separate from optional facial steps. If you use more than one product with exfoliating ingredients, check each label and avoid using them more often than directed.
Can you do an at-home facial if your skin is sensitive?
Yes, but keep the routine familiar and uncomplicated. Choose products whose directions suit your needs, and introduce only one unfamiliar formula at a time so you can tell which product you used if your skin feels uncomfortable. Make exfoliation easy to skip. If a product doesn’t feel comfortable, stop using it and return to the routine you know works for you.
Should you steam your face before an at-home facial?
No, steaming isn’t required for a complete home facial. A gentle cleanse can prepare your skin for the steps that follow, so you can leave steam out of your routine. If you’re planning a mask, check its directions for how to apply and remove it. A clear sequence doesn’t depend on adding heat or extra equipment.
Can you use a face mask and serum in the same facial?
Yes, if the directions for both products fit your routine. Apply the mask as directed, then use serum according to its label before finishing with moisturizer. Avoid making a mask day the first time you try several unfamiliar products together. Keeping the other steps familiar makes it easier to notice how your skin responds to the new addition.
Do you need microneedling for an at-home facial to look glowing?
No, microneedling isn’t a required part of a basic facial. You can keep your routine focused on familiar skincare steps without adding a device. If you use a microneedling device, treat it as a separate, advanced routine and follow the specific instructions for both the device and any products used with it.
What should you do after an at-home facial?
Finish with moisturizer and follow the directions for every product you used. Afterward, return to your usual routine rather than adding extra exfoliants or unfamiliar formulas right away. If you did your facial during the day, continue with your normal daytime skincare steps. Keep the next routine simple, especially if you added an optional product during the facial.
Microneedling Scalp Side Effects: Risks and Safety
Can You Drink Alcohol After Microneedling? Understand the Risks
Related Posts

Consistent Microneedling and the Long-Term Changes to Expect

Aftercare choices to lower infection risk at home after microneedling

How to Create a Relaxing At-Home Spa Day With Simple Rituals

Sunscreen Recommendations After Microneedling: How to Protect Healing Skin

Investing in my skin for the future: what deserves my budget

Post-microneedling skincare routine for masks, makeup, and recovery

Skin Peeling After Microneedling: What to Avoid and When to Resume Makeup
