

Microneedling for Large Nose Pores: Professional Guide
Microneedling for large pores on nose works by triggering a natural rejuvenation process that firms the skin structure surrounding each pore. By using professional-grade devices at shallow depths between 0.25mm and 0.5mm, you can effectively refine "orange peel" texture and minimize the look of stubborn sebaceous filaments.
Have you ever wondered why your most expensive blurring primers still can't hide the texture on your nose? It's incredibly common to feel frustrated when topical treatments don't deliver the smooth, airbrushed finish you're after. You deserve a solution that goes deeper than the surface to address the structural integrity of your skin.
In this professional guide, you'll discover how to safely perform microneedling to achieve visibly smaller-looking pores and a more even complexion. We will walk you through the precise steps for using a Dr. Pen device; the importance of Salmon DNA (PDRN) serums for recovery; and why a cooling jelly mask is the ultimate finishing touch for your routine. It's time to stop hiding behind heavy makeup and start celebrating your clearest, most nourished skin yet.
Key Takeaways
- Understand how collagen induction therapy firms the skin structure to visibly minimize pore size and improve "orange peel" texture.
- Learn the ideal needle depths between 0.25mm and 0.5mm when performing microneedling for large pores on nose to ensure safety and precision.
- Master the professional double-cleansing and sanitization protocols necessary to maintain a sterile environment for your at-home or clinic sessions.
- Identify the best professional-grade pairings, such as Salmon DNA (PDRN) serums and cooling jelly masks, to accelerate your skin's recovery.
- Get a clear timeline of what to expect during the healing process, from initial redness to the final stage of textural remodeling.
Does Microneedling Work for Large Pores on the Nose?
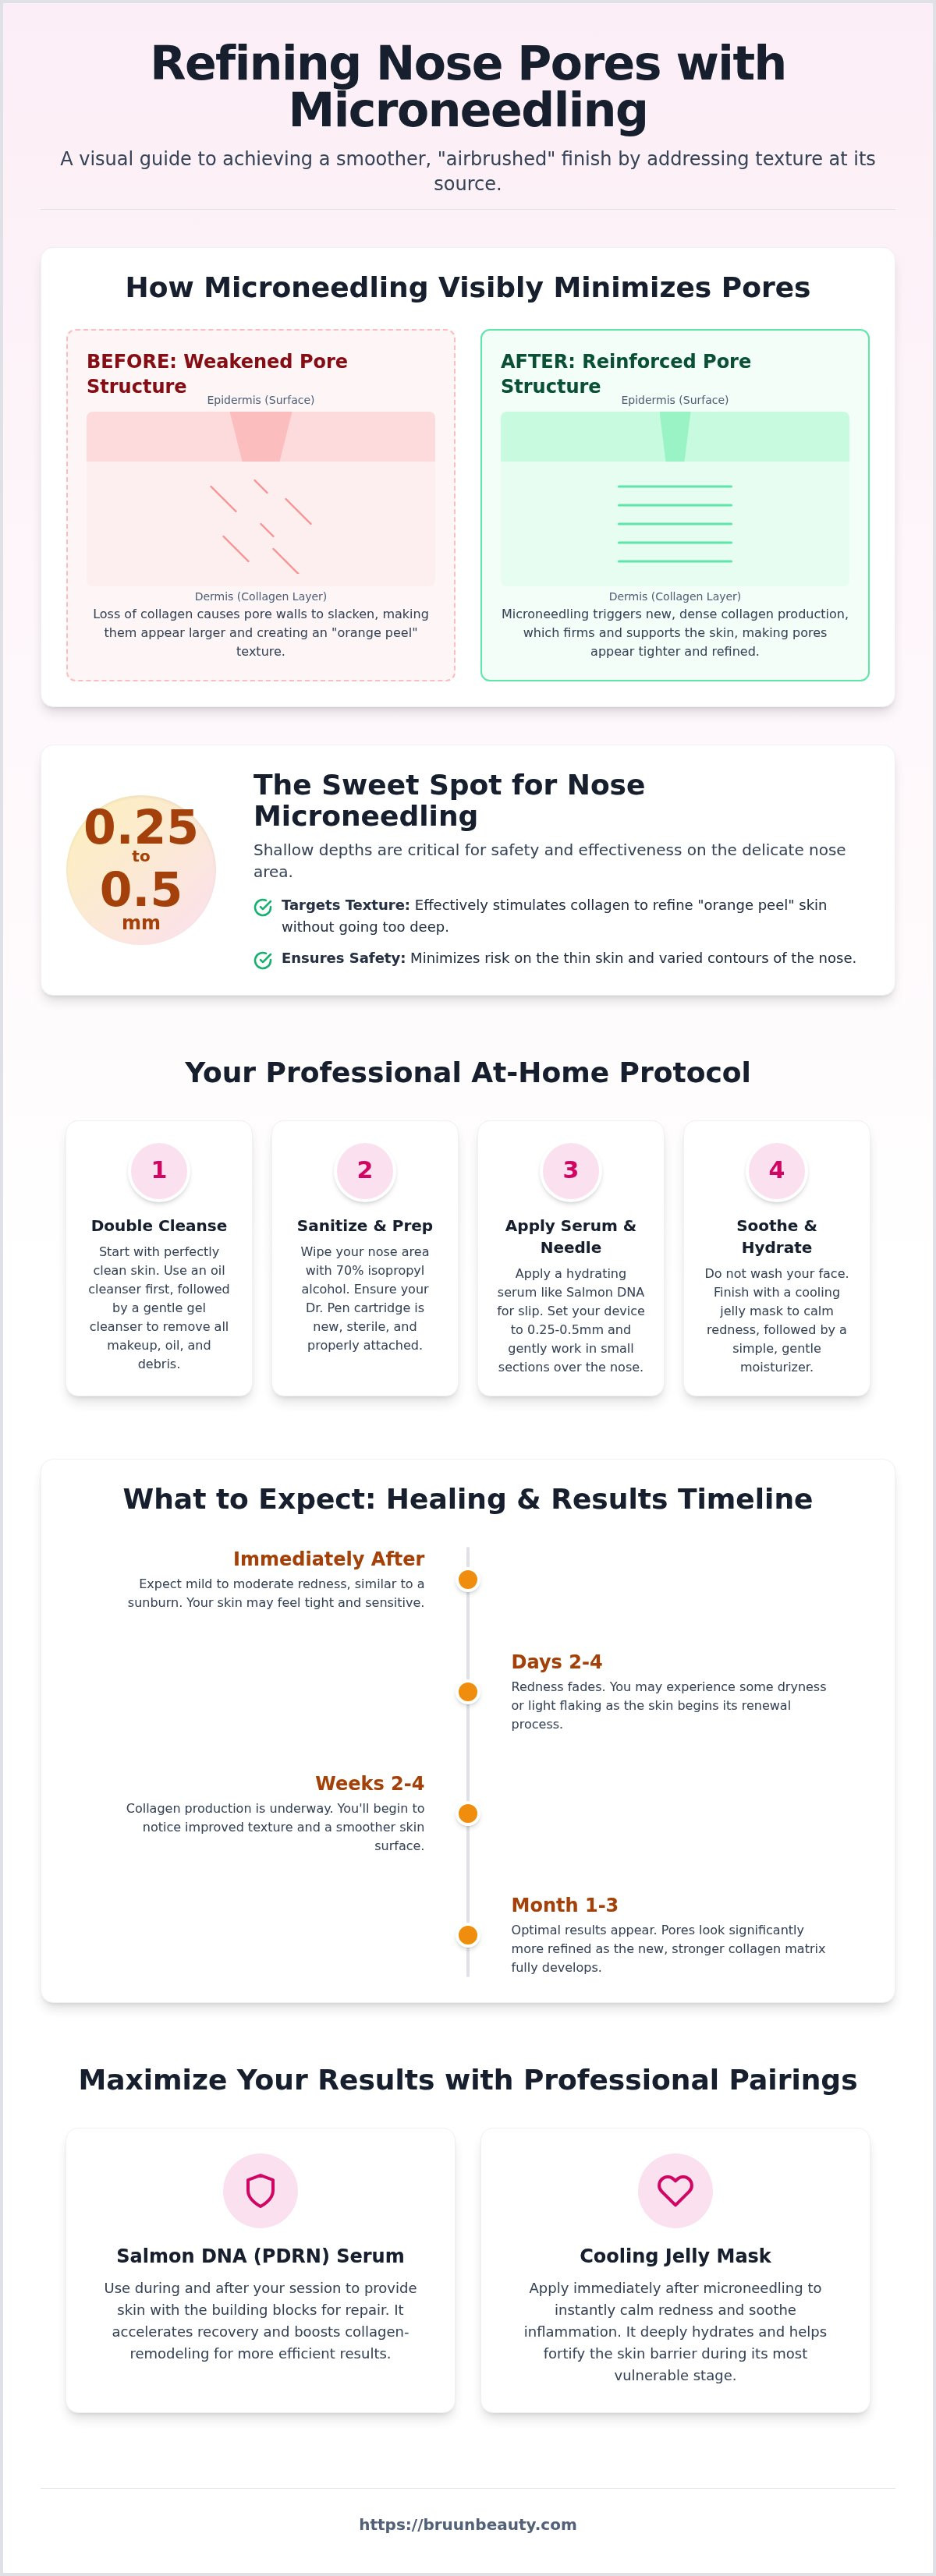
The short answer is a resounding yes. If you feel like the skin on your nose resembles an orange peel, you aren't alone. Using microneedling for large pores on nose is one of the most effective ways to address texture that topical creams simply can't reach. This process, scientifically known as collagen induction therapy, works by creating thousands of controlled micro-channels in the skin. These tiny punctures signal your body to produce a fresh wave of collagen and elastin, which naturally firms the area.
It's vital to clear up a common myth: pores aren't like doors. They don't have muscles, so they don't actually "open" or "close." Instead, they are simply openings for hair follicles and oil. When the skin around these openings loses its bounce, the pores look wider and more obvious. Microneedling helps by tightening that surrounding "sleeve" of skin. It's also important to distinguish between actual enlarged pores and sebaceous filaments. Those small, greyish dots on your nose are often just normal oil collections. While needling won't stop oil production, it refines the overall nose texture so these filaments appear much less prominent.
The Role of Collagen in Pore Size
Think of collagen as the scaffolding for your skin. When this scaffolding is strong, your pores stay tightly packed and narrow. As we age or deal with sun damage, that support system starts to go slack. On the nose, where oil glands are more active, this lack of support causes pores to stretch out and look "gaping."
By triggering the production of new collagen fibers, you are essentially reinforcing the walls of every pore. This structural support is what creates that coveted "blurred" look. Because the nose area is prone to congestion, keeping the skin firm prevents debris from stretching the pore openings even further. It's a proactive way to maintain a refined complexion.
Microneedling vs. Topical Pore Minimizers
You might have tried every "pore-shrinking" serum on the market with little success. The reason is simple. Most topicals only work on the very surface of the skin or help dissolve the oil inside the pore. They can't rebuild the dermal layers where the actual structural damage lives. Serums are great for maintenance, but they lack the mechanical power to change skin density.
This is where professional-grade microneedling tools provide a distinct advantage. Instead of just sitting on top of the skin, a device like Dr. Pen creates physical change. It forces the skin to remodel itself from the inside out. This mechanical action is far more effective for deep-seated textural irregularities than any chemical exfoliant. When you combine the precision of a professional device with the right aftercare, the results are much more predictable and visible.
The Science: How Microneedling Refines Nose Texture
Microneedling for large pores on nose relies on your body's natural ability to repair itself. When the needles create tiny channels, they kickstart a three-stage wound healing response. First is the inflammation phase, where your skin sends white blood cells to the area. Next comes proliferation, where new tissue and collagen fibers form. Finally, the remodeling phase begins, which is where the real magic happens for your pore size.
These micro-injuries act as a wake-up call for your skin. They trigger the release of essential growth factors that increase epidermal thickness. A thicker, healthier epidermis creates a smoother surface that reflects light better, giving you that "blurred" look. According to the Cleveland Clinic on microneedling, this process is highly effective for addressing enlarged pores and textural concerns.
A secondary benefit is a noticeable reduction in sebum overproduction. When your skin barrier is healthy and the structure is firm, your oil glands don't need to overcompensate. This leads to a cleaner, less congested nose over time. To start your journey toward smoother skin, explore our professional microneedling kits designed for precision and safety.
Dermal Remodeling and Pore Support
Dermal remodeling is the process of reorganizing skin tissue to improve structural integrity. During this phase, your skin replaces temporary Type III collagen with stronger, more permanent Type I collagen. This denser collagen network acts like a corset for your skin. It literally "squeezes" the pore walls from the outside, making the openings appear significantly more refined and narrow.
Why the Nose Area Requires Special Care
The nose is a complex piece of facial anatomy. The skin on the bridge is quite thin and sits close to the bone, while the alae (the sides of the nostrils) are thicker and much oilier. Because the nose has a high density of sebaceous glands, it can be more prone to post-treatment breakouts if not handled correctly. You must be careful not to over-treat this area. Using needles that are too deep or performing too many passes can lead to unnecessary irritation. Keep these anatomical facts in mind:
- Varying Thickness: Use shorter needle depths on the bridge of the nose to avoid hitting bone.
- Oil Control: High oil levels can affect how quickly the micro-channels close, so proper sanitization is key.
- Precision: Focus on slow, steady movements rather than aggressive pressure to protect the delicate nasal skin.
Choosing the Right Tools: Needle Depths and Serums
Selecting the right equipment is the most critical step in your journey to refined skin. When performing microneedling for large pores on nose, you must balance effectiveness with the delicate nature of the nasal bridge. For beginners or those focusing on product absorption, a 0.25mm depth is ideal. However, to address the structural integrity of the pore walls, a 0.5mm depth is often necessary to reach the dermal layers where collagen is built.
You should never exceed 0.5mm on the nose when treating yourself at home. The skin here is thin and sits directly over bone and cartilage; going too deep can lead to bruising or unnecessary trauma. To maintain this level of control, the Dr. Pen collection is a professional favorite. These devices allow you to adjust needle depth with a simple twist, ensuring you use the correct setting for every contour of your face.
Scientific literature, such as this Microneedling: A Review and Practical Guide, highlights that using the correct depth and technique is essential for achieving the best textural outcomes. By following these professional standards, you can safely minimize the appearance of large pores and achieve a smoother complexion with confidence.
The Power of PDRN: Salmon DNA for Pores
If you want to upgrade your results, consider using Salmon DNA (PDRN) ampoules as your glide serum. PDRN is a K-beauty powerhouse that mimics human DNA to speed up tissue repair and boost skin radiance. It's especially effective for the "orange peel" texture often found on the nose because it promotes rapid cellular turnover.
This serum doesn't just provide a smooth surface for your device to glide over. It delivers bio-active molecules directly into the micro-channels to support the collagen remodeling process. You'll notice a more hydrated, glowing finish that complements the skin-tightening effects of the needling session, helping your nose look more refined and polished.
Cartridge Selection for Precision
The type of cartridge you choose determines how targeted your treatment will be. A 12-pin cartridge is perfect for focused work on stubborn pores, while a 36-pin cartridge offers a gentler experience for overall resurfacing. Always ensure you are using sterile, single-use cartridges for every session to keep your skin healthy and prevent cross-contamination.
A professional pen device offers a significant advantage over manual rollers on the nose. The vertical "stamping" motion of a pen creates clean micro-channels without the "track-mark" tearing that can happen with a roller on curved surfaces. This precision allows you to treat the sides of the nostrils and the bridge with total ease and safety.
How to Microneedle Your Nose Safely: A Step-by-Step Guide
Performing microneedling for large pores on nose requires a steady hand and a sterile environment. Since the nose is a focal point of the face, following a precise protocol ensures you get professional results without unnecessary irritation. It's a simple process once you master the technique, but you shouldn't rush the preparation phase.
Start with a thorough double cleanse to remove every trace of oil, sunscreen, and debris. Once your skin is dry, use a cotton pad soaked in 70% isopropyl alcohol to sanitize the surface. This step is non-negotiable for safety. It ensures that no surface bacteria are pushed into the skin during the session.
Next, apply a professional glide serum. Whether you choose Hyaluronic Acid or Salmon DNA, the serum acts as a vital buffer. It allows the needles to enter and exit the skin smoothly without friction or resistance. You'll then set your device depth. For the nose area, stay within the 0.25mm to 0.5mm range. This depth is sufficient to trigger collagen production without risking damage to the thin skin over the nasal bone.
Work in small sections using vertical, horizontal, and diagonal passes. Never press the device into your skin; the motor provides all the power you need. Finish the session by applying a cooling professional jelly mask. This step helps reduce immediate redness and locks in moisture while your skin is most receptive to active ingredients.
Navigating the Contours of the Nose
Navigating the nose's unique curves takes a bit of practice. When working on the bridge, keep the pen perpendicular to the bone to ensure even penetration. For the nostrils and sides, use your free hand to gently pull the skin taut. This creates a flat surface for the needles to work effectively. Never drag the device across your skin while the needles are moving. This "track-mark" dragging can cause micro-tears that lead to longer recovery times and uneven texture.
Immediate Post-Treatment Care
Your skin is highly sensitive for the first 24 to 48 hours while the micro-channels remain active. Avoid all makeup and direct sun exposure during this window to prevent irritation. Stick to a strict "no-touch" rule; this prevents bacteria from your hands from entering the skin. For aftercare, look for products containing Centella Asiatica, Peptides, or Panthenol. These ingredients support the skin barrier and keep the area hydrated without clogging your newly refined pores.
Maximizing Results: Timeline and Aftercare
After your session of microneedling for large pores on nose, the real work begins beneath the surface. During the first 24 hours, your skin will likely feel warm and look flushed, similar to a mild sunburn. This redness is a natural sign that your body's inflammatory response is active and ready to start the repair process. Stick to a simple, hydrating routine and avoid any strenuous exercise that causes excessive sweating during this initial window.
By days 3 to 5, you'll typically enter the "peeling" phase. Your skin is shedding its outer layer to make room for the fresh, refined tissue underneath. It's tempting to peel away the dry skin, but you must resist the urge. Picking can lead to irritation or post-inflammatory hyperpigmentation. Around the 4-week mark, the collagen-driven refinement becomes truly visible. Your nose texture will appear smoother, and those "orange peel" pores will look significantly more blurred.
Frequency is the final piece of the puzzle. You should wait 4 to 6 weeks between sessions. This timeline gives your skin enough time to move through the proliferation and remodeling phases without being over-stressed. Consistency over several months is what leads to lasting structural changes and the best possible outcome for your complexion.
Building a Pore-Refining Routine
Maintenance keeps your results glowing between treatments. We love pairing microneedling with targeted K-beauty products that focus on deep hydration and barrier support. Daily SPF 30 or higher is your best defense against UV rays, which quickly degrade new collagen fibers. If your routine includes strong retinoids or exfoliating acids, wait at least 7 days post-treatment before reintroducing these active ingredients to avoid sensitivity.
When to See a Professional
It's helpful to know the difference between normal recovery and a complication. Normal healing involves temporary redness, minor swelling, and flaking. If you notice spreading redness that feels hot to the touch, extreme swelling, or yellow discharge, consult a licensed professional immediately. You might also consider alternating your at-home sessions with clinic-based treatments using advanced beauty machines like LED therapy or professional hydrodermabrasion. Stay consistent with your schedule, and you'll soon enjoy the confidence of a refined, glowing complexion.
Start Your Journey to Refined, Glowing Skin
Mastering microneedling for large pores on nose is about precision, patience, and the right professional-grade tools. By using shallow needle depths and high-quality serums like Salmon DNA, you can effectively tighten the skin structure and minimize "orange peel" texture. It's a proven way to rebuild your skin's scaffolding from the inside out and achieve a truly blurred, airbrushed finish.
Our 5-star rated Dr. Pen devices are trusted by licensed estheticians across the US for their accuracy and ease of use on delicate contours. With fast shipping from our hubs in Miami and Los Angeles, you won't have to wait long to begin your personal skin transformation. We are proud to provide the same professional-grade inventory used in top-tier clinics directly to your door.
Consistency is your best friend when it comes to dermal remodeling and achieving lasting results. Stick to your recommended 4-6 week schedule and prioritize daily sun protection to keep your new collagen healthy and vibrant. You're well on your way to achieving that smooth, nourished, and confident look you've always wanted for your skin.
Frequently Asked Questions
Is microneedling safe for the thin skin on my nose?
Yes, it's safe when you use a shallow depth between 0.25mm and 0.5mm. Because the skin on the bridge of the nose is thin, staying within these professional limits prevents unnecessary trauma or hitting the bone. Performing microneedling for large pores on nose with a controlled device ensures even penetration. Always move slowly and keep the pen perpendicular to the skin for the best safety profile.
How many sessions do I need to see a difference in my nose pores?
Most people notice visible refinement after 3 to 6 sessions. Since collagen production is a cumulative process, you'll see the most significant changes about four weeks after your third session. Spacing your treatments 4 to 6 weeks apart is essential. This allows the skin to fully remodel itself and build the structural support needed to make your pores look smaller and tighter over time.
Can microneedling make my nose pores look bigger initially?
It's common for pores to look slightly larger for the first 2 to 3 days. This happens because the initial inflammatory response causes temporary swelling and redness in the area. Once the inflammation subsides and the proliferation phase begins, the skin starts to firm up. Don't panic if your texture looks more pronounced immediately after your session; it's a normal part of the rejuvenation cycle.
Which Dr. Pen is best for targeting the nose area?
Any model from the Dr. Pen collection with an adjustable depth dial is excellent for the nose. Models like the M8 or A6S offer high precision and slim cartridges that make it easy to navigate the curves of the nostrils. These professional-grade devices provide the vertical stamping motion needed to treat the nose area safely without causing micro-tears in the skin.
Should I use a numbing cream before microneedling my nose?
Numbing cream is entirely optional but can make the experience more comfortable. Since the nose is a small area, many enthusiasts find they don't need it for shallow 0.25mm depths. However, if you're using a 0.5mm setting for structural pore work, applying a topical 5% lidocaine cream for 20 minutes beforehand can help. Just ensure you thoroughly remove the cream and sanitize the skin with alcohol before you begin needling.
What is the best serum to use for microneedling large pores?
The gold standard is a PDRN-based serum like the SD Control Salmon DNA Ampoule. This serum mimics human DNA to accelerate tissue repair and improve the "orange peel" texture often found on the nose. Using microneedling for large pores on nose in combination with Salmon DNA helps deliver these active ingredients deep into the skin, maximizing your results for a smoother complexion.
Can I microneedle if I have blackheads on my nose?
You should avoid needling directly over active blackheads or inflamed acne. Microneedling can push bacteria deeper into the skin or spread it to other areas of the nose. It's best to clear congestion first using a gentle exfoliant or professional extraction. Once your pores are clear of debris, you can safely proceed with needling to tighten the pore walls and help prevent future congestion from stretching the skin.
How long does the redness last after needling the nose?
Redness typically lasts between 24 and 48 hours on the nose area. Your skin might feel slightly tight or sensitive, similar to a mild sunburn, during this time. You can significantly speed up your recovery by applying a cooling professional jelly mask immediately after your session. This helps soothe the inflammation and provides a burst of hydration to the newly opened micro-channels while they are most receptive.
How to Get Your Skin Ready for At-Home Microneedling
How to Microneedle at Home While Reducing Infection Risk
Related Posts

Consistent Microneedling and the Long-Term Changes to Expect

Aftercare choices to lower infection risk at home after microneedling

How to Create a Relaxing At-Home Spa Day With Simple Rituals

Sunscreen Recommendations After Microneedling: How to Protect Healing Skin

Investing in my skin for the future: what deserves my budget

Post-microneedling skincare routine for masks, makeup, and recovery

Skin Peeling After Microneedling: What to Avoid and When to Resume Makeup
