

9 Critical Microneedling Mistakes to Avoid for Glowing, Professional Results
What if the secret to that coveted K-beauty glow isn't the needle itself, but the small errors you make before the device even touches your skin? You've likely invested in a quality device and serums, yet you're still dealing with lingering redness or a stubborn lack of results. It's frustrating to follow every tutorial and still feel like your skin barrier is under attack rather than being renewed. You deserve to see the "glass skin" results you're working so hard for.
You can master the art of both at-home and professional treatments by identifying the specific microneedling mistakes to avoid that are stalling your progress. With approximately 58% of consumers now preferring non-surgical procedures like this, it's more important than ever to focus on safety and precision. We'll help you understand the science of micro-channels so you can protect your skin while maximizing collagen production.
This guide breaks down nine critical pitfalls, from improper needle depth to poor post-session nourishment. You'll gain a clear, repeatable checklist to ensure every session leaves your skin clearer, stronger, and more radiant than before.
Key Takeaways
- Learn why a sterile workspace and avoiding active breakouts are critical to prevent spreading bacteria and ensuring a safe session.
- Discover why professional-grade devices like Dr. Pen offer superior vertical delivery compared to low-quality rollers that can cause micro-tearing.
- Identify the most common microneedling mistakes to avoid so you don't use serums with harsh preservatives or accidentally "dry needle" your skin.
- Understand the 24-hour recovery rules and why it's vital to pause active ingredients like Retinol to protect your delicate skin barrier.
- Master the science of the 28-day skin cell turnover cycle to avoid over-needling and maximize your collagen production results.
Pre-Treatment Blunders: Why Cleanliness and Timing Are Non-Negotiable
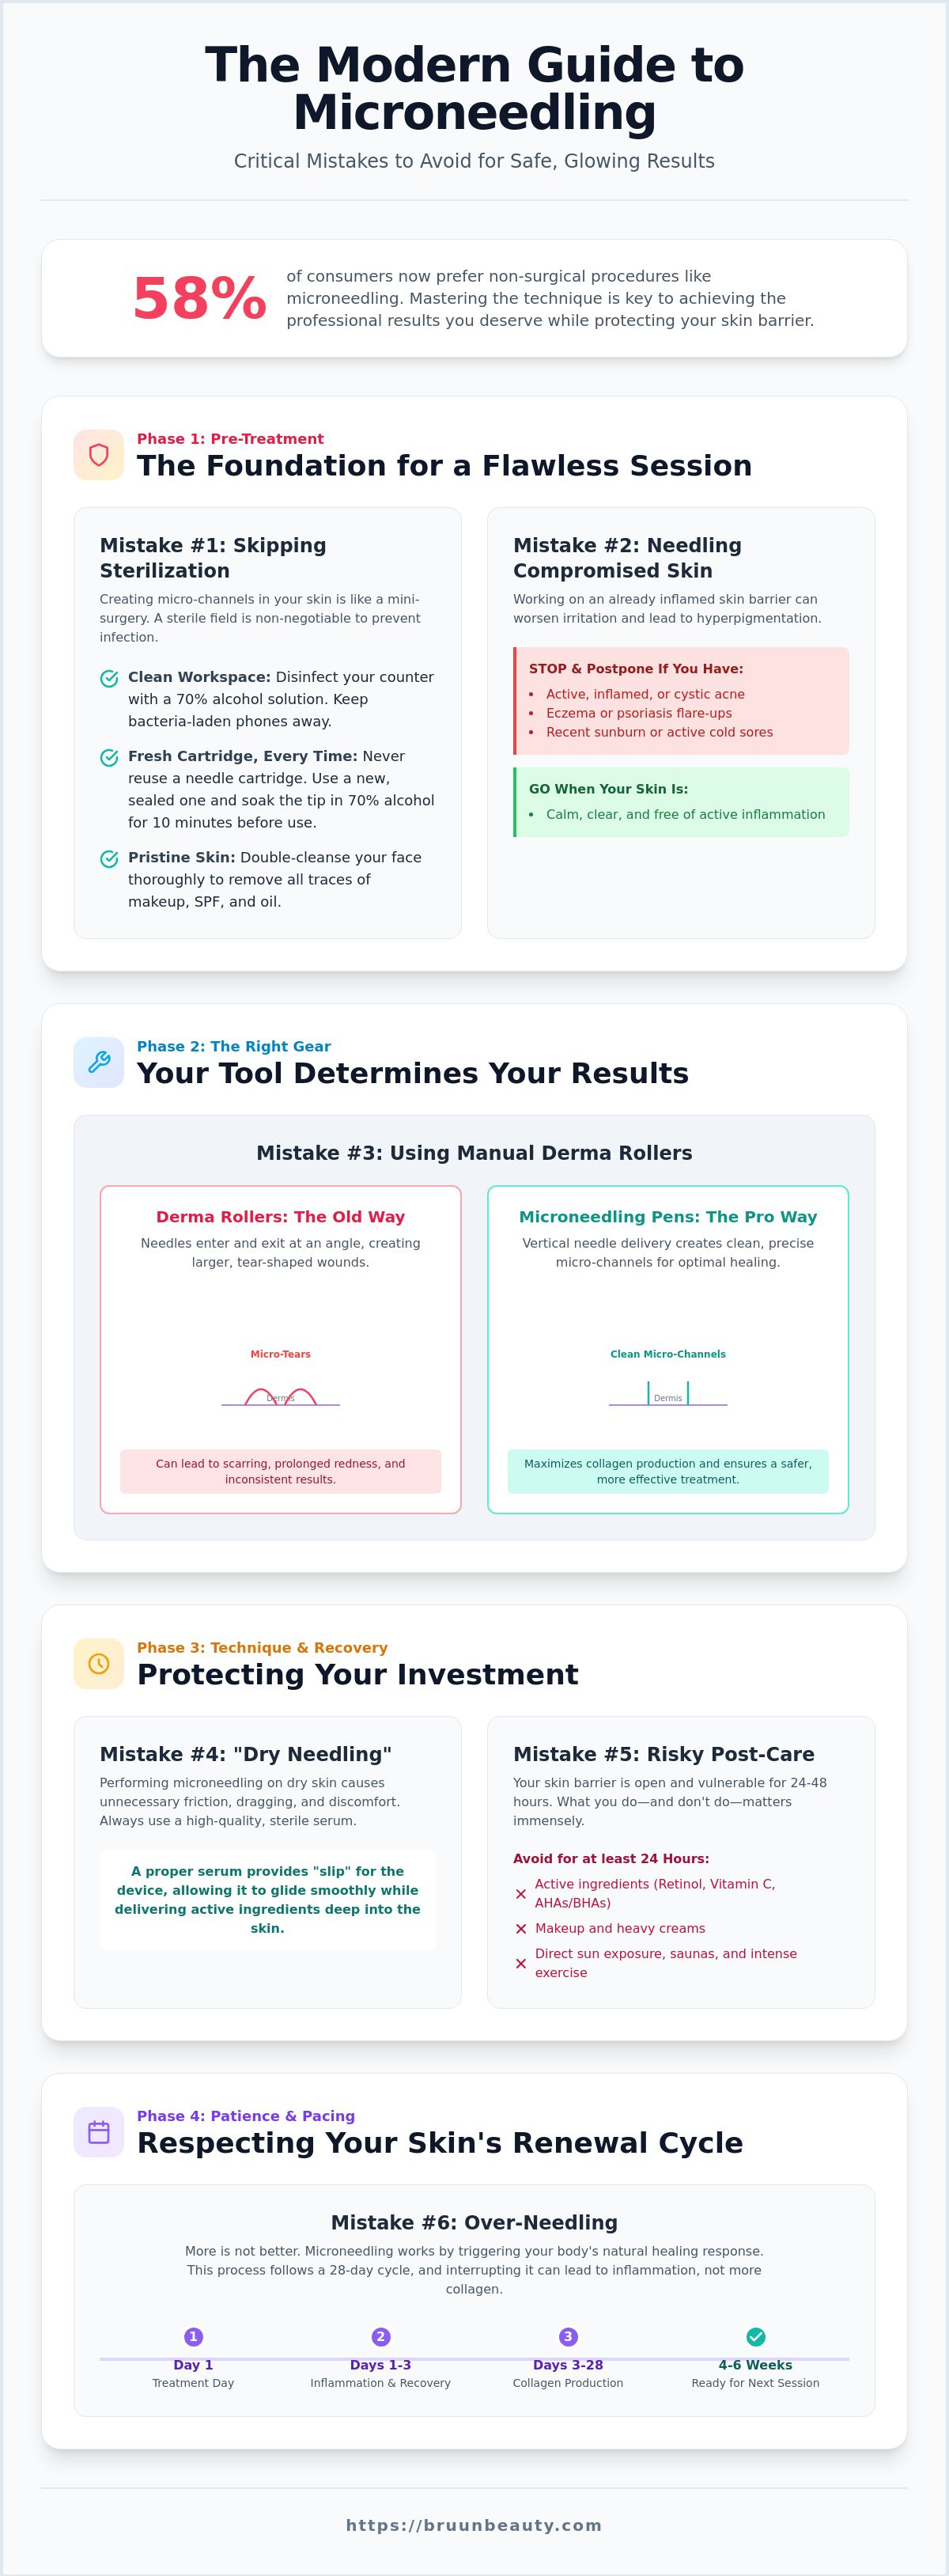
You're ready to achieve that professional glow, but rushing into the process is one of the most common microneedling mistakes to avoid. Think of your session as a mini-surgery. When you perform Collagen induction therapy (microneedling), you're creating thousands of microscopic channels that reach deep into your dermis. If your environment or skin isn't perfectly prepared, you're essentially inviting bacteria and irritants to enter those open pathways.
Sanitizing Your Workspace and Device
Start by creating a "clean zone" on a hard surface like a bathroom counter or vanity. Wipe the entire area down with a disinfectant spray or a 70% alcohol solution. Tie your hair back securely and put your phone in another room. Your phone is a magnet for bacteria; touching it mid-session can compromise your entire sterile field. Follow these steps for your equipment:
- Always select a fresh, sealed needle cartridge for every single session.
- Soak the needle head in a small cup of 70% isopropyl alcohol for 10 minutes before you begin.
- Wash your hands with antibacterial soap up to your elbows.
- Never reuse a single-use cartridge, even on your own skin, because the needles become microscopic hooks after one use that cause unnecessary trauma.
Assessing Your Skin: When to Postpone Your Session
Your skin's current state determines whether you should proceed or wait. Take a close look in a well-lit mirror. If you see active, raised, or painful cystic acne, you must wait until the inflammation subsides. Needling over a pustule is the fastest way to spread acne-causing bacteria across your face. Active inflammation is a strict contraindication for microneedling because it can exacerbate skin damage and lead to post-inflammatory hyperpigmentation.
You should also postpone your session if you're dealing with eczema flares, active cold sores, or a recent sunburn. These "stop signs" indicate your skin barrier is already compromised. Adding micro-trauma to an already stressed barrier won't give you better results; it will only lead to prolonged redness and potential scarring. If you're unsure, wait an extra 48 hours to see how your skin settles.
Finally, remember the "clean face" rule. Double cleansing is non-negotiable. Use an oil-based cleanser first to break down stubborn SPF and makeup. Follow this with a gentle, pH-balanced water cleanser to ensure your skin is a blank canvas. This preparation ensures your microneedling session is safe and effective from the very first pass.
Choosing Your Gear: The Danger of Low-Quality Devices and Wrong Depths
Your equipment is the foundation of your entire skincare journey. Selecting a low-quality tool is one of the most common microneedling mistakes to avoid. While budget-friendly options look tempting, they often lack the precision required for safe skin remodeling. Professional results require professional tools that offer consistent performance without compromising your skin barrier.
The Pitfalls of Manual Derma Rollers
Manual rollers are a dated technology that can actually do more harm than good. Because the needles are on a wheel, they enter and exit your skin at an angle. This creates a "sideways" tear or a "track mark" effect rather than a clean, vertical channel. These jagged tears increase your downtime and can lead to unwanted scarring over time. It is also nearly impossible to standardize manual pressure, which leads to inconsistent needle penetration across your face.
Modern Dr. Pen devices have revolutionized this process by using vertical delivery. The needles move straight up and down at high speeds. This creates precise micro-channels without dragging or snagging your skin. Before you purchase any device, review the FDA guidance on microneedling devices to understand the safety standards required for these tools. Using high-quality needle cartridges ensures that every tip is sharp and sterile, preventing the microscopic burrs found on cheap alternatives.
Matching Needle Depth to Your Skin Concern
You might think a deeper needle gets faster results, but that is a myth that often leads to inflammation. Your skin thickness varies significantly across your face. For example, the skin under your eyes is incredibly thin. Pushing a needle deeper than 0.25mm or 0.5mm in that area can cause bruising or damage. Conversely, tougher areas like the cheeks or chin may require slightly more depth to address the appearance of deep acne scars or texture issues.
Always start with a shallow setting to see how your skin reacts. You can find a variety of professional microneedling supplies that allow you to adjust your depth settings with precision. Use the guide below to help you navigate your next session safely.
| Facial Zone | Suggested Needle Depth | Primary Goal |
|---|---|---|
| Forehead | 0.25mm – 0.5mm | Fine lines and glow |
| Under-eyes | 0.25mm | Dark circles and thinning skin |
| Cheeks | 0.5mm – 1.5mm | Texture and acne scars |
| Chin & Jawline | 0.5mm – 1.0mm | Firmness and tone |
During the Session: Serum Mistakes and Technique Errors
Once you've sanitized your space and selected your needle depth, the actual session begins. This is where many enthusiasts stumble into microneedling mistakes to avoid by focusing only on the device and ignoring the liquid gold that makes it work. "Dry needling," or using your pen on bare skin without a medium, is a recipe for disaster. Without a proper glide, the needles create friction and drag, which leads to unnecessary inflammation and a compromised skin barrier.
The most effective way to ensure a smooth session is by using high-quality microneedling serums. These products act as a lubricant, allowing the pen to float effortlessly across your skin. For professional-level results, Salmon DNA (PDRN) is the current gold standard in the K-beauty world. It provides deep nourishment and supports the skin's natural regenerative processes while your micro-channels are open and receptive.
Why Fragrance and Harsh Actives Are Prohibited
When you create micro-channels, you bypass the skin's protective outer layer. This means any ingredient you apply will penetrate much deeper than it would during a normal skincare routine. Ingredients like fragrance, alcohol, and harsh preservatives can trigger a foreign body response, leading to small, stubborn bumps called granulomas. You must also be careful with active ingredients that you normally love. Vitamin C should be avoided during the actual needling process because its acidic nature can cause extreme irritation and potential granulomas when delivered into the dermis.
Mastering the Glide: Pressure and Pass Count
Your technique is just as vital as your serum choice. Hold your device like a pen, keeping it perpendicular to your skin to ensure vertical precision. You don't need to press hard; let the motor do the work for you. Applying too much manual pressure is one of the most frequent microneedling mistakes to avoid, as it can cause the needles to go deeper than intended.
One of the biggest errors is over-working the skin. Stick to a "two-pass" limit per area of the face. Crossing over the same spot too many times increases trauma without adding any extra benefit to your collagen production. If the skin begins to feel tacky or dry, apply more serum immediately to maintain that essential glide. This keeps the process comfortable and ensures your skin remains nourished throughout the entire session.
The Aftermath: Post-Procedure Recovery and Product Traps
Your skin is now essentially a sponge, ready to soak up everything it touches. This makes the next 24 to 48 hours the most critical part of your journey. One of the biggest microneedling mistakes to avoid is rushing back into your normal routine before your skin barrier has had time to reset. Your micro-channels are temporarily open, meaning your face lacks its usual defenses against environmental pollutants and harsh chemicals.
The Critical 24-Hour Window
For the first full day, your skin needs a complete "breathable" period. This means no heavy makeup, no intense workouts that cause sweating, and no direct sun exposure. Sweat can carry bacteria into your micro-channels, which may lead to breakouts or unwanted irritation. Applying foundation with a dirty makeup brush is another significant trap. Those bristles often harbor old bacteria that can easily enter your skin while it is in this vulnerable state. Stick to lukewarm water and a basic, fragrance-free moisturizer for the first 24 hours to keep your recovery simple and safe.
You must also be strategic about your sun protection. For the first 48 hours, rely on a wide-brimmed hat or physical (mineral) sunscreens containing zinc oxide or titanium dioxide. These sit on top of the skin and reflect UV rays. Chemical sunscreens work by absorbing into the skin, which can cause a stinging sensation or inflammation on freshly needled areas. Additionally, pause your Retinol, AHA, and BHA products for at least 5 to 7 days. Your skin is already in a state of high turnover; adding acids too soon can cause excessive peeling and sensitivity.
Soothing Micro-Channels with Jelly Masks
Immediately after your session, your face will likely feel like it has a mild sunburn. This is the perfect time to apply professional jelly masks. These masks create a vacuum-like seal over your face, which helps force hydration and soothing ingredients deep into the micro-channels you just created. This process ensures that your skin receives maximum nourishment during its most receptive phase.
The cooling effect of a jelly mask helps to lower the skin's temperature and significantly reduce post-procedure redness. Look for ingredients like Calendula for its calming properties or Hyaluronic Acid for intense moisture. By reducing the "heat" in your skin early on, you minimize your overall downtime and help prevent the lingering redness that many people fear. Using these specialized masks is a K-beauty secret that elevates a standard session into a professional-grade experience.
To ensure you have everything you need for a safe recovery and professional results, explore our full range of professional microneedling supplies to support your skin's journey to a healthy glow.
The Patience Game: Over-Needling and Skipping Maintenance
You've mastered the technique and chosen the perfect serums, but now comes the hardest part: waiting. Rushing your results is among the most common microneedling mistakes to avoid. While it's tempting to think that more frequent sessions will lead to faster glow, your skin actually needs significant downtime to build the collagen you're after. Over-needling doesn't speed up progress; it halts it by keeping your skin in a state of constant trauma.
Why More Isn’t Better: The Science of Recovery Cycles
Your skin moves through three distinct phases after a session. First is the inflammatory phase, which lasts about one to three days. This is followed by the proliferative phase, where new tissue and micro-vessels form. Finally, the remodeling phase begins, which can last for several weeks as new collagen fibers strengthen and tighten. If you needle every week, you interrupt these phases before they can finish their work.
This constant disruption can lead to chronic inflammation or a "glassy," thin appearance often called "orange peel" texture. Your skin's natural cell turnover cycle takes approximately 28 days, though this can slow down as you age. Respecting this biological clock is essential for seeing a real change in skin density. The real results happen during the "rest" days, not the "needle" days.
Building a 12-Week Transformation Plan
Consistency beats intensity every time. Instead of a "quick fix" mindset, commit to a long-term plan that respects your skin's limits. Schedule your sessions 4 to 6 weeks apart. This window allows the remodeling phase to complete, giving you the best possible appearance of skin density and smoothness. During your "off" weeks, focus on maintenance with other K-beauty products like soothing essences, ceramides, and peptides that support the skin barrier.
You should also keep an eye on your hardware. Even a professional-grade microneedling device has a lifespan. If you notice the motor sounds different or the needle delivery feels less than smooth, it's time to upgrade your kit. Using a device that isn't performing at 100% precision can lead to uneven results or unnecessary skin stress.
Before your next session, run through this final checklist for success:
- Do you have a fresh, sterile, single-use needle cartridge ready?
- Is your workspace fully sanitized and free of distractions?
- Have you waited at least 4 weeks since your last session?
- Do you have your post-care jelly mask and mineral SPF on hand?
- Is your skin free of active breakouts or irritation?
By following these steps and avoiding the trap of over-frequency, you'll ensure your skin remains healthy, nourished, and glowing for the long haul.
Take the Next Step Toward Your Professional Glow
Mastering your skincare routine requires a balance of the right tools and the right timing. By understanding the common microneedling mistakes to avoid, you've already set yourself apart from those who rush the process and risk their skin's health. Remember that professional results are built on a foundation of sterile technique, high-quality vertical delivery devices, and the patience to let your skin's natural 28-day cycle work its magic.
You don't have to navigate this journey alone. BRÜUN provides a professional-grade inventory trusted by estheticians across the country. We offer fast, US-based shipping from our hubs in Los Angeles and Miami, so you can start your next session without delay. Whether you're looking for our 5-star rated Salmon DNA and PDRN serums or the latest precision technology, we have the essentials your skin deserves.
Ready to elevate your skincare game? Explore our professional Dr. Pen collection and K-beauty serums today. Your journey to clearer, more nourished, and glowing skin starts with the right choices. We're here to support every step of your transformation.
Frequently Asked Questions
How long should I wait to apply makeup after microneedling?
You should wait at least 24 hours before applying any makeup to your skin. Your micro-channels remain open during this window, and applying cosmetics can trap bacteria or irritating pigments deep inside. Using a dirty brush or sponge is one of the top microneedling mistakes to avoid. Stick to a gentle, hydrating routine until the initial redness subsides to keep your barrier protected and healthy.
Can I use my regular Vitamin C serum during the treatment?
You should avoid using Vitamin C serums during the actual microneedling process. While Vitamin C is a powerhouse for brightening, its acidic nature can cause extreme stinging and irritation when it reaches the deeper layers of your skin through open channels. Instead, reach for a soothing Hyaluronic Acid or a professional-grade Salmon DNA serum to provide nourishment without the risk of an inflammatory reaction.
How many times can I reuse a Dr. Pen needle cartridge?
You must never reuse a needle cartridge; they are strictly designed for single use only. Even if you sanitize the cartridge with alcohol, the needles become dull and develop microscopic hooks after just one session. These hooks can cause unnecessary tearing and trauma to your skin. Always dispose of your cartridge immediately after use and start with a fresh, sterile one for your next session.
Is it normal for my skin to feel like a sunburn after the session?
It is completely normal for your skin to feel like it has a mild sunburn for 24 to 48 hours after your session. You may also notice some tightness or slight swelling as your skin begins its natural recovery process. To ease this sensation, you can apply a cooling jelly mask or a chilled hyaluronic serum. This temporary sunburn feeling is a sign that your skin's remodeling phase has begun.
Should I use a numbing cream, and does it affect the results?
Using a numbing cream is a personal choice for comfort and it does not negatively impact your final results. Most users find that a topical lidocaine cream makes the session much more pleasant, especially on sensitive areas like the forehead or upper lip. Just ensure you thoroughly cleanse the numbing cream off your skin before you begin needling to maintain a sterile and effective workspace.
Can I go to the gym or sauna immediately after microneedling?
You should avoid the gym, saunas, and intense physical activity for at least 24 to 48 hours after treatment. Sweating can introduce bacteria into your freshly opened micro-channels, potentially leading to breakouts or prolonged inflammation. High heat from a sauna also increases blood flow to the face, which can make post-procedure redness last much longer. Give your skin a day of rest to focus on recovery.
What is the best needle depth for treating the appearance of large pores?
A needle depth of 0.25mm to 0.5mm is generally the most effective range for addressing the appearance of large pores. Since pores are a surface-level concern, you don't need to go deep to see a difference in skin texture and refinement. Consistently using these shallower depths helps improve the overall glow and smoothness of your complexion without causing excessive downtime or stress to your skin barrier.
When will I start to see visible results from my microneedling routine?
You will likely notice a K-beauty glow within a week, but the most significant changes usually appear after 4 to 6 weeks. This timeline aligns with your skin's natural 28-day cell turnover cycle and the production of new collagen. Understanding the biological timing is key to identifying microneedling mistakes to avoid, such as over-needling before your skin has finished its remodeling phase. Be patient for the best results.
At-Home Microneedling for Beginners: A Safe Step-by-Step Guide (2026)
Best Serum for Microneedling: A Professional Guide to Glowing Results (2026)
Related Posts

How Many Times Can You Use a Dr. Pen Cartridge? The Single-Use Answer

Best Dr. Pen Needle for Fine Lines: Cartridge Guide

Calming Skincare for Post-Procedure Skin: How to Choose the Right Routine

Does At-Home Microneedling Hurt? What to Expect

Best Korean Ampoule for Mature Skin: How to Choose in 2026

Botanical Stem Cell Serum for Anti-Aging: What to Know

Skincare Ingredients to Avoid After Microneedling: A Practical Checklist
