

Whiteheads After Microneedling: How to Adjust Your Skincare
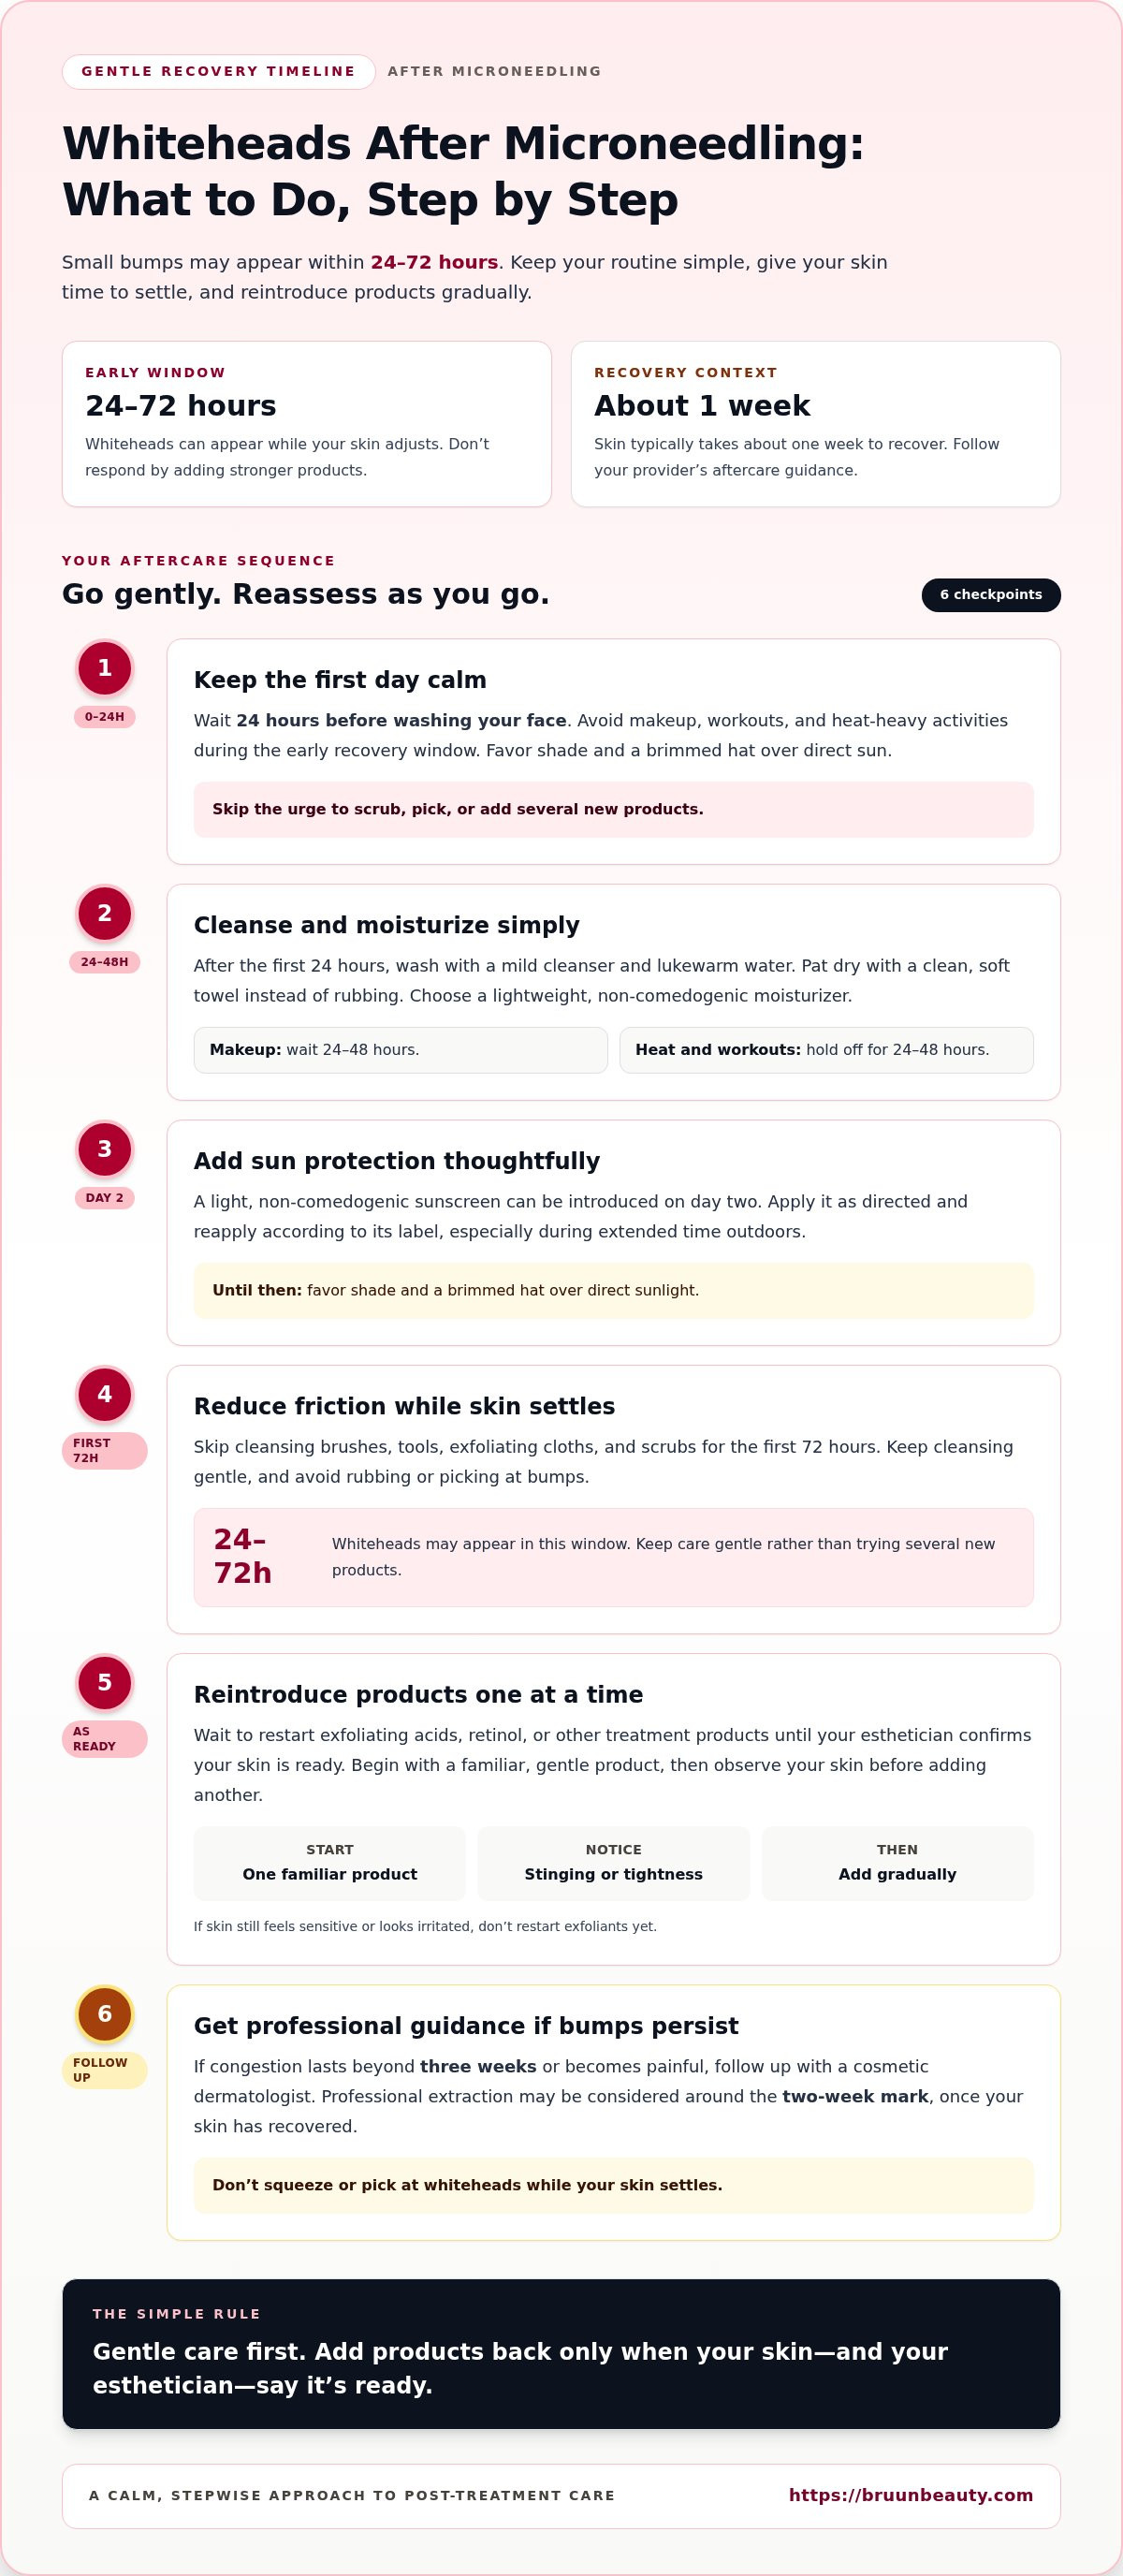
New bumps after microneedling don’t automatically mean your routine needs stronger actives. Whiteheads after microneedling may appear within 24-72 hours, so keep early care gentle: choose lightweight, non-comedogenic products and wait to restart exfoliating acids or retinol until your esthetician confirms your skin is ready. Avoid scrubbing or adding several new products while your skin settles.
It’s understandable to wonder whether a breakout is part of short-term recovery or a sign to change course. If you notice whiteheads after microneedling, simplify your routine, avoid irritating your skin, and watch for changes. This guide explains what to do, which recovery triggers to avoid, and when to seek professional advice if bumps persist or become painful. You’ll also learn how to reintroduce products gradually without rushing your recovery.
Key Takeaways
- Keep early aftercare simple with lightweight, non-comedogenic products, and skip cleansing tools for the first 72 hours.
- Hold off on exfoliating acids and retinol until your esthetician confirms your skin is ready, then reintroduce products gradually.
- Limit heat, sweat, and makeup during early recovery, and protect your skin from sun exposure.
- Avoid squeezing or picking at bumps; professional extraction may be considered around the two-week mark once your skin has recovered.
- Follow up with a cosmetic dermatologist if congestion lasts beyond three weeks or becomes painful.
1. Gradually reintroducing active skincare products
A few whiteheads after microneedling can appear as your skin adjusts, but adding strong products too soon may increase irritation. For the first 48 hours, keep your routine simple: use a gentle cleanser and a lightweight, non-comedogenic moisturizer. Avoid exfoliating acids, retinol, scrubs, and new treatment products until your esthetician confirms your skin is ready.
Reintroduce products one at a time instead of restarting your entire routine at once. This makes it easier to spot whether a product causes stinging, tightness, or new congestion. Start with a familiar, gentle product, use it as directed, and observe your skin before adding another active. Don’t use exfoliants while your skin still feels sensitive or looks irritated.
Salicylic acid is sometimes used as a spot treatment for an isolated blemish. The suggested concentration is 0.5-2%, applied 48-72 hours after microneedling. Since this is an active exfoliant, don’t treat that timing as an automatic green light: wait for your esthetician’s guidance on whether your skin is ready. Avoid combining it with retinol or another acid during the same early recovery period.
To help prevent new bumps, follow a simple sequence after treatment: cleanse gently, moisturize with a lightweight formula, and leave exfoliating products aside until your skin is ready. Avoid trying multiple new products to clear bumps quickly. During the first 72 hours, skip cleansing brushes and tools, which can add friction while your skin feels sensitive.
Microneedling over active, inflamed acne isn’t advised because it may spread bacteria and prolong recovery. If you have active breakouts, postpone treatment on those areas and discuss timing with a dermatologist or esthetician. Microneedling isn’t generally a first-line option for active acne, and evidence for treating active breakouts this way is limited.
At-home microneedling can make whiteheads or infection more likely if device use, technique, or aftercare is inconsistent. Infection is a rare risk, and careful use of the device’s instructions and a simple recovery routine can help you make safer choices. For treatment and aftercare education, explore the microneedling product collection alongside guidance from your skincare professional.
Acne can be part of the early experience: the reader reported that acne worsened for about the first week after microneedling. Skin improvement may become more noticeable over the several weeks after microneedling as the body produces new collagen and healthy skin cells. The page reports that over 60% of microneedling patients see significant improvements in skin texture and tone. These observations cover different time frames, so an early change and a later improvement are not the same measure.
If you have active breakouts or acne scars, consult a doctor or dermatologist before microneedling. For patients with known acne problems, a doctor may consider acne treatment before microneedling, usually with antibiotics. Preparation also matters: the page advises avoiding retinoids and exfoliating acids for 3-5 days before microneedling. Discussing these factors before treatment can help establish whether and when the procedure is appropriate for your skin.
2. Avoiding sweat, sun exposure, and makeup early in recovery
For the first 24-48 hours after a microneedling treatment, keep workouts and heat-heavy activities off your schedule. Sweat and warmth can make freshly treated skin feel more uncomfortable, especially if redness or sensitivity is present. Choose a cool, low-effort day instead of a hot yoga class, sauna, or strenuous run. Resume your usual activity when your skin feels comfortable and your provider’s aftercare instructions allow it.
Plan errands and outdoor time with sun exposure in mind. Sun protection matters after microneedling, and a light, non-comedogenic sunscreen can be introduced on day two. Until then, favor shade and a brimmed hat over direct sunlight. Once sunscreen is part of your routine, apply it as directed and reapply according to its label, especially during extended time outdoors.
Makeup can wait, too. Avoid applying foundation, concealer, or powder for 24-48 hours after treatment. Makeup adds another layer to cleanse away and may feel uncomfortable on sensitive skin. If you have a work event or plans, schedule the appointment when you can comfortably go without complexion products during that window.
Keep cleansing gentle and respect the first day’s timing. Wait 24 hours before washing your face, then use a mild cleanser and lukewarm water. Pat dry with a clean, soft towel instead of rubbing. Skip cleansing brushes and exfoliating cloths during the first 72 hours, since friction can aggravate visible redness or tightness.
Let your skin’s response guide your routine. If redness or sensitivity persists, don’t rush back to sweat-heavy exercise, makeup, or extended outdoor exposure. Keep your routine simple, and introduce a light, non-comedogenic sunscreen on day two. Avoid layering several new products at once, which makes it harder to tell what feels comfortable.
A practical early-recovery plan is simple: schedule a calm first day, wait 24 hours before cleansing, and avoid makeup and heat for 24-48 hours. On day two, add sun protection with a lightweight sunscreen. These steps can limit avoidable irritation while your skin settles. For a closer look at products intended for microneedling routines, browse the microneedling skincare collection.
Skin typically takes about one week to recover from microneedling. Stay attentive beyond the first couple of days rather than assuming that the end of initial restrictions means your skin has fully recovered. Let your skin’s comfort and your provider’s aftercare instructions guide your return to usual activities, and give your skin time to settle before resuming your regular routine.
3. Following up with a cosmetic dermatologist
Temporary congestion after microneedling often settles within 1 to 2 weeks. Contact a cosmetic dermatologist if bumps persist beyond three weeks or become painful. That change in timing or discomfort deserves attention, especially if redness and inflammation are increasing rather than easing. A dermatologist can assess whether the bumps look like clogged pores, milia, or another skin concern, then recommend an appropriate next step.
Track what you notice before your appointment. Write down the treatment date, when the bumps first appeared, and whether they are spreading or changing. Note the products you used afterward, including exfoliating acids, retinol, sunscreen, and makeup. These details help the dermatologist relate your routine and treatment timeline to changes in your skin’s texture.
Bring photos taken in consistent lighting, such as one each morning, and avoid squeezing bumps before your visit. Picking can make the area harder to assess and may increase inflammation. Note whether the bumps feel tender, redness is fading, or you’ve added new products. These observations help distinguish a few isolated whiteheads from persistent congestion.
A professional may consider extraction around the two-week mark after microneedling, once they confirm your skin has recovered. The timing matters: your skin should be ready before anyone attempts extraction. Don’t force a bump out at home, as pressure can irritate the surrounding skin. Ask the dermatologist to assess the bump and your recovery before deciding whether extraction is appropriate.
Keep your routine steady while waiting for follow-up. Cleanse gently and don’t add exfoliants to try to clear bumps faster. If your skin remains sensitive, pause active products and follow your aftercare plan. A dermatologist can review ingredients and timing, including when to restart retinol or exfoliating acids, based on your skin’s current condition.
Prepare a short checklist for your appointment: treatment date, first day of bumps, products used, photos, and any changes in discomfort. Mention whether new spots appeared after using a particular product or whether the texture has stayed the same. If congestion has lasted beyond three weeks, say so clearly. Focus on these observations rather than trying to diagnose the bumps yourself.
Follow-up is especially useful when symptoms don’t fit a brief recovery. Persistent bumps, increasing pain, or ongoing inflammation are reasons to seek professional assessment. A cosmetic dermatologist can examine your skin and guide your next skincare steps. Keep your notes and product list handy so the appointment can focus on what changed and how your skin is responding.
4. Gentle skincare and product choices
Choose simple formulas during the first 48 hours after microneedling. Lightweight, non-comedogenic products can reduce the chance of adding heavy residue while your skin feels sensitive. Use a gentle cleanser and a basic moisturizer rather than layering several serums, face oils, and treatment products. A shorter routine also makes it easier to identify which product feels uncomfortable.
For the initial 72 hours, choose a lightweight, non-comedogenic moisturizer to support skin comfort. Apply it gently, without rubbing or massaging areas with bumps. If a product stings or increases tightness, stop using it and return to the simplest routine that feels comfortable. Avoid fragranced or newly introduced formulas during this early period.
Keep cleansing tools out of your routine for the first 72 hours. Skip scrubby brushes, textured pads, and cleansing devices, which can add friction. Use your fingertips and lukewarm water instead. Pat your face dry with a clean, soft towel, then apply moisturizer with light, even strokes.
After 72 hours, gentle exfoliation may be considered, but that timing isn’t automatic clearance for every active ingredient. Retinol and exfoliating acids should wait until your esthetician confirms your skin is ready. If you’re approved to restart an active, introduce one product at a time. Avoid using an acid and retinol together during the same restart window.
White bumps can have different causes, so don’t assume every spot needs exfoliation. Tiny bumps may be milia, while congestion can resemble a whitehead. If new products worsen redness or sensitivity, stop adding active ingredients and keep your routine simple. Seek professional advice for persistent or painful congestion.
Microneedling is associated with collagen and elastin production, while visible skin improvement may develop over several weeks. This doesn’t mean you need to speed up cell turnover with extra acids. Give your routine time to settle, and judge products by comfort and your skin’s response, not by how quickly they promise to change texture.
A practical routine is cleanser, lightweight moisturizer, and no cleansing tools during the first 72 hours. After that, consider gentle exfoliation only when your skin feels ready, and restart stronger actives with your esthetician’s guidance. This measured approach helps you protect comfort while supporting normal skin recovery and collagen production.
5. Can you pop or extract whiteheads after microneedling?
Don’t squeeze or pick at bumps after microneedling. Pressure can irritate the spot and surrounding skin, making redness and inflammation more noticeable. A white tip doesn’t confirm what a bump is, so don’t assume every raised spot is a clogged pore. Leave it alone while your skin settles, and keep nails, tweezers, and extraction tools away from your face.
Timing matters. Skin may still be recovering during the first week, so avoid home extractions during that period. If you have one isolated blemish, a plain hydrocolloid patch is an option to consider after the first 3 to 5 days. Use it only on the spot, and remove it gently rather than pulling or scraping at the skin.
Don’t use a comedone extractor, needle, or fingernails to open a bump. Home tools can apply uneven pressure, and repeated attempts may leave the area more irritated. Avoid scrubs and exfoliating acids on the spot, too. They won’t identify the bump or make squeezing safer.
A professional may consider extraction around the two-week mark after microneedling, once they confirm your skin has recovered. That timing doesn’t mean you should automatically book an extraction. A cosmetic dermatologist or esthetician should first assess whether your skin is ready and whether the bump is suitable. If your skin remains tender or visibly irritated, leave it untouched.
Until then, follow a practical care plan: cleanse gently, apply a lightweight moisturizer, and avoid picking as you monitor the spot. Note when it appeared and whether it changes. If it becomes painful or congestion continues beyond three weeks, follow up with a cosmetic dermatologist instead of attempting extraction yourself.
Small white bumps can have different causes, including milia, so appearance alone isn’t enough to decide whether extraction is appropriate. Don’t press a bump to see whether it will release. A professional can assess its location and appearance alongside your recovery timeline, then advise whether extraction or continued gentle care makes sense.
For your appointment, bring the microneedling date and a list of products used afterward. Photos taken on different days can show whether a spot is changing. These details help the provider assess your recovery and choose an appropriate next step, rather than relying on repeated squeezing at home.
Bruun Beauty: Advanced Microneedling Serum SD - Control Salmon DNA Ampoule Serum
Advanced Microneedling Serum SD - Control Salmon DNA Ampoule Serum is one option for a microneedling skincare routine. Use a serum only when your skin is ready for the products in your routine. If whiteheads or sensitivity are still present, keep care simple and follow your skincare professional’s aftercare guidance rather than adding products to address bumps.
Explore the Salmon DNA microneedling serum when you’re ready to consider a product for your routine. For more details, visit bruunbeauty.com.
Make your next skincare decision with confidence
If you notice whiteheads after microneedling, use the experience to make your next routine more intentional. Keep a brief record of the products you used and how your skin responded. This can help you and your skincare professional make thoughtful decisions about future treatments and product timing.
Let your skin’s comfort guide when you add products back. A steady, familiar routine is more useful than changing several steps at once because it helps you understand what works for you. If bumps persist or become painful, share your observations with a cosmetic dermatologist for personalized guidance.
Give your routine time to work, and choose a gentle, considered next step. Clear, nourished-looking skin starts with choices that respect what your skin is telling you.
Frequently Asked Questions
Clearing the Confusion: Breakouts After Microneedling?
A few new spots can appear after treatment, and temporary congestion often settles within 1 to 2 weeks. Note when bumps appear and whether they follow a routine change. For example, record a new moisturizer or makeup product alongside the date, so you can discuss a clear timeline with your skincare professional.
What to avoid?
Avoid picking, abrasive scrubs, cleansing brushes, and strong actives until your skin is ready. Don’t add several unfamiliar products at once. If a new product causes discomfort, stop using it and note its name. This creates a useful record and avoids multiple routine changes that are hard to evaluate.
What to do?
Keep a simple record of new bumps, product changes, and how your skin feels each day. Use gentle skincare and avoid experimenting with multiple spot treatments. If you seek professional advice, bring your product list and photos taken in consistent lighting to show how the bumps have changed.
Are these bumps normal after microneedling?
A few temporary bumps can occur after treatment, but appearance alone can’t reveal their cause. Tiny white bumps may also be milia. Notice whether they fade, remain unchanged, or become uncomfortable. This pattern gives a skincare professional more useful context than trying to classify each bump yourself.
What causes whiteheads or acne breakouts after microneedling?
Microneedling may temporarily worsen acne or lead to a new breakout. The timing of spots and recent skincare changes can offer clues. Record whether bumps appeared after you used a new product, makeup, or a richer moisturizer. Don’t assume the cause from appearance alone, especially if several parts of your routine changed at once.
How can you safely care for these bumps after microneedling?
Avoid squeezing or using extraction tools at home. For an isolated blemish, a plain hydrocolloid patch may be considered after the first 3 to 5 days of recovery. If the spot remains uncomfortable or you’re unsure what it is, seek professional guidance rather than testing several treatments.
What skincare products should you avoid after microneedling?
Wait to restart exfoliating acids and retinol until your esthetician confirms your skin is ready. Avoid abrasive scrubs and unfamiliar products while your skin feels sensitive. Reintroduce familiar products one at a time so you can observe your skin’s response before changing another part of your routine.
When should you seek professional assessment for post-microneedling bumps?
Contact a cosmetic dermatologist if bumps become painful or congestion lasts beyond three weeks. Before your appointment, note when the spots began, which products you used, and any changes in redness or comfort. These details can help the dermatologist assess your skin and guide your next skincare steps.
Wholesale Spa Supplies for Salon and Spa Professionals
Wholesale Spa Supplies for Salon and Spa Professionals
Related Posts

PDRN Benefits for Skin: Regeneration, Results and Safety

How to Dispose of Used Microneedle Cartridges Safely

Self-care rituals for better skin through mindful daily habits

How to Explain Microneedling Benefits for Skin and Scars

How to use a Korean 10-step skincare routine for hydration

Microneedling for atrophic scars: clinic or at-home results

V-Line Lifting Masks and Their Claimed Face-Shaping Effects
