

Microneedling Forehead Lines: Esthetician's Guide
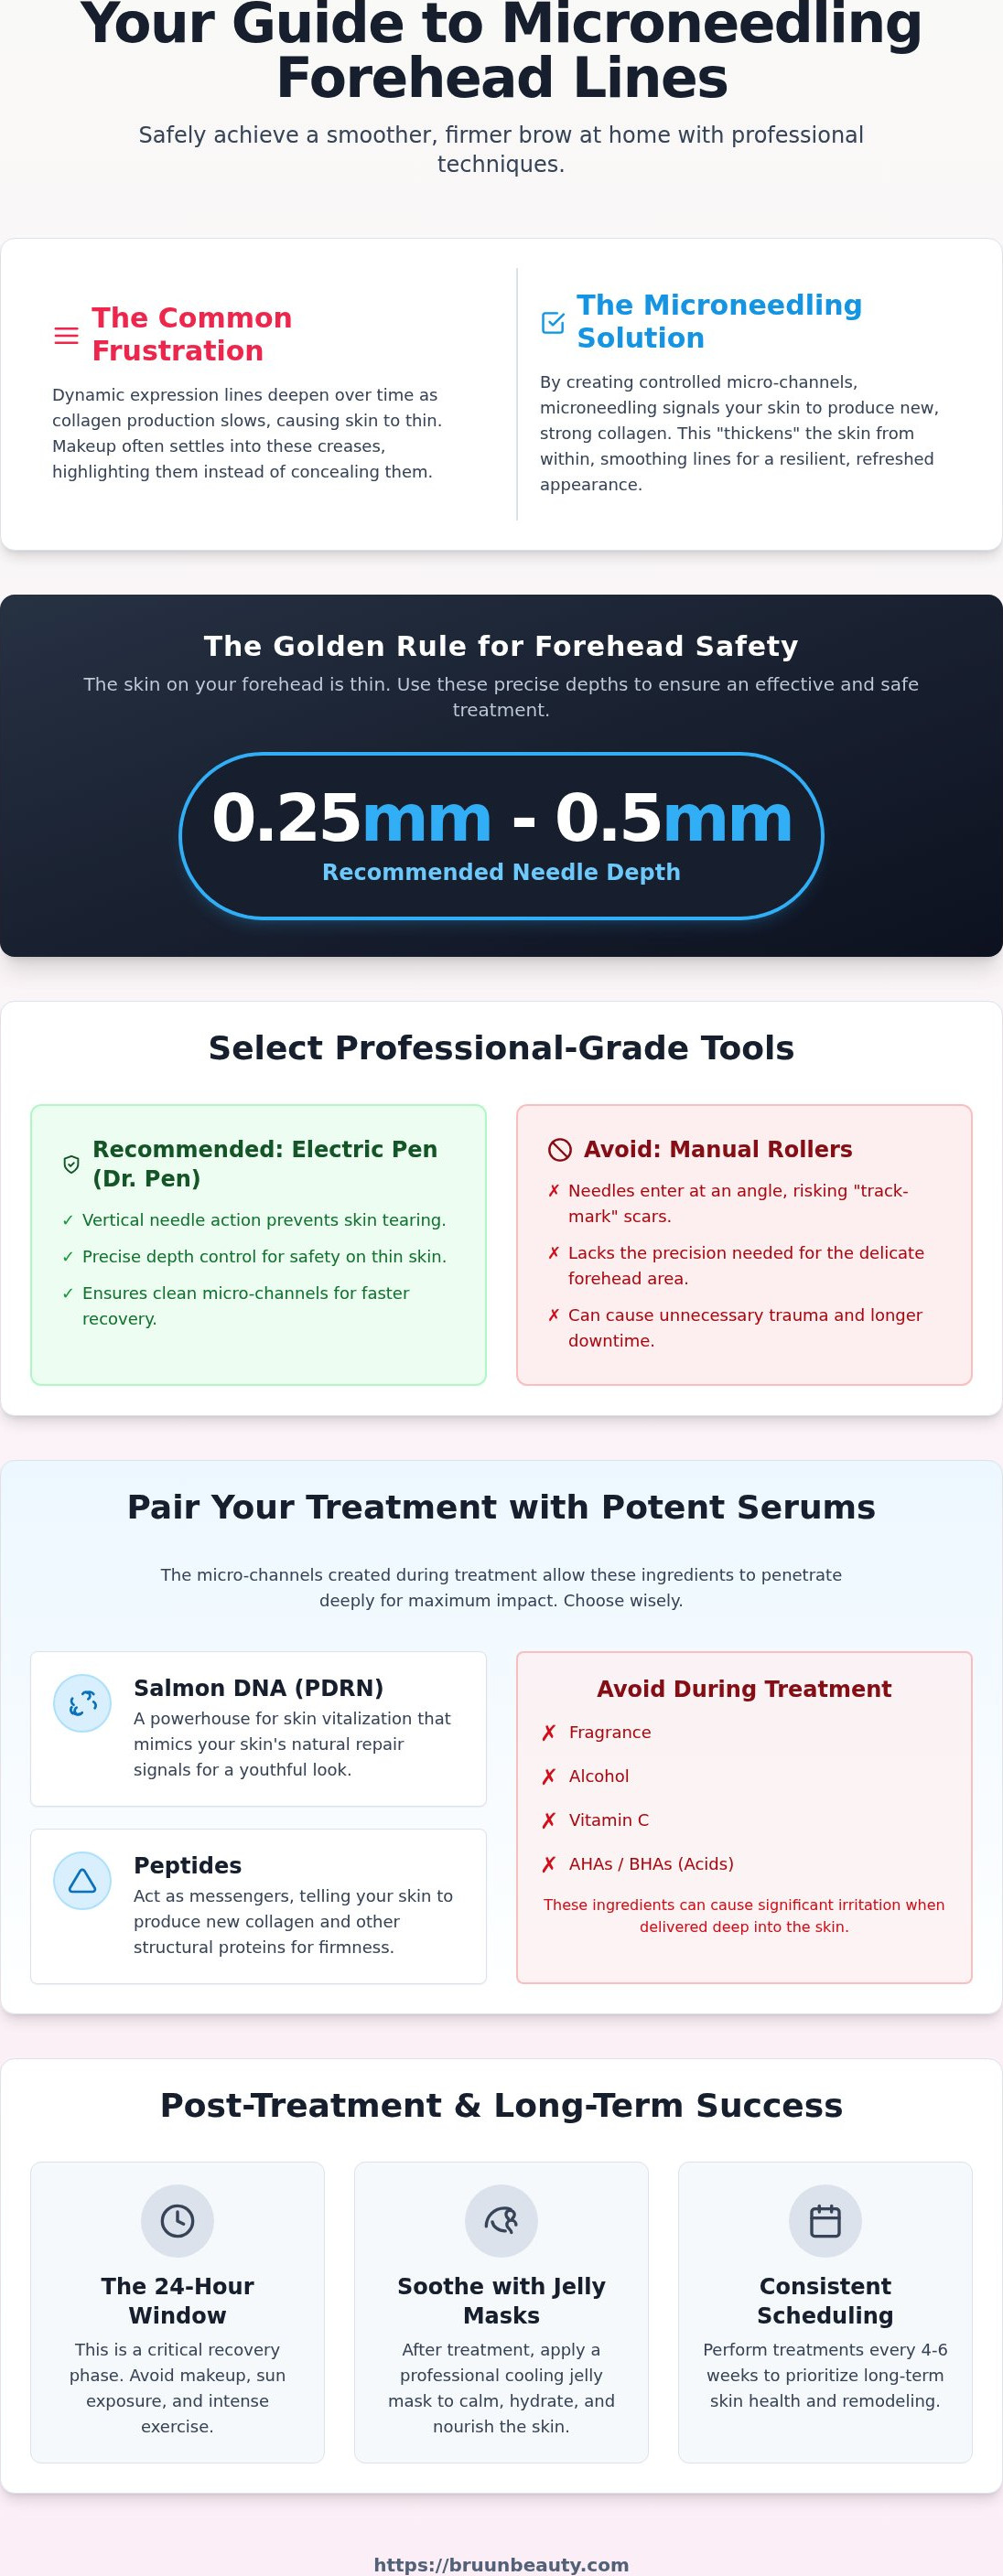
What if you could erase the deep expression creases that make you look tired without a single office visit? Learning how to microneedle forehead lines with a 0.25mm to 0.5mm needle depth allows you to safely boost collagen and remodel thin skin. By pairing your Dr. Pen device with Salmon DNA serums, you can achieve a visibly smoother, firmer brow and prevent makeup from settling into fine lines.
It's frustrating to watch your favorite foundation settle into forehead creases by lunchtime, often highlighting the very lines you want to hide. While microneedling helps smooth the skin over time, learning professional techniques from Elaine Beauty Studio can help you master makeup application that works with your skin's texture. You aren't alone in feeling cautious about the thin skin on your forehead or confused by different needle settings. We understand that you want professional results but need a clear, safe protocol to follow at home.
In this guide, we'll walk you through the esthetician-approved method for softening forehead wrinkles. You'll discover the best serum pairings for your skin type, the precise depths to use for safety, and how to finish your treatment with a cooling jelly mask for a nourished, glowing complexion.
Key Takeaways
- Understand the precise needle depths of 0.25mm to 0.5mm required to safely navigate the thinner skin on your forehead.
- Learn exactly how to microneedle forehead lines using a professional Dr. Pen device for superior control and results compared to manual rollers.
- Discover why pairing your treatment with Salmon DNA (PDRN) serums is the gold standard for boosting collagen and smoothing deep expression creases.
- Master the critical 24-hour recovery window and learn how to use professional jelly masks to cool and nourish your skin after treatment.
- Establish a consistent 4-6 week treatment schedule that prioritizes long-term skin health and remodeling over aggressive needle depths.
Why Forehead Lines Form and How Microneedling Helps
Forehead lines are often the first sign of aging that people notice in the mirror. These creases usually start as dynamic lines, which only appear when you're expressive, like when you're surprised or frowning. Over time, these become static wrinkles that remain visible even when your face is completely relaxed. This happens because your skin's natural production of collagen and elastin slows down, making the skin thinner and less resilient. Because the forehead has very little subcutaneous fat and sits directly over the frontal muscle, these lines can look deeper and more pronounced than wrinkles elsewhere on the face.
Collagen induction therapy (microneedling) offers a way to address these concerns by encouraging the skin to remodel itself. When you use a professional device, you create controlled micro-injuries that signal your body to produce fresh, strong collagen fibers. This process is essential for the forehead because it helps "thicken" the skin from the inside out. By improving skin density, you make the surface more resistant to the repeated folding that causes deep expression lines. Understanding how to microneedle forehead lines properly allows you to target these specific structural changes safely and effectively.
What is Microneedling for Forehead Wrinkles?
Microneedling is a minimally invasive technique that uses an array of micro-fine needles to create thousands of invisible "micro-channels" in the skin. These channels serve a dual purpose. First, they trigger a natural renewal process that leads to smoother, firmer skin texture over time. Second, they act as temporary pathways, allowing high-performance microneedling serums to reach the deeper layers where they can do the most good. On the thin skin of the forehead, this precision is vital for achieving a youthful, plumped appearance without causing unnecessary trauma.
Microneedling vs. Other Forehead Treatments
While many people rely on neurotoxins to "freeze" muscles and stop lines from forming, those injections don't actually improve the quality of your skin. Microneedling is a natural alternative that focuses on skin health and long-term density. Unlike topical retinoids that can take months to show results or chemical peels that only exfoliate the surface, microneedling works deeper within the dermis. It provides a structural solution by building up the skin's foundation. Using professional-grade skincare devices at home or in a clinic gives you the power to maintain a smooth brow while keeping your natural range of expression.
Choosing Your Professional-Grade Tools and Serums
Achieving a smooth, youthful brow starts with the right equipment. While manual derma rollers were once popular, an electric device like a Dr. Pen is now the gold standard for precision. When you're learning how to microneedle forehead lines, you need the vertical needle action that only an electric pen provides. Manual rollers enter and exit the skin at an angle, which can cause "track-mark" scarring or unnecessary trauma to the thin forehead tissue. In contrast, an electric pen moves needles straight up and down, allowing for a much cleaner entry and faster recovery.
Safety is paramount, so always use sterile, single-use needle cartridges. Reusing needles is a major risk for infection and dulls the tips, leading to skin dragging and poor results. You'll also need a high-quality serum to provide "slip" during the procedure. Without enough lubrication, the device won't glide smoothly across your brow, which can irritate the skin surface. A comprehensive scientific review highlights that the success of microneedling depends heavily on the controlled nature of the injury and the safety of the tools used.
The Power of Salmon DNA (PDRN) and Peptides
The "channel-open" phase is your best opportunity to feed your skin potent ingredients. We highly recommend using Salmon DNA (PDRN), a powerhouse for skin vitalization. PDRN works by mimicking your skin's natural repair signals, encouraging a more youthful and refreshed appearance. Peptides are another essential ingredient, acting as messengers that tell your skin to produce new structural proteins. Avoid any serums containing fragrance, alcohol, or harsh acids like Vitamin C or AHAs during the actual procedure, as these can cause significant irritation when delivered deep into the dermis.
Selecting the Right Needle Gauge and Count
For the forehead, choosing between a 12-pin and a 36-pin cartridge depends on your specific goals. A 12-pin cartridge is often preferred for deeper wrinkles because the needles are slightly more spaced out, allowing for more effective penetration into the skin's foundation. A 36-pin cartridge is excellent for improving overall texture and addressing very fine lines. High-quality needles are essential to prevent micro-tearing, which happens when low-grade needles hook or pull the skin. You can find professional-grade inventory at BRÜUN to ensure your skincare devices perform reliably every time. If you're ready to upgrade your routine, explore our full range of microneedling essentials to find the perfect match for your skin goals.
The Step-by-Step Technique for Forehead Microneedling
Before you begin your session, you must start with a perfectly clean canvas. Double cleansing ensures that every trace of makeup, SPF, and oil is removed from the skin surface. Once your skin is dry, use a cotton pad soaked in 70% isopropyl alcohol to thoroughly disinfect the entire forehead area. This step is non-negotiable for safety. You should also ensure your Dr. Pen device and work surface are fully sanitized to maintain a professional environment.
Safety is the most important factor when working on the upper face. The forehead has very little fat, meaning the skin sits close to the frontal bone. Learning how to microneedle forehead lines requires a gentle touch and careful attention to your device settings. Unlike the cheeks or chin, the forehead doesn't require deep penetration to achieve visible results. Using a shallower depth protects the delicate tissues while still triggering the collagen response you're looking for.
Step 1: Mapping the Forehead Area
To ensure even results, it's best to divide your forehead into three vertical sections: the left temple area, the center, and the right temple area. This mapping technique prevents you from missing spots or over-treating one specific zone. Apply your Salmon DNA serum to only one section at a time. This prevents the serum from drying out before the device reaches it, ensuring you always have enough "slip" for the needles to glide effortlessly across the skin.
Step 2: Proper Needle Depth and Pressure
The optimal forehead depth is 0.25mm for beginners to ensure safety over the thin skin and bone. Because the forehead lacks the fleshy cushion found in the cheeks, you don't need to apply heavy pressure. Let the electric pen do the work. Move the device in a systematic pattern: first horizontally across the section, then vertically, and finally diagonally. This cross-hatch technique ensures every millimeter of the skin is addressed. Following FDA guidance on microneedling safety helps you avoid over-treating delicate areas like the temples, where the skin is particularly thin.
Step 3: Managing the 'Pink' Glow
As you work, you'll notice a uniform pinkness called erythema. This is a positive sign that your skin's natural renewal process is active. You generally only need 2 to 3 passes per area to achieve this effect. If the skin becomes bright red or shows signs of pinpoint bleeding, it's time to stop. The goal is to stimulate the skin, not to cause excessive inflammation. Once the entire forehead has that healthy "pink glow," you've completed the active portion of your session. You can find high-quality needle cartridges in our professional-grade inventory to ensure each pass is clean and precise.
The Recovery Phase: Post-Care and Soothing Solutions
The first 24 hours after your session are the most critical for your skin's barrier repair. Since you've just created thousands of micro-channels, your forehead will feel tight and sensitive. Keeping the area hydrated with a pure hyaluronic acid serum is essential for maintaining a plump, healthy look. This prevents the "crepey" texture that can sometimes occur when thin skin is dehydrated during the healing process. Your skin is working hard to produce new collagen, so providing it with a clean, moisture-rich environment is your top priority.
You must avoid direct sun exposure, intense workouts, and makeup for at least 24 to 48 hours. Sweat contains bacteria that can easily enter open channels; meanwhile, makeup pigments can cause irritation if they penetrate too deeply. Protecting your results means letting your skin breathe and focus entirely on renewal. Learning how to microneedle forehead lines effectively includes mastering this "hands-off" period to ensure the best possible outcome. If you must go outside, a wide-brimmed hat is a better choice than sunscreen for the first day to avoid chemical irritation.
Using Jelly Masks to Reduce Redness
Applying a professional jelly mask immediately after your treatment is an esthetician's favorite secret. These jelly masks create a gentle vacuum seal over the skin, which pushes hydration and soothing nutrients deeper into the micro-channels. We recommend selecting formulas with Aloe or Calendula to instantly cool the skin and reduce the appearance of redness. This step provides immediate relief from the "sunburn" sensation and jumpstarts the recovery process. The cooling effect also helps to constrict blood vessels, which minimizes swelling in the delicate brow area.
The 3-Day Recovery Timeline
Your skin undergoes a rapid transformation in the days following your session. On Day 1, expect your forehead to look pink and feel slightly tight. This is a normal sign of activation and shows that your body is responding to the treatment. By Day 2, you might notice very light peeling or dryness as the old skin cells make way for new growth. Don't pick at any flakes; simply keep the area moisturized with a bland, fragrance-free cream. On Day 3, the initial irritation typically fades, revealing a fresh, glowing complexion and a visibly smoother forehead texture. Consistency with your post-care routine ensures these results continue to improve over the coming weeks.
Shop Professional Post-Care Essentials
Optimizing Your Results: Frequency and Long-Term Care
Real progress with microneedling is a marathon, not a sprint. While the initial glow is exciting, the true remodeling of your skin happens over several months as new collagen fibers mature. We recommend a schedule of one session every 4 to 6 weeks. This timeframe respects your skin's natural turnover cycle and gives your forehead the necessary time to build a stronger foundation. If you're wondering how to microneedle forehead lines for the best results, remember that consistency always beats aggressive needle depths. Staying at a safe depth regularly will yield better, safer results than trying to go too deep in a single session.
Between your sessions, supporting your skin with a Korean beauty inspired regimen keeps the forehead area hydrated and resilient. Focus on layering lightweight, moisture-binding ingredients like hyaluronic acid and peptides. For an extra boost, continue using your Salmon DNA serum as part of your nightly routine during the weeks between treatments. Most people start to notice a visible softening of fine lines after their third or fourth session, with structural improvements continuing for up to six months.
Building a Long-Term Forehead Rejuvenation Plan
Daily SPF is your most important anti-aging tool. New collagen is incredibly sensitive to UV damage; skipping sunscreen can undo the hard work of your microneedling sessions. To enhance your results, consider alternating your treatments with LED light therapy or other beauty machines. Red light therapy is excellent for supporting the skin's energy production and calming inflammation between needling sessions. Don't forget to take monthly photos in the same lighting. Progress can be subtle from day to day, but looking back at a three-month comparison often reveals a significant difference in skin firmness and texture.
When to Consult a Professional
While at-home care is powerful for fine lines and texture, very deep, set-in folds might require a professional's touch. Licensed estheticians can use more advanced techniques or combine treatments for complex cases that go beyond surface-level texture. At BRÜUN, we take pride in supporting both licensed professionals and advanced home enthusiasts with our professional-grade inventory. Whether you're working in a clinic or your own bathroom, we're here to provide the tools you need for clear, nourished, glowing skin. Embrace the process and celebrate the small improvements you see along the way.
Achieve a Smoother Brow with Professional Precision
Mastering how to microneedle forehead lines is about more than just owning a device; it's about the precision and care you bring to your skin's unique needs. By sticking to safe needle depths between 0.25mm and 0.5mm and feeding your skin Salmon DNA (PDRN) serums, you're providing the structural support required for a firmer, smoother appearance. These small, consistent steps lead to significant changes in how your skin looks and feels over time.
The most impressive results always come from a dedicated routine paired with professional-grade tools used by experts nationwide. Whether you're using a 5-star reviewed Dr. Pen device or finishing your session with a soothing jelly mask, every choice you make builds toward that clear, nourished, glowing skin you've been dreaming of. You have the knowledge and the protocol; now it's time to put it into practice.
With fast shipping from our hubs in Miami and Los Angeles, your professional-grade tools are ready when you are. Join the nationwide community of licensed estheticians and advanced enthusiasts who trust BRÜUN for their skincare results. We're excited to support you on your journey to a more confident, revitalized brow.
Frequently Asked Questions
How deep should I microneedle my forehead lines at home?
You should keep your needle depth between 0.25mm and 0.5mm when working on the forehead. This area has very little fat and sits directly over the frontal bone, so deeper penetration isn't necessary and can be uncomfortable. Staying within this range ensures you stimulate the dermis for collagen production without causing trauma to the underlying tissue. It's the safest way to learn how to microneedle forehead lines at home while achieving professional-grade results.
Can microneedling really get rid of deep forehead wrinkles?
Microneedling is highly effective at softening the appearance of deep wrinkles by triggering the skin's natural remodeling process. While it won't "erase" set-in folds overnight, it builds skin density and elasticity from within. Over a series of treatments, the increased collagen production "plumps" the skin, making those deep creases look shallower and much less noticeable. For the best outcome, combine your sessions with a high-performance Salmon DNA serum to support skin vitalization.
How long does it take to see results from microneedling the forehead?
Most people notice an immediate "microneedling glow" within a few days, but structural results take longer to appear. You'll likely see improvements in skin texture and firmness after your second or third session, usually around the 8 to 12-week mark. Because collagen synthesis is a biological process, the full remodeling of forehead wrinkles typically peaks between 3 and 6 months after you begin your treatment series. Consistency is the secret to long-term success.
Is forehead microneedling painful?
You'll likely feel a prickly or vibrating sensation, which some find slightly more intense on the forehead than the cheeks. Since the skin on your brow is quite thin, the needles are closer to the bone, which can feel a bit "buzzy." Most users find the sensation manageable without numbing cream at shallow depths, but you can certainly apply a topical anesthetic 20 minutes before starting if you have a lower pain tolerance.
What should I put on my forehead after microneedling?
Stick to pure, hydrating ingredients like hyaluronic acid or Salmon DNA (PDRN) ampoules immediately after your session. These ingredients penetrate the open micro-channels to nourish the skin without causing irritation. We also highly recommend applying a professional jelly mask to cool the area and reduce redness. Avoid using any active ingredients like Vitamin C, retinol, or exfoliating acids for at least 72 hours to prevent damaging your skin's delicate recovery process.
Can I microneedle my forehead if I have Botox?
You can absolutely microneedle your forehead if you have Botox, but you must wait at least 14 days after your injections. This allows the neurotoxin to fully settle into the muscle. Microneedling is actually a fantastic companion to Botox because it improves the overall quality and thickness of the skin, while the Botox addresses the muscle movement that causes dynamic lines. Using both treatments together provides a comprehensive approach to forehead rejuvenation.
How many sessions are needed for forehead lines?
We generally recommend a series of 3 to 6 sessions to see a significant transformation in forehead texture and line depth. These treatments should be spaced 4 to 6 weeks apart to allow your skin's barrier to fully recover and for new collagen to form. Once you've achieved your desired results, a maintenance session every 3 to 4 months will help keep your forehead looking firm, smooth, and nourished year-round.
What are the side effects of microneedling the forehead?
The most common side effects are temporary redness, tightness, and a sensation similar to a mild sunburn. You might also experience light peeling or dryness 2 to 3 days after your treatment as old skin cells turn over. These effects are a normal part of the skin's renewal process and typically resolve within 48 to 72 hours. Understanding how to microneedle forehead lines with proper technique and sterile cartridges ensures these side effects remain minimal and manageable.
Microneedling for Hyperpigmentation: Professional Home Guide
Microneedling for Deep Wrinkles Results: What to Really Expect in 2026
Related Posts

Is At-Home Microneedling Worth It? A Practical Comparison

What to Put on Your Scalp After Microneedling: A Safe Aftercare Guide

Derma Pen for Hair Regrowth: A Thoughtful Journey from Research to Routine

How Many Times Can You Use a Dr. Pen Cartridge? The Single-Use Answer

Best Dr. Pen Needle for Fine Lines: Cartridge Guide

Calming Skincare for Post-Procedure Skin: How to Choose the Right Routine

Does At-Home Microneedling Hurt? What to Expect
