

Microneedling for Textured Skin: Before and After Results You Can Expect
Have you ever spent twenty minutes carefully layering primer and foundation only to find your skin's uneven texture looks even more obvious in the light? It's a common frustration when topical creams don't reach deep enough to smooth out stubborn bumps or enlarged pores. Learning about microneedling for textured skin before and after results is the first step toward reclaiming your confidence and achieving a clear, nourished, glowing complexion.
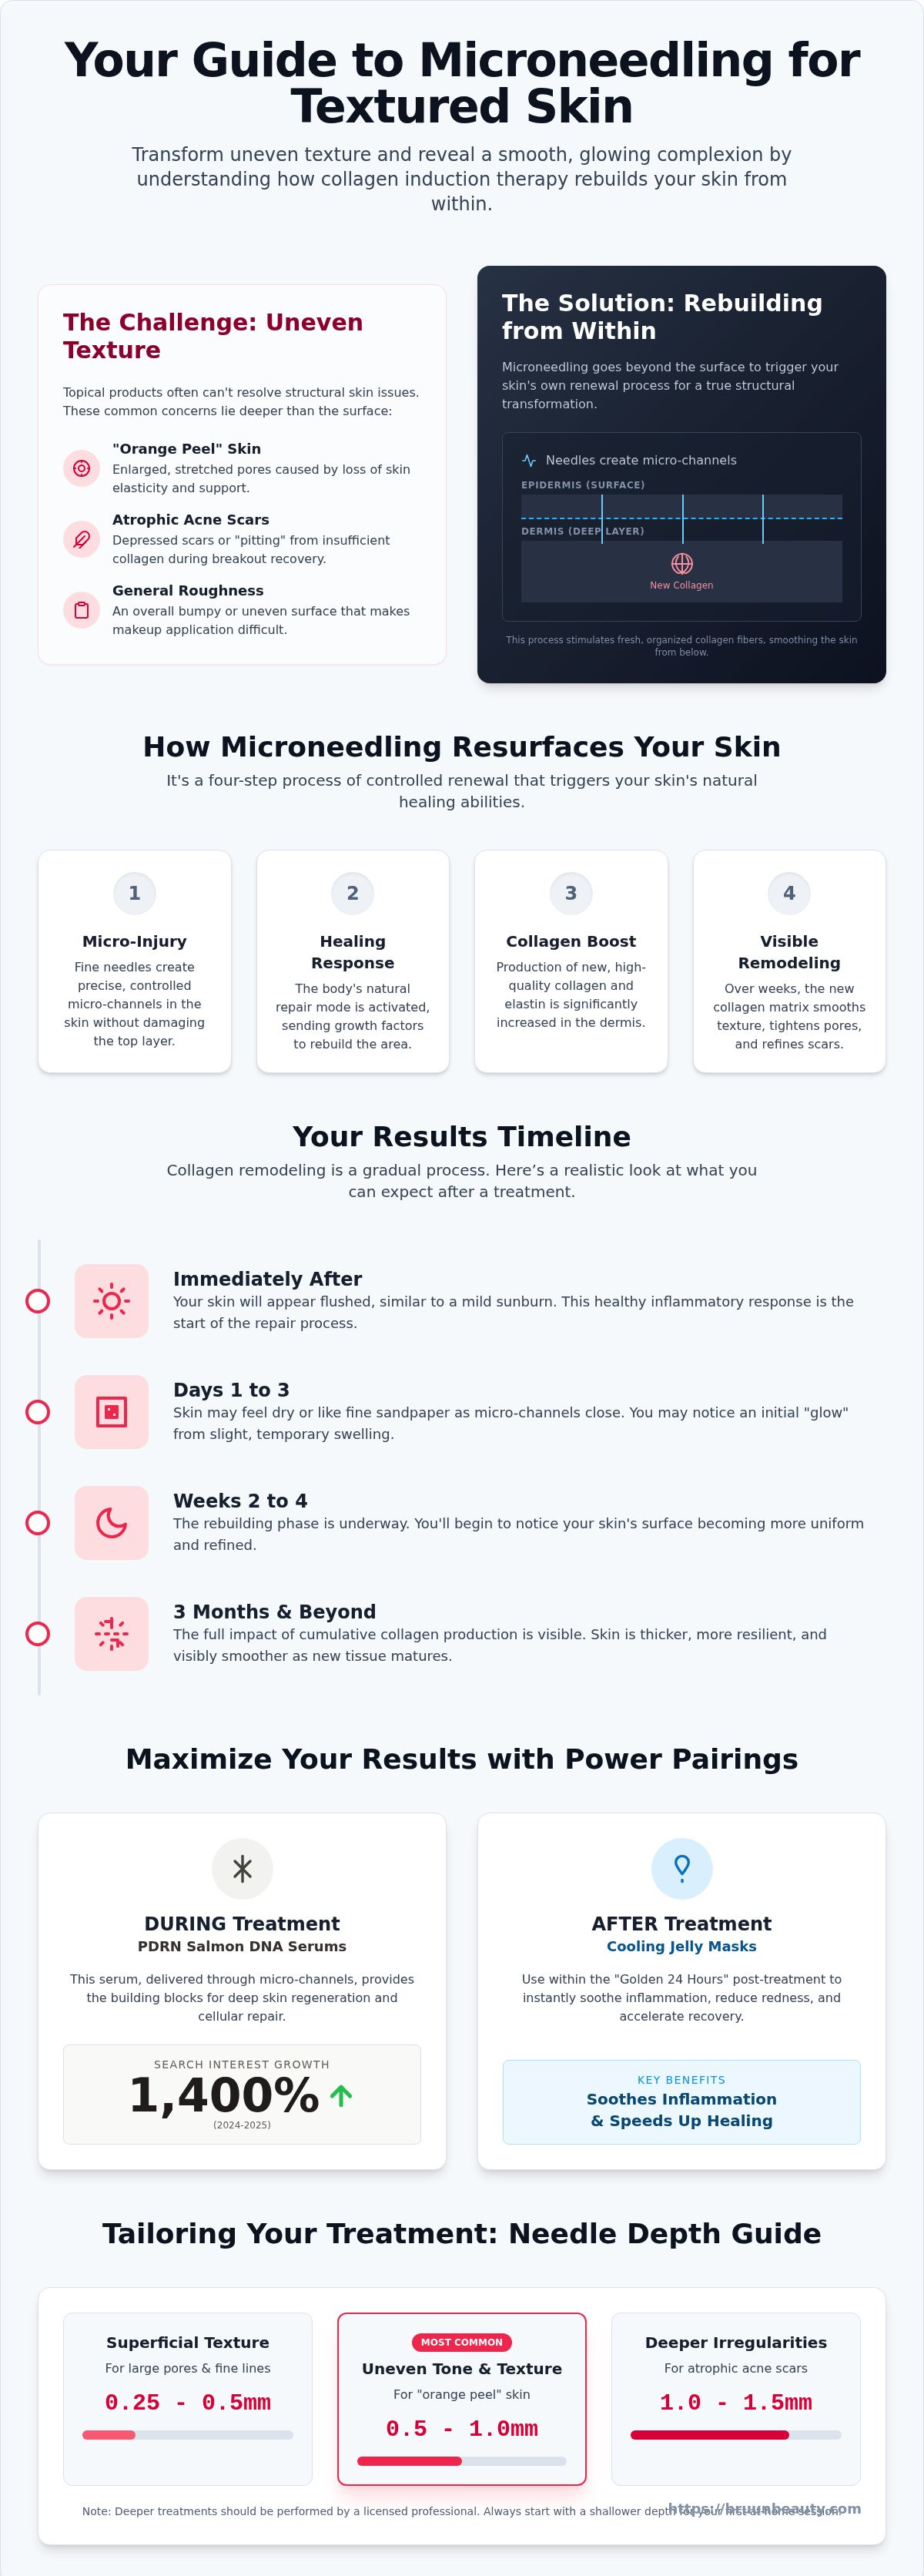
You deserve a solution that goes beyond the surface to rebuild your skin's foundation. In this guide, you'll discover how this treatment stimulates collagen to refine your complexion and what a typical recovery timeline looks like for your schedule. We also explore why search interest for PDRN Salmon DNA serums grew by 1,400% between 2024 and 2025 as the ultimate pairing for texture. By the end, you'll see how professional tools and finishing touches like cooling jelly masks can maximize your results for a smooth, healthy look.
Key Takeaways
- Learn how Collagen Induction Therapy triggers your skin's natural repair mode to smooth "orange peel" texture and atrophic scars.
- Understand the realistic timeline for microneedling for textured skin before and after results, from the immediate post-session glow to long term remodeling.
- Discover why pairing Salmon DNA serums with your treatment creates the ultimate delivery system for deep skin regeneration.
- Master the post-treatment "Golden 24 Hours" by using cooling jelly masks to soothe inflammation and speed up your recovery.
- Identify the best needle depths for your specific concerns, whether you're targeting large pores or deeper skin irregularities.
How Microneedling Resurfaces Uneven Skin Texture
Textured skin often feels like a puzzle you can't solve with standard creams alone. Whether you're dealing with enlarged pores, an "orange peel" appearance, or atrophic acne scars, these issues aren't just on the surface. They represent structural changes in your skin's deeper layers that require a more targeted approach than a simple scrub can provide.
This is where Collagen induction therapy changes the game. Unlike mechanical exfoliation or facial scrubs that only buff the epidermis, microneedling uses fine needles to create controlled micro-channels. These tiny punctures trigger your body's natural repair mode without removing the protective top layer of your skin. It's a way of whispering to your skin to start its own renewal process.
When you look at microneedling for textured skin before and after results, the real transformation happens in the dermis. This is the layer where collagen and elastin provide the "scaffolding" for your face. By stimulating this area, you're encouraging the skin to produce fresh, organized fibers. These new fibers replace the old, disorganized ones that cause visible unevenness, leading to a firmer and smoother appearance.
Breaking Down the 'Orange Peel' Effect
When your skin loses its natural elasticity, the walls of your pores lose their support. This causes them to stretch and sag, creating a texture that resembles the skin of an orange. Microneedling helps "tighten" these pores from the inside out by thickening the surrounding dermis with new collagen. As the skin becomes firmer, the appearance of these stretched pores diminishes significantly.
You aren't just smoothing the surface; you're improving the structural integrity of the skin itself. For those seeking professional results at home or in the clinic, using high-quality microneedling equipment ensures these channels are precise. This precision is what allows the skin to bounce back with a refined, soft-focus finish.
Addressing Acne Scarring and Pitting
Atrophic acne scars occur when the skin doesn't produce enough collagen while recovering from a breakout. These scars are often held down by tough, fibrous bands of tissue that pull the surface inward. The mechanical action of the needles helps break up this old, restrictive tissue, allowing for a more even distribution of new skin cells. This process encourages a faster cell turnover rate, which helps "fill in" depressed areas over time.
Collagen induction therapy creates a smoother, more refined skin canvas over a period of 4 to 6 weeks as new tissue matures. Consistent sessions help ensure that the microneedling for textured skin before and after transformation is both visible and long-lasting.
The Microneedling Timeline: Before and After Results
The journey to smoother skin starts the moment the device touches your face. Immediately after your session, your skin will likely look flushed, similar to a mild sunburn. This isn't damage; it's a healthy inflammatory response that signals your body to begin the repair process. Within the first 24 hours, you might notice a temporary "glow" caused by slight swelling, which can make fine lines and pores look instantly blurred.
Between days one and three, your skin might feel like fine sandpaper. This happens as the micro-channels close and tiny, invisible scabs form. It's vital to keep the area hydrated during this phase to manage temporary dryness. By weeks two through four, the "rebuilding" phase is in full swing. You'll start to notice a shift in how your makeup sits on your skin as the surface becomes more uniform and refined.
Three months and beyond is when you see the full impact of cumulative collagen production. Because collagen remodeling is a slow and steady process, the microneedling for textured skin before and after transformation continues to improve long after your last appointment. Your skin becomes thicker, more resilient, and visibly smoother as the new tissue matures.
What to Look for in Your Before and After Progress
When tracking your progress, look for structural changes rather than just surface-level brightness. You'll likely see a reduction in the depth of boxcar or rolling acne scars as new collagen fills the depressions. Large pores often take on a "blurred" look because the surrounding skin is firmer and more supportive. You'll also notice improved light reflection on the skin surface, which is the hallmark of the "microneedling glow."
Setting Realistic Expectations for Texture
While you might see a "refresh" after a single session, a true transformation usually requires a series of three to six treatments. Most providers recommend this series to allow collagen to build in layers for lasting change. Factors like your age, lifestyle, and consistent aftercare play a huge role in your final results. Since cell turnover naturally slows as we get older, younger skin may see changes faster than mature skin.
Safety is just as important as the results themselves. Always refer to FDA guidance on microneedling devices to understand the best practices for needle-based treatments. If you're ready to start your journey, you can explore our microneedling collection for professional-grade tools designed to deliver consistent, beautiful results at home or in the clinic.
The Secret to Better Texture: PDRN and Salmon DNA Serums
While the needles create the physical change, the serums you use determine the quality of the new tissue your body produces. Microneedling acts as the ultimate delivery system, creating thousands of micro-channels that bypass the skin's protective barrier. This allows high-performance active ingredients to reach the deeper layers of the dermis where they can actually influence cell behavior. The difference in your microneedling for textured skin before and after photos often comes down to the bio-stimulants applied during this window of opportunity.
One of the most significant breakthroughs in skin regeneration is PDRN, or Polydeoxyribonucleotide, commonly known as Salmon DNA. Search interest for PDRN skincare grew by more than 1,400% between 2024 and 2025 because it goes beyond simple hydration. These molecules signal your cells to speed up repair and produce more collagen and elastin. By providing these raw materials exactly when the skin is in "repair mode," you can achieve a much smoother, more resilient finish than needling alone could provide.
Purity is essential during this process because your skin is vulnerable. You must avoid "filler" ingredients like heavy fragrances, silicones, or parabens that could cause irritation when delivered deep into the skin. Instead, focus on peptides and growth factors that mimic the body's natural signaling system. Understanding these microneedling benefits and results helps you choose products that support, rather than hinder, your skin's transformation.
Spotlight on SD Control Salmon DNA
For those targeting stubborn texture, the SD Control Salmon DNA Ampoule is a professional favorite. Salmon DNA is remarkably similar to human DNA, which allows it to integrate seamlessly and accelerate tissue repair. This ampoule provides a refreshing and vitalizing effect, specifically helping to brighten dull areas and refine the "crinkled" look of dehydrated, textured skin. It's an essential tool for anyone looking to maximize their results with a professional-grade regenerative serum.
Hyaluronic Acid: The Foundation of Hydration
Hydration is the first step to any successful "after" photo. Using a low-molecular-weight Hyaluronic Acid (HA) during your treatment helps plump the skin from within, making it easier for the needles to glide and create precise channels. Post-needling, HA is vital for preventing transepidermal water loss (TEWL). When your skin stays hydrated, it can focus its energy on remodeling collagen rather than struggling to maintain its basic moisture levels. This foundation of moisture ensures your skin looks bouncy and smooth as it moves through the rebuilding phase.
Post-Treatment Care: Soothing the 'After' with Jelly Masks
What you do in the first 24 hours after your treatment is just as important as the needling itself. During this "Golden Window," your micro-channels are still open, making your skin incredibly receptive but also vulnerable to bacteria and irritation. To protect your microneedling for textured skin before and after results, you must avoid the "three S's": sun, sweat, and slap (makeup). Keeping the skin clean and free of heavy products allows the natural inflammatory response to work without interference.
While some redness is a sign that your skin is busy building collagen, excessive heat can lead to discomfort or unwanted pigmentation. This is why professional estheticians prioritize cooling the skin immediately after a session. By lowering the skin's temperature, you reduce the "sunburn" sensation and help the skin transition more quickly into the repair phase. Proper aftercare ensures that your downtime is measured in hours, not days.
Why Professional Jelly Masks are a Must-Have
Jelly masks are the secret weapon for anyone serious about skin texture. When applied, they create a vacuum-seal effect over the face, which helps with occlusion. This physical barrier forces the regenerative serums you applied during the treatment, like Salmon DNA or Hyaluronic Acid, deeper into the open channels. It's a way to ensure every drop of active ingredient is absorbed rather than evaporating off the surface.
Beyond nutrient delivery, these masks provide an instant cooling sensation that soothes the skin on contact. They help to significantly reduce post-treatment redness and swelling, making them the perfect finishing touch for a professional-grade session. You can browse our professional Jelly Masks to find the perfect match for your skin's post-needling needs.
Daily Aftercare Checklist for Smooth Skin
Your routine for the next few days should focus on simplicity and protection. Use a very gentle, non-foaming cleanser and lukewarm water to keep the area clean without stripping away essential moisture. You should avoid harsh actives like Retinol, Vitamin C, or chemical exfoliants for at least 72 hours to prevent over-stimulating the delicate new tissue.
The most important rule is non-negotiable: you must wear SPF every single day. New collagen is highly sensitive to UV damage, and skipping sunscreen can lead to hyperpigmentation that ruins your smooth results. If you notice any light peeling or flakiness around day three, don't pick at it. Let the skin shed naturally to reveal the refined, glowing surface underneath.
Choosing the Right Microneedling Device for Your Skin
Choosing the right tool is the bridge between a simple facial and the dramatic microneedling for textured skin before and after results you see in professional portfolios. Dr. Pen devices have become the gold standard for both licensed estheticians and advanced enthusiasts because they offer the precision needed to address specific depths. Whether you're refining pores or working on deep scars, the hardware you choose determines your safety and success.
Adjustable needle depths are your most powerful setting. A shallow depth of 0.25mm is perfect for increasing product absorption and refining the skin's surface "glow." To address more structural issues like atrophic acne scars, you'll typically need to work at depths of 1.0mm or more to reach the dermis and trigger significant collagen remodeling. Always use sterile, single-use cartridges to ensure every pass is clean and sharp, protecting your skin's integrity.
When picking a model, consider your workflow. Corded models provide consistent, high-speed power without the worry of a battery fading mid-session. Cordless models offer the freedom to move around a treatment area without a cable getting in the way. Both options deliver professional results, so it often comes down to your personal preference and the environment you work in.
Comparing Top Dr. Pen Models for Texture
The Dr. Pen A6S and M8 are two of the most popular choices for addressing uneven skin. The A6S features a dual-power design and a specialized motor that minimizes vibration, which is crucial for precision work on delicate areas. The M8 uses an even thinner needle gauge than older models, which helps minimize discomfort while still creating effective micro-channels for regeneration. You can shop the Dr. Pen Collection to find an authentic device that fits your specific skin goals.
Needle Cartridges: 16-pin vs. 36-pin
The number of needles in your cartridge changes how the device interacts with your skin. A 16-pin cartridge is often the top choice for targeting deep acne scars because it provides better penetration with less resistance than high-pin-count cartridges. If your goal is pore refining or general smoothing, a 36-pin cartridge or even a 'Nano' needle can be excellent for sensitive areas and product infusion. Cartridges with 12 to 16 pins are often preferred for targeted texture work because they create more focused micro-channels that effectively break up stubborn scar tissue. You can find the right fit for your device by browsing our needle cartridges collection.
Start Your Journey to Smoother, Refined Skin
You now understand how microneedling works from the inside out to rebuild your skin's foundation. By choosing the right Dr. Pen device and pairing it with regenerative Salmon DNA serums, you can significantly enhance your results. Remember that consistency and proper aftercare with cooling jelly masks are the keys to a successful transformation.
Achieving impressive microneedling for textured skin before and after results is about more than just the treatment; it's about using the right professional-grade tools. We ship all our inventory directly from Miami and Los Angeles to ensure you get started on your routine without delay. You've got the knowledge and the equipment to help your skin thrive.
Your path to a clear, nourished, glowing complexion is just a few sessions away. We're excited to see you reclaim your confidence with a smoother, more radiant look. Stay consistent, protect your skin, and enjoy the glow.
Frequently Asked Questions
How many microneedling sessions do I need for textured skin?
What needle depth is best for smoothing out large pores?
For smoothing out large pores, a needle depth between 0.25mm and 0.5mm is usually the most effective range. Since pores are located in the upper layers of your skin, you don't need to go deep to see a difference. At these shallow depths, the treatment focuses on thickening the epidermis and tightening the pore walls from the inside out. This creates a "blurred" effect that makes your complexion look more uniform without unnecessary downtime or discomfort.
Can microneedling make skin texture worse before it gets better?
It is common for your skin to feel a bit rough or dry in the first few days after a session. You might experience a "sandpaper" texture or light flaking as your skin sheds old cells and prepares for renewal. This doesn't mean your texture is permanently worse; it's just a sign that your skin is in active repair mode. Once the initial peeling finishes around day five, you'll start to see a fresher, smoother surface emerging.
How long after microneedling will I see an improvement in acne scars?
You will likely start to see an improvement in the appearance of acne scars about 4 to 6 weeks after your first treatment. This is the time it takes for new collagen fibers to form and reach the surface. However, the most significant microneedling for textured skin before and after transformation happens around the three-month mark. Collagen remodeling is a slow process, so your skin will continue to look better and smoother as the months go by.
Is it safe to do microneedling at home for deep texture issues?
It is safe for advanced enthusiasts to use devices like a Dr. Pen at home, provided you prioritize sterilization and safety. Experts recommend keeping your needle depth at 0.5mm or less for unsupervised use to avoid injury or hyperpigmentation. For deep texture issues like pitted scars, professional guidance is often best to ensure you reach the correct depth safely. Always use a new, sterile cartridge for every session and follow a strict sanitization routine to protect your skin.
What should I put on my skin immediately after microneedling for texture?
Immediately after your session, you should only apply pure, hydrating ingredients like Hyaluronic Acid or PDRN (Salmon DNA) serums. These ingredients help to soothe inflammation and provide the raw materials your skin needs for regeneration. Avoid any products with fragrances, alcohols, or harsh acids, as your micro-channels are still open and highly sensitive. Finishing with a professional cooling jelly mask is also an excellent way to lock in moisture and reduce post-treatment redness.
Does microneedling hurt when targeting deep skin texture?
Most people describe the sensation as a light, vibrating scratch rather than intense pain. When targeting deep skin texture, you may need a slightly deeper needle setting, which can feel more noticeable. Using a topical numbing cream 20 minutes before you start can significantly minimize any discomfort. Modern devices, such as the Dr. Pen M8, also use ultra-thin needle gauges to make the process feel much smoother and more comfortable compared to older tools.
Can I use Vitamin C or Retinol after microneedling for better results?
You must wait at least 72 hours before reintroducing active ingredients like Vitamin C or Retinol into your routine. While these are great for long-term results, they are far too aggressive for skin that has just been needled. Your micro-channels make these ingredients penetrate much deeper than usual, which can lead to severe irritation or even chemical burns. Stick to gentle, nourishing serums and plenty of SPF until your skin's protective barrier has fully closed.
At-Home Microneedling for Darker Skin: Acne Scars and Pigmentation
Microneedling PIH Risk Management: Downtime and Prevention
Related Posts

Consistent Microneedling and the Long-Term Changes to Expect

Aftercare choices to lower infection risk at home after microneedling

How to Create a Relaxing At-Home Spa Day With Simple Rituals

Sunscreen Recommendations After Microneedling: How to Protect Healing Skin

Investing in my skin for the future: what deserves my budget

Post-microneedling skincare routine for masks, makeup, and recovery

Skin Peeling After Microneedling: What to Avoid and When to Resume Makeup
