

How to Apply Numbing Cream Before Microneedling
For microneedling, choose a topical anesthetic such as a 4-5% lidocaine formula and follow its label for application instructions. To learn how to apply numbing cream before microneedling, cover only the intended area, then remove the cream and cleanse your skin before needling.
Key Takeaways
- Choose a topical anesthetic by checking its active ingredients and strength, then follow the product directions for timing and use.
- Apply cream evenly over the intended area without rubbing it in, and remove it fully before microneedling.
- Plan coverage around the exact treatment zone, taking extra care with sensitive areas such as the lips and the delicate skin nearby.
- Prepare your skin and supplies before applying cream so you can keep the process organized and avoid spreading product beyond the area being treated.
- For a post-session skincare pairing, explore Bruun Beauty’s Advanced Microneedling Serum SD - Control Salmon DNA Ampoule Serum.
How Long Does the Numbing Effect Last?
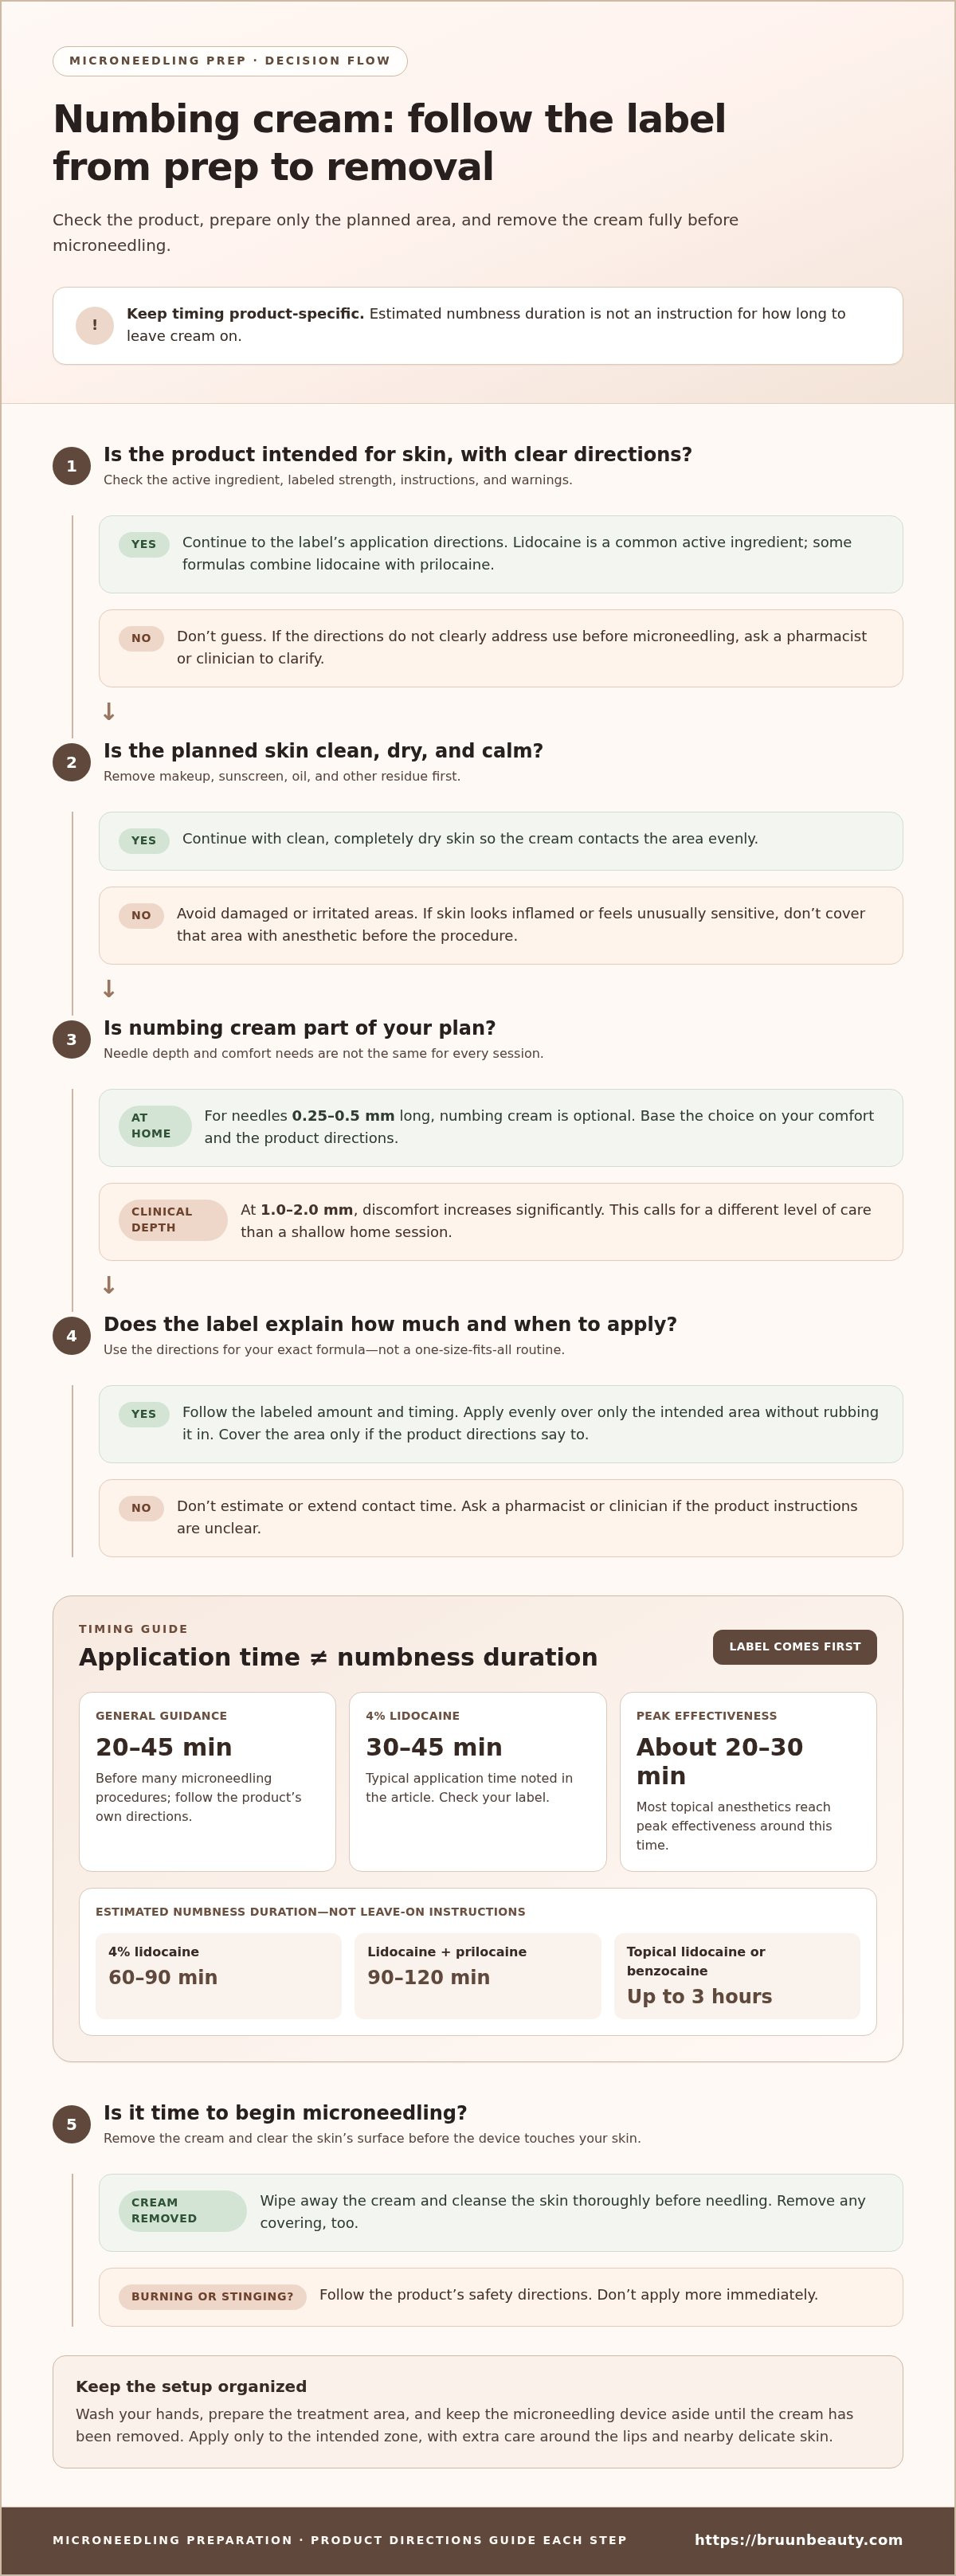
- A clear plan for how to apply numbing cream before microneedling starts with its active ingredient and labeled strength. A 4-5% lidocaine concentration is a common choice. A 4% lidocaine formula may provide numbness for 60-90 minutes, while lidocaine plus prilocaine may last 90-120 minutes. Topical lidocaine or benzocaine may last up to three hours. These are duration estimates, not instructions for how long to leave cream on.
- Topical anesthetics create a superficial loss of sensation where applied. They reversibly block nerve conduction in nerve cells within the dermis, which reduces pain signals. You may still feel pressure from the device, even when the area feels numb. Comfort can therefore change during a session as the device moves across different areas.
- Numbing cream changes sensation, not the microneedling process itself. Microneedling’s tiny punctures stimulate collagen production, and this still occurs when cream is used. Lidocaine and mepivacaine may inhibit skin-repair processes in human skin fibroblasts, so follow the product directions instead of extending contact time or applying extra cream.
- Choose topical anesthetic intended for skin and review its ingredients, strength, directions, and warnings. A pharmacy or clinician can help you understand a product’s label. The microneedling collection offers context for planning the equipment and supplies used in your routine.
- Plan around the specific formula, not the longest duration you have seen listed. Numbness may wear off during a session, so don’t assume one application will cover the entire procedure. Remove the cream as directed before needling. If you notice burning, stinging, or another reaction, follow the product’s safety directions and don’t apply more immediately.
Consider comfort and treatment goals separately when deciding whether numbing cream fits your plan. A physician notes that microneedling’s tiny punctures stimulate collagen production, and this still occurs when numbing cream is used. The cream changes how the skin feels rather than replacing the procedure’s intended action. Before a session, review the product directions and warnings, and ask a pharmacist or clinician to clarify anything you do not understand. Follow the labeled application instructions rather than adjusting them because you are worried about discomfort.
When planning, consider how long your session may take and whether fading numbness could affect your comfort. Don’t treat an estimated duration as a promise that sensation will remain absent. Discuss comfort concerns with the person guiding your microneedling routine, and follow the directions for the specific product. If its instructions do not clearly address use before microneedling, seek clarification before applying it. Realistic expectations can help you notice changes in sensation and pause for guidance rather than adding cream or extending application time. Keep the procedure and your choice of pain management distinct, and follow the product-specific directions throughout preparation.
What Ingredients Should Your Numbing Cream Have?
- Choose a topical anesthetic by checking its active ingredients and labeled strength. Lidocaine is a common ingredient, while some formulas combine lidocaine with prilocaine. A 4% lidocaine product typically requires 30-45 minutes of application time; most topical anesthetics reach peak effectiveness in about 20 to 30 minutes. Follow the specific label because ingredients and timing vary by formula.
Ingredients matter beyond comfort. Lidocaine and mepivacaine may inhibit skin-repair processes in human skin fibroblasts. This is a reason to use only the amount and contact time directed, not to apply extra cream or leave it on longer.
- Prepare clean, completely dry skin before applying cream. Remove makeup, sunscreen, oil, and other residue so the cream contacts the skin evenly. Avoid applying it to damaged or irritated areas. If your skin feels unusually sensitive or looks inflamed, don’t cover that area with anesthetic before the procedure.
In a clinic, a dermatologist may apply numbing cream to the planned treatment area, then wipe it off and cleanse the skin before microneedling. This final cleanse removes residue before the device touches your skin.
- Set the application time according to the formula, not a one-size-fits-all routine. General guidance places application around 20-45 minutes before many microneedling procedures, while 4% lidocaine may call for 30-45 minutes. Some healthcare providers may give instructions for applying cream several hours beforehand. Use the product label or the clinician’s directions for your exact product.
A plastic wrap cover may help prevent cream from drying out or being wiped away. Follow the product’s directions for covering the area, and remove both the wrap and cream before microneedling.
- Understand the risks before applying lidocaine. Topical anesthetics can cause burning or stinging, a localized allergic reaction, or, rarely, widespread anaphylaxis. Excessive use can cause systemic toxicity, with possible signs such as agitation, elevated blood pressure, heart rhythm disturbances, or muscle twitching. Anesthetic products can also affect skin capillaries and change the likelihood of bleeding.
After application, wipe away the cream and cleanse the skin thoroughly before needling. This removal step clears residue from the skin’s surface.
- For at-home microneedling with needles 0.25-0.5 mm long, numbing cream is optional. Choose based on your comfort and the product directions, and don’t assume cream makes every sensation disappear. Discomfort increases significantly at clinical depths of 1.0-2.0 mm, which calls for a different level of care than a shallow home session.
Plan the device and topical steps together. The microneedling supplies collection can help you explore equipment and related supplies for your routine.
Applying a thick, even layer without rubbing it in
- Start with the amount and timing on the cream’s label. Wash your hands, prepare the treatment area, and keep the microneedling device off the counter until the cream is removed. A clean setup helps prevent cream from transferring to equipment or nearby skin.
Use the package directions rather than estimating an amount based on another product. Formulas contain different ingredients and strengths, so the appropriate amount can vary.
- Spread a generous, even layer across the area you plan to needle. Work in small sections, such as one cheek at a time, so you can check that the cream covers the skin evenly. The layer should be continuous, without bare spots or thick clumps.
Don’t massage the cream into your skin. Place and spread it lightly over the surface instead. Rubbing can move the product beyond the intended area and make coverage uneven.
- Use clean fingers or an applicator to spread the cream across the planned area. For example, on a cheek, work methodically across the treatment zone and check the edges before moving to the next section. Keep the cream away from areas you won’t needle.
Follow the label’s directions for covering the application area. If the product instructions allow a cover, use it only as directed and keep the cream away from your eyes and mouth.
- Leave the layer undisturbed for the time specified on the product label. Set a timer so you don’t lose track while preparing your device or treatment space. Don’t add more cream simply because you still feel something. Extra product can increase exposure without ensuring better coverage.
At the end of the stated time, remove all the cream before microneedling. Follow the product’s removal and cleansing directions, then check that no visible residue remains.
- Check your skin as you apply and remove the cream. Looking over each section can reveal missed spots, spreading, or redness. If you notice irritation or a reaction, stop and follow the product’s safety directions rather than continuing with the device.
Once the cream is gone, keep your hands and the application area clean. Then prepare the device according to its instructions, avoiding any transfer of cream or residue from your skin to the equipment.
Coverage areas for the face, neck, chest, and lips
- Mark the exact treatment zone before applying cream. For a cheek session, cover only the skin intended for the device, not the entire face by default. A larger area may require more product, so don’t increase the amount by guesswork. Follow the product directions and stay within their stated limits.
Consider FDA and medical guidance alongside the cream’s specific directions. Excessive topical anesthetic use can cause systemic toxicity, so a large treatment area is not a reason to apply extra product. The amount, strength, application time, and condition of the skin all matter.
- For the forehead, cheeks, and chin, work in separate sections and keep the edges clear. Apply cream only where the microneedling device will pass, rather than coating areas around the eyes or nostrils. This makes coverage easier to track and the cream easier to remove thoroughly before needling.
Use the same approach on the neck, where the planned zone may be long or irregular. Divide it into manageable areas, and don’t spread the cream beyond the treatment boundary. Follow the label for the total amount and application time.
- Plan chest coverage carefully, since a chest session may involve more skin than a small facial zone. Don’t assume you can repeat the amount used for one cheek across the chest. Follow the product’s directions for the area and don’t add excess cream to cover a larger zone.
Before starting, make sure you can remove the product from every covered section. Thorough removal matters before the needles touch your skin, especially when cream covers a broad area.
- Take extra care around the lips. Keep cream on external skin only where the product directions permit it, and keep it away from your mouth and other areas not intended for application. Even a small treatment zone needs precise placement, so don’t spread cream beyond the planned border.
If you’re unsure where the treatment boundary is, define it before applying anything. This simple step helps prevent accidental coverage of nearby skin.
- After the labeled application time, remove all cream from each area before using the device. Check the face, neck, chest, and lip borders separately for residue. Cleanse the skin thoroughly and make sure no excess product remains where the needles will pass.
Don’t microneedle over cream. A clean, clear treatment zone helps you follow the device’s directions without transferring topical anesthetic into the procedure area.
Preparing and applying numbing cream
- Read the product label before opening the container. Check the active ingredients, concentration, amount, application time, and removal directions. A 5% lidocaine patch is prescription-strength, but that strength doesn’t make it a guide for applying cream. Choose the instructions for your exact product, not a different format or formula.
Set out a timer, clean applicator, and cleansing supplies before you begin. Having these items ready helps you follow each step without searching for them while the cream is on your skin.
- Test a small amount on a discreet skin area and monitor it for 24 hours before full application. This step can help you notice a localized allergic reaction before using the product across a larger zone. Follow the package directions for the test, and don’t proceed if irritation or an unexpected reaction appears.
Check the ingredient panel each time you use a product. Different formulas may contain different active ingredients, even when both packages say “numbing cream.”
- Use the product’s application time, not a guess. Guidance for many microneedling sessions places cream application 20-45 minutes beforehand; 4% lidocaine may call for 30-45 minutes. Topical anesthetics can take 30-60 minutes to reach maximal effect, so directions for the specific formula should guide your timing.
Start your timer as soon as you finish applying the cream. Don’t extend contact time to increase numbness or because you still feel pressure.
- Follow the label’s directions about covering the cream. Plastic wrap may help keep it from drying out or being wiped away, but use a cover only if the product directions permit it. Keep the cream within the intended area, and don’t add extra product under the cover.
Remove the cover and cream at the directed time. Cleanse the area thoroughly before using a microneedling device so no residue remains on the skin.
- Pay attention to your skin during application. Topical anesthetics can cause burning or stinging, and allergic reactions can occur. Stop if you notice a reaction and follow the product’s safety directions. Excessive use can cause systemic toxicity, so use only the labeled amount and contact time.
Some reports suggest numbing cream may increase swelling after microneedling, but the evidence is not strong. Cream can also affect skin capillaries and may change bleeding, so careful use according to the label matters.
Bruun Beauty: Advanced Microneedling Serum SD - Control Salmon DNA Ampoule Serum
Advanced Microneedling Serum SD - Control Salmon DNA Ampoule Serum is one option to consider when planning your microneedling skincare routine. Choose products according to their directions and the stage of your routine. Don’t apply a serum through freshly needled skin unless its instructions say it is suitable for that use.
Bruun Beauty also offers Jelly Mask Kits and BB Glow Treatment Supplies for different skincare and beauty routines. Keep numbing cream steps separate from product selection: follow the anesthetic label, remove the cream thoroughly, and use only skincare products suitable for your procedure.
Visit bruunbeauty.com to explore the available microneedling skincare options or contact Bruun Beauty with questions about its products.
Make Your Next Session More Intentional
Knowing how to apply numbing cream before microneedling can help you build a calm, consistent preparation routine. Before your next session, note which product you used, how long you applied it, and how your skin responded. These notes can help you repeat a careful process and recognize a reaction early.
Keep your skincare choices aligned with your routine. Bruun Beauty offers professional microneedling devices and Advanced Microneedling Serum SD - Control Salmon DNA Ampoule Serum for your microneedling setup and aftercare. Follow each product’s directions, and keep numbing cream separate from products intended for other stages of your routine.
Thoughtful preparation can help you approach each session with more confidence. Keep the steps simple, pay attention to your skin, and build a routine that feels manageable.
Frequently Asked Questions
Does Microneedling Hurt?
Microneedling can feel uncomfortable, and sensation varies between people and treatment areas. Before starting, agree on a simple signal to use if you need a pause. This gives you a practical way to communicate during the session, before discomfort becomes distracting. The practitioner can then respond to your feedback and adjust the approach.
How Will You Feel During Microneedling?
You may notice pressure, prickling, or a scratch-like sensation as the device moves. Sensations can change as treatment moves from one area to another, so keep communicating throughout the session. Tell the practitioner promptly if you feel burning or sharp discomfort. Clear feedback helps distinguish expected pressure from a sensation that calls for stopping and reassessing.
Is Topical Numbing Cream Essential When Microneedling?
No, numbing cream isn’t essential for every person or session. Your comfort, the size of the area, and the planned procedure all affect whether you choose it. If you prefer to avoid anesthetic, discuss that before the session and agree on how you’ll communicate discomfort. Numbing cream is a comfort measure, not a requirement for microneedling.
Is Numbing Cream Recommended Before Microneedling?
Numbing cream may be recommended when comfort is a priority, but the choice depends on the session and your preferences. Consider the area being treated and how you typically respond to skincare procedures. Discuss your plan in advance, especially if you’ve previously reacted to a topical product. This conversation can help you make an informed choice.
What Type and Strength of Topical Numbing Cream Is Used for Microneedling?
Choose a product labeled for topical skin use and review its active ingredients, format, and directions. Don’t assume a patch, gel, and cream are interchangeable; their instructions can differ. If the label is unclear about the intended use, ask a pharmacist or healthcare professional to explain it before applying the product.
How Long Before Microneedling Should Numbing Cream Be Applied?
Follow the timing printed on the exact product you have, since application instructions vary by formula. Build your preparation schedule around those directions, leaving time to remove the product and cleanse the area before needling. Don’t rely on a routine you used with another brand. Different ingredients or formats may have different application instructions.
How Much Numbing Cream Should Be Applied, and How Thick Should the Layer Be?
Follow the package directions for the amount and area rather than estimating from someone else’s routine. Spread the product evenly over the intended zone, and don’t add extra to compensate for uneven coverage. The permitted amount depends on the product directions and the size of the area. Keep it away from skin not included in the procedure.
Can You Apply Numbing Cream Yourself or Should a Licensed Provider Do It?
You can apply the cream yourself only if the product directions permit self-application and you can follow them precisely. In a clinic, the practitioner may handle application and removal as part of session preparation. Either way, tell the person performing microneedling which product you used and when you applied it. Also share any previous skin reaction.
Salmon DNA Serum Benefits: The Ultimate Guide to PDRN for Glowing Skin
Salmon DNA Serum Benefits: The Ultimate Guide to PDRN for Glowing Skin
Related Posts

Consistent Microneedling and the Long-Term Changes to Expect

Aftercare choices to lower infection risk at home after microneedling

How to Create a Relaxing At-Home Spa Day With Simple Rituals

Sunscreen Recommendations After Microneedling: How to Protect Healing Skin

Investing in my skin for the future: what deserves my budget

Post-microneedling skincare routine for masks, makeup, and recovery

Skin Peeling After Microneedling: What to Avoid and When to Resume Makeup
