
How to Use Dr. Pen at Home: A Safe Step-by-Step Guide
Learning how to use a dr pen at home is a technical skill that rewards precision, professional-grade tools, and K-beauty-inspired serum pairings over aggressive needle depth. While these devices are popular for cosmetic use, achieving a professional-level glow safely requires a strict, esthetician-approved protocol to protect your skin barrier. Using the correct technique ensures you get the results you want without the risk of irritation.
You're likely excited about the prospect of smoother skin but feel hesitant about potential scarring or using the wrong settings on delicate areas. It's common to feel overwhelmed by needle depths and serum choices; after all, your skin's health is the top priority. This guide provides the technical confidence you need to master your device safely and effectively for professional-grade results.
We will cover everything from sanitizing your Dr. Pen M8 or A1 to selecting the right Salmon DNA or peptide serums for your session. You will learn the exact steps to improve your skin's texture and glow while following a clear post-care routine that minimizes downtime. It is time to turn your bathroom into a professional-grade skincare suite with a routine that is both safe and effective.
Key Takeaways
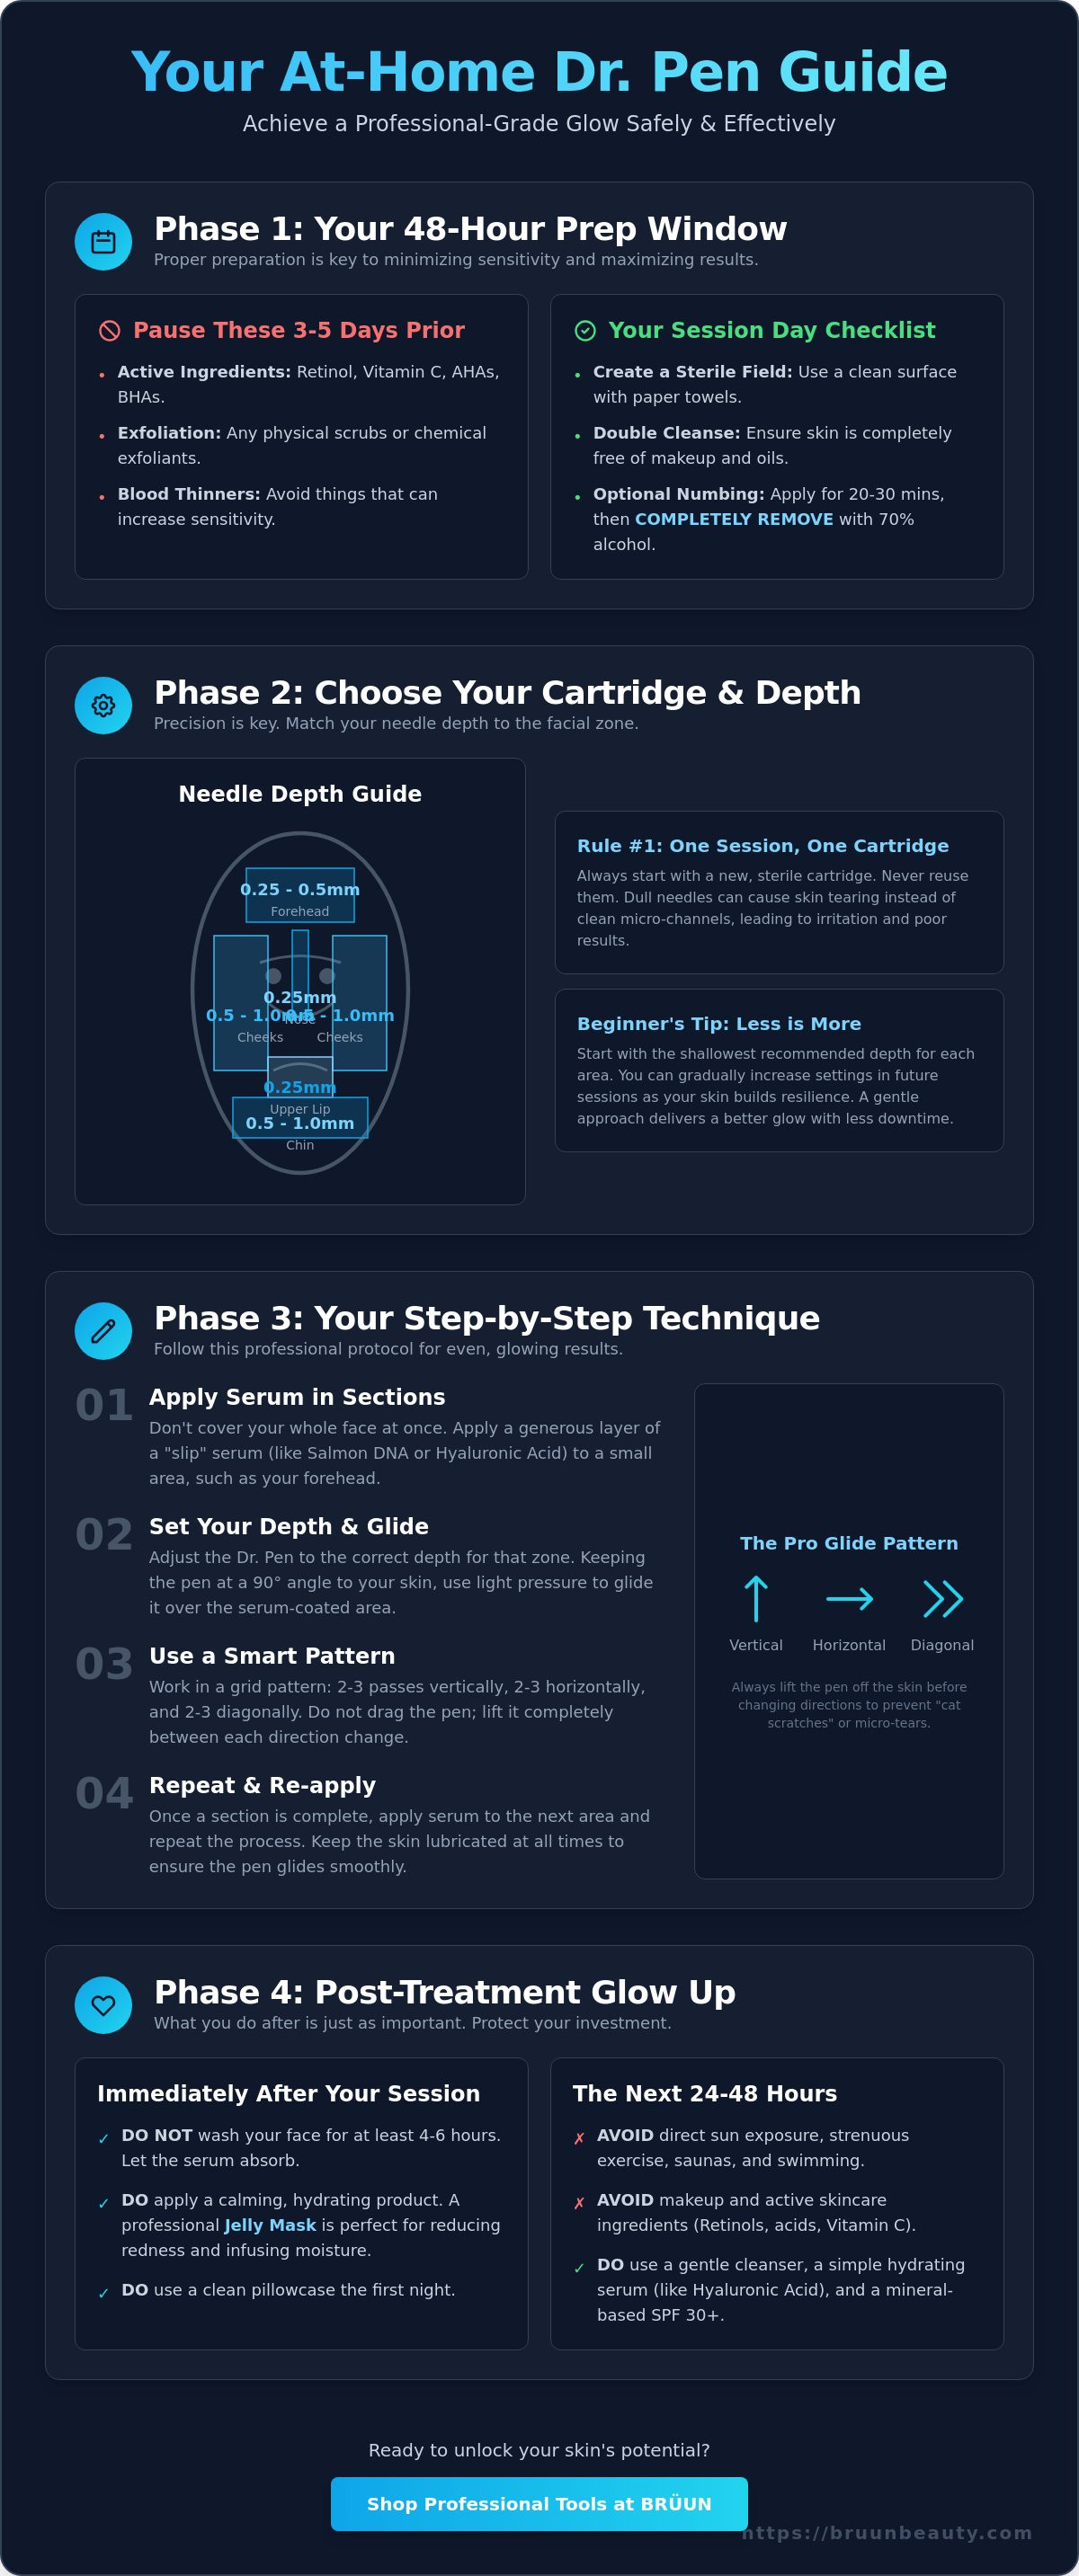
- Learn the essential 48-hour preparation window and sanitization protocols to keep your skin safe and minimize sensitivity.
- Master the technical steps of how to use a dr pen at home, focusing on the 90-degree vertical entry method and using slip serums in sections.
- Identify the best cartridge for your goals and why starting with a "less is more" approach to needle depth yields superior results for beginners.
- Unlock professional-grade radiance by pairing your device with Salmon DNA (PDRN) and cooling jelly masks to nourish your skin barrier.
- Follow a clear post-treatment routine that includes strict 24-hour safety rules and proper device maintenance to ensure long-lasting success.
Preparing for Your Session: The At-Home Microneedling Checklist
A Dr. Pen is a professional-grade microneedling device designed to create controlled micro-channels in the skin. This process, often called collagen induction therapy, encourages your skin to refresh itself naturally for a smoother, more radiant look. Learning how to use a dr pen at home starts long before you turn the device on. Your results depend on a clean environment and a well-prepared skin barrier.
A 48-hour preparation window is essential for minimizing sensitivity and inflammation. During this time, you should focus on intense hydration and avoid anything that might irritate your skin or thin your blood. Set up a "sterile field" on a clean, hard surface like a bathroom counter. You'll need surgical gloves, 70% isopropyl alcohol, and a fresh, sterile Dr. Pen cartridge. Laying everything out on a clean paper towel prevents cross-contamination during your session. This organized approach keeps you focused on your technique rather than fumbling for supplies mid-treatment.
The Pre-Treatment Skin Cleanse
Your skin must be completely free of oils, makeup, and environmental debris. Start with a double cleanse using a gentle, pH-balanced cleanser. The first wash removes surface grime; the second ensures your pores are truly clear. This step is vital because you don't want to push surface bacteria into those micro-channels. It's a simple step that makes a massive difference in your safety.
Avoid using active ingredients like retinol, vitamin C, or AHAs for at least 3 to 5 days before your session. These products can make your skin too reactive and increase the risk of post-treatment redness. Once your skin is dry, use a light alcohol swipe to finish the job. This ensures a totally prep-ready surface for your serums to penetrate effectively without any interference.
Numbing Strategy for a Comfortable Experience
If you're concerned about discomfort, a topical numbing cream can make your experience much more pleasant. Apply a thin, even layer to the target area and let it sit for 20 to 30 minutes. This allows the cream to dull the nerve endings for optimal comfort. Most users find that this makes the process feel like a light vibration rather than a series of pinpricks.
The most critical step, however, is removing every trace of that cream before you begin. Use a clean gauze pad and a bit of alcohol to wipe the skin until it's squeaky clean. Residual cream can interfere with serum absorption or cause deep-seated irritation once the needles begin their work. Clean skin ensures your high-performance serums can do their job without any barriers in the way, leading to that clear, nourished, glowing skin we all want.
Choosing Your Cartridge and Setting the Perfect Needle Depth
Precision is the secret to a professional-grade glow. When you are figuring out how to use a dr pen at home, the dial on your device becomes your most important tool. This adjustable collar allows you to control exactly how deep the needles penetrate, ensuring you stay within safe limits for each part of your face. Accuracy here is what separates a successful session from one that causes unnecessary irritation.
While professionals use FDA-cleared microneedling devices in a clinical environment, the same principles of hygiene apply to your home routine. A non-negotiable safety rule is to never reuse a cartridge. Even if it is only on your own skin, needles dull instantly and can cause jagged micro-tears. Always start your session with a fresh, sterile tip from a trusted Dr. Pen cartridge pack to keep your skin healthy and vibrant.
Starting with a shallower depth often yields better results for beginners. Your skin needs time to build resilience, and jumping to deeper settings too quickly can lead to prolonged redness without additional benefits. Think of it as training for a marathon; you wouldn't start with a 20-mile run on day one. By being patient and keeping your settings conservative, you allow your skin barrier to remain strong while still seeing visible improvements in texture.
Needle Depth Guide by Facial Zone
Different areas of your face have varying skin thicknesses, so a "one size fits all" depth setting won't work. For the forehead and nose, where the skin is thin and sits directly over bone, keep your setting between 0.25mm and 0.5mm. This prevents unnecessary discomfort and protects the delicate tissue in these high-sensitivity zones.
Your cheeks and jawline have more "cushion," allowing you to safely adjust the depth to 0.5mm or 1.0mm. This range is excellent for improving the appearance of skin texture and enlarged pores. However, the neck and decolletage are notoriously sensitive. Always stick to a cautious 0.25mm to 0.5mm here to avoid lingering inflammation or sensitivity.
Cartridge Selection: 12-Pin vs. 36-Pin
Choosing the right cartridge is just as important as the depth. The 12-pin cartridge is ideal for targeted texture issues and addressing more specific skin concerns with precision. If you want a general brightening effect or want to manage the look of fine lines, the 36-pin is the "gold standard" for most at-home enthusiasts. It provides a more even distribution for overall skin rejuvenation.
If you are looking for a zero-downtime option, nano-needling is a fantastic alternative. These cartridges don't use traditional needles; instead, they create tiny pathways to maximize serum infusion. It is a great way to get started if you are nervous about traditional microneedling. To find the right fit for your specific skin goals, you can explore our full range of microneedling supplies to safely elevate your routine.
Step-by-Step: How to Use Your Dr. Pen for Professional Results
Once your skin is prepped, it's time to begin the actual session. Knowing how to use a dr pen at home requires a steady hand and a methodical approach. Start by applying your slip serum in small sections. If you apply it to your entire face at once, it'll dry out before you reach every area. This section-by-section method ensures the pen glides smoothly without pulling on your skin, which is essential for a comfortable experience.
Hold your device at a 90-degree angle to your skin. This ensures vertical needle entry, which is the most effective way to create micro-channels. Use the gliding technique by moving the pen in horizontal, vertical, and finally diagonal passes. For bony areas like the bridge of the nose or stubborn spots, switch to the stamping technique. This involves lifting and placing the pen rather than sliding it. Always keep the device moving to avoid track mark patterns or over-treating one spot.
Following a structured pattern ensures you don't miss any areas while maintaining a uniform finish. Professional results come from consistency and patience rather than speed. By taking your time and focusing on your form, you'll see a visible improvement in your skin's texture and glow. You can find high-quality microneedling tools to help you maintain this professional standard at home.
Mastering the Motion and Speed
A medium speed setting is usually the best choice for at-home gliding. It provides enough power to penetrate the skin without being so fast that it becomes difficult to control. Apply feather-light pressure; you should let the device do the work rather than pressing it into your skin. Limit your passes to 2-3 per area. Over-treating can lead to unnecessary trauma, which goes against the Benefits, Risks and Safety guidelines provided by health experts.
Handling Sensitive Areas Safely
When working near the eyes, stay on the orbital bone. Never get too close to the lash line or the soft tissue of the lids. For the cheeks and jawline, you can use your free hand to stretch the skin slightly. This creates a flatter, firmer surface for a smoother glide. You might see pinpoint bleeding in some areas. This is a normal part of the process, though it isn't required for great results. If it happens, simply wipe it away with a clean gauze pad and continue your session with confidence.
The Esthetician’s Secret: Pairing Your Treatment with PDRN and Jelly Masks
Microneedling is the ultimate delivery system for high-performance ingredients. The micro-channels created by your device act like tiny tunnels, allowing professional-grade serums to bypass the tough outer layer of the skin. Mastering how to use a dr pen at home is only half the battle; what you put on your skin during this "vulnerable window" determines your final glow. The first 60 minutes after your session is the most critical time for ingredient penetration.
Peptides and growth factors are essential during this time. They support the skin's natural rejuvenation process by providing the necessary signals for a refreshed, youthful appearance. Using professional-grade serums ensures your skin gets exactly what it needs without fillers or harsh preservatives that could cause deep-seated irritation. This targeted approach is why estheticians achieve such consistent results in a clinical setting.
Why Salmon DNA is the Gold Standard for Microneedling
Salmon DNA, also known as PDRN, is a favorite among K-beauty experts for a reason. It is a bio-stimulator that mimics the natural building blocks of your skin, encouraging a nourished and vitalized complexion. When you apply Salmon DNA (PDRN) during and immediately after your session, you are maximizing the delivery system you just created. It is the secret to that glass-skin finish that everyone craves.
You will notice a visible difference in your skin's radiance compared to using basic hyaluronic acid. This professional-grade approach ensures your results look like they came from a high-end clinic. Simply apply the ampoule in small sections as you needle to ensure every micro-channel is filled with these potent nutrients. This technique keeps the skin lubricated and ensures the needles glide without any resistance.
Soothing the "Sunburn" with Jelly Masks
After your session, your skin will likely feel warm, similar to a mild sunburn. This is where a professional jelly mask becomes a mandatory final step. These masks lower the skin's temperature instantly, providing immediate comfort and reducing visible redness. They turn a technical procedure into a relaxing, spa-like ritual in your own home.
The magic of a jelly mask lies in its occlusive seal. By forming a vacuum-like barrier over your face, it forces the serums you just applied deeper into the micro-channels. This barrier prevents evaporation and ensures your skin absorbs every drop of nourishment. When mixing your mask, aim for a consistency that resembles thick cake batter. This ensures it stays in place while it sets into a rubberized texture that is easy to remove in one satisfying piece.
Ready to elevate your results? Shop our curated microneedling serums and devices to start your professional journey today.
Post-Treatment Care and Safety: Ensuring Your Skin Stays Glowing
The final step in mastering how to use a dr pen at home is the most important part of your long-term results. Your skin is now in a state of active renewal, making it more sensitive to environmental factors than usual. For the first 24 hours, you must avoid makeup, intense sweating, and direct sun exposure. There are no exceptions to this rule. Your micro-channels are still closing; introducing bacteria or heavy pigments during this window can lead to unwanted irritation or breakouts.
Sunlight is the primary enemy of fresh skin. Use an SPF 30+ every single day for at least 14 days following your session. Even if you stay indoors, UV rays can penetrate windows and cause hyperpigmentation in your newly sensitized tissue. Patience is your greatest asset here. You must wait 4 to 6 weeks between full-depth treatments. This window allows your skin to complete its natural collagen cycle, ensuring you see the full benefits of your hard work without over-stressing the barrier.
Cleaning your device is just as vital as cleaning your skin. A professional-grade routine requires a sanitized environment from start to finish. By following a disciplined post-care schedule, you protect your investment and ensure your skin remains clear and nourished. It's the difference between a simple DIY project and a true esthetician-level transformation.
The 7-Day Recovery Timeline
- Days 1 to 3: Focus entirely on hydration and a gentle cleanser. Your skin will likely feel dry or have a "sandpaper" texture. This is a normal sign that the renewal process is underway and your skin is shedding old cells.
- Days 4 to 7: This is the "peeling" phase. You must never pick, scratch, or use manual exfoliants like scrubs. Picking at peeling skin can cause lasting marks and interrupt the natural results you've worked so hard to achieve.
- Day 7 and Beyond: Once your skin feels smooth and no longer shows signs of redness, you can reintroduce your favorite actives. Start slowly with Vitamin C for brightening or Retinol for texture, but only if your skin feels resilient.
Device Maintenance and Storage
Remove the single-use cartridge immediately and dispose of it in a sharps container or a sealed plastic bottle. Never leave a used needle attached to the pen. Thoroughly wipe down the entire body of your Dr. Pen with 70% isopropyl alcohol. This ensures no serum or biological material remains on the device, keeping it sterile for your next session.
Store your microneedling kit in a cool, dry place away from direct sunlight. Protecting the motor from humidity ensures your device remains a reliable part of your routine for years to come. A well-maintained pen provides the consistent power needed for those vertical needle entries that deliver the best results. Taking care of your tools is just as important as taking care of your skin.
Unlock Your Professional-Grade Glow Today
Mastering the technical skill of how to use a dr pen at home gives you the power to transform your skin's texture and radiance on your own terms. By prioritizing a sterile environment, selecting the correct needle depth for each facial zone, and pairing your treatment with high-performance Salmon DNA serums, you are setting yourself up for long-term success. Remember that consistency and safety are your best tools for achieving that clear, nourished, glowing skin you deserve.
You don't have to navigate this journey alone. We provide the same professional-grade inventory trusted by licensed estheticians across the country. With thousands of 5-star reviews on our advanced beauty devices and fast US-based shipping from Miami and Los Angeles, your professional-grade routine is just a few clicks away. It's time to take the guesswork out of your skincare and start seeing real results.
Your journey to a more confident, radiant complexion starts with the right tools and the right knowledge. Keep practicing your technique, stay diligent with your post-care, and enjoy the beautiful results that follow.
Frequently Asked Questions
How often can I use a Dr. Pen at home?
You should wait 4 to 6 weeks between sessions to allow your skin to fully rejuvenate. This timeline aligns with your skin's natural turnover cycle plus extra time for structural support. Rushing the process doesn't lead to faster results; instead, it can over-stress your skin barrier and lead to chronic sensitivity. Patience is your best friend when you are learning how to use a dr pen at home for long-term skin health.
Does microneedling with a Dr. Pen hurt?
Most users describe the sensation as a light vibration or slight scratchiness rather than actual pain. If you apply a quality topical numbing cream for 20 to 30 minutes before you begin, the procedure is very comfortable. The needle speed is so fast that the entry is swift and clean. You'll likely feel a warm sensation afterward, similar to a mild sunburn, but the session itself is quite manageable for most people.
Can I use Vitamin C serum during my Dr. Pen session?
No, you shouldn't use high-strength Vitamin C during your microneedling session. Vitamin C is highly acidic and can cause significant irritation when pushed into open micro-channels. It's much safer to stick with Hyaluronic Acid or Salmon DNA (PDRN) during the treatment to support the skin barrier. You can reintroduce your favorite Vitamin C serum once your skin has fully closed, which usually takes about 48 to 72 hours.
How long does the redness last after using a Dr. Pen?
Most "sunburn" redness subsides within 12 to 24 hours after your session. Your skin might look quite flushed immediately after, but this is a normal sign of increased circulation. To speed up the cooling process, follow your treatment with a professional jelly mask. These masks lower the skin's temperature and provide immediate relief. By the next morning, most of the intense redness should have faded to a light pink, healthy-looking glow.
Is it normal for my skin to peel after microneedling?
Yes, light flaking or a sandpaper texture is a very common part of the rejuvenation process. This usually appears 3 to 5 days after your treatment as your skin sheds old cells to make room for a fresher surface. It's vital that you don't pick or manually exfoliate during this phase. Let the skin shed naturally while keeping it deeply hydrated with gentle moisturizers to ensure a smooth transition to clear, nourished skin.
Which Dr. Pen model is best for beginners?
The Dr. Pen M8 and A6S are highly recommended for beginners because of their stability and ease of use. These models feature precise depth adjustment dials and professional-grade motors that prevent needle dragging. Having a reliable device makes it much easier to learn how to use a dr pen at home with confidence. They offer the perfect balance of safety and power for those starting their advanced at-home skincare journey.
Can I use a Dr. Pen on active acne?
You must never needle directly over active or inflamed breakouts. Doing so can spread bacteria across your face and significantly increase inflammation, which can lead to more breakouts. Instead, carefully work around any active spots to keep the rest of your skin safe. Microneedling is excellent for improving the appearance of old marks once the skin is clear, but it should stay far away from any current "active" zones.
How many passes should I do with the Dr. Pen?
You should aim for 2 to 3 passes per area in different directions. This includes vertical, horizontal, and diagonal movements to ensure even coverage across the skin's surface. More passes don't equal better results; they only increase the risk of unnecessary trauma and longer downtime. Keep your movements steady and consistent. This methodical approach ensures you create enough micro-channels to stimulate the skin without over-treating any single spot on your face.
Dr. Pen Needle Depth Chart: The Ultimate Treatment Guide
5 Best Professional Microneedling Pens for Pro Results
Related Posts

Dr. Pen Aftercare Guide: Healing Tips for Glowing Skin

5 Microneedling Serum Mistakes to Avoid for Better Results

Serum Timing After Microneedling: Expert Recovery Tips

How to Apply Serum After Microneedling: Best Practices

Dr. Pen A6 vs. A7 vs. M8: Which Microneedling Pen is Best?

Is Microneedling with Dr. Pen Safe at Home? Expert Guide

Maximize Microneedling Results with Exosome Serums
